In this YouTube video, I went over the reasons why it’s a good idea to start a website or more specifically a WordPress blog.
But just to recap if you’re one of the 7 billion people who haven’t seen it:
I talked about how once you write around 100 blog posts about a subject that you’re really knowledgeable about (or sometimes 50 is enough, whatever floats your boat), and with the help of affiliate marketing, ads, and selling your digital products your blog can become a great passive income machine letting you earn money on autopilot even while you sleep.
But today I want to show you how to do it.
Step-by-step.
Even if you don’t know what a domain name is or have never seen a WordPress dashboard.
I’ll try to explain everything in detail and that’s why this guide is going to be pretty long.
I’m adding a table of contents so you can instantly jump to any place:
How To Make A WordPress Website
Table of contents:
- Set Up Your Website’s Domain And Hosting
- Configure Your WordPress Dashboard Settings
- Install A Theme
- Install Essential Plugins
- Understand How Google Works
- Start Writing Blog Posts
- Use The Right Structure For Your Blog Posts
- Focus On People’s Search Intent
- Create A Blog Post Template
- Optimize Images For Faster Load Speeds
- Do Keyword Research By Using Google
- Optimize Your Blog Post For SEO
- Don’t Make Grammar Mistakes
- Set Up Google Search Console
- Use Ads, Affiliate Programs And Your Own Products To Monetize Your Blog
- Interlink Your Blog Posts And Become An Authority On A Topic
- Set Up A CDN (Optional)
- Brief Summary
P.S. If you prefer to watch or listen instead of read, here’s this guide in video form:
1. Set up your Website's domain and hosting
The first thing every website needs to have a place on the internet is a domain and hosting.
I’ll briefly explain what they are.
What's a domain name?
A domain is what you type into the search bar.
For example, “YouTube.com” is a domain.
You can think of it as a home address for your website. People want to find your website so they type in the address and they get in.
Every single domain has an ending. The most popular one is .com but you can also have your country’s domain and there are also .org, .gov, .net, and many other domain types.
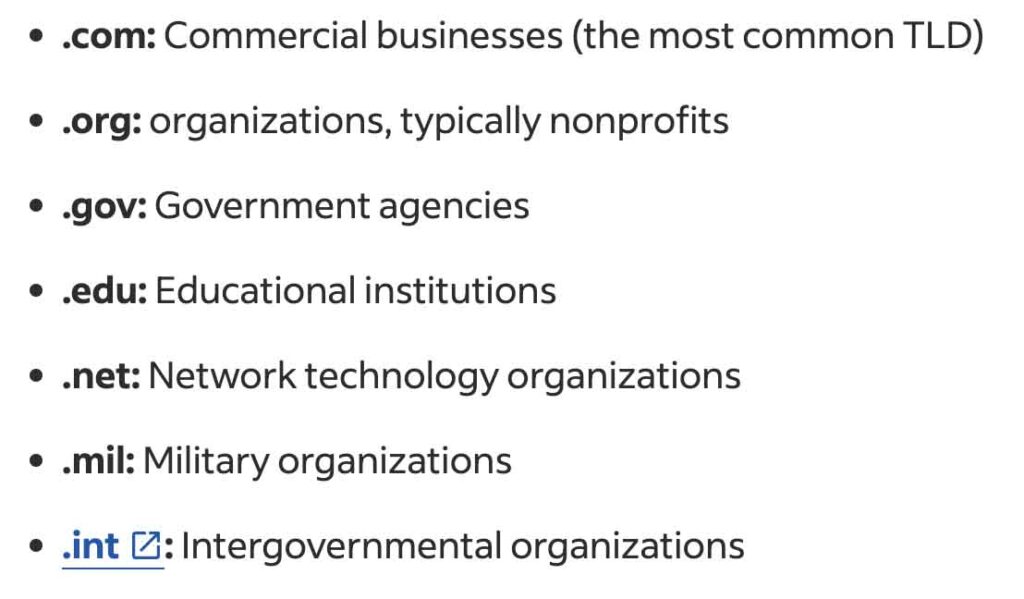
Image source: indeed.com
I would recommend just going with a .com domain because it’s the safest option that most blogs or websites in general use.
Also, there can only exist one of every domain. So you can’t choose YouTube.com as your domain because it already exists. Obviously.
Ideally, you’d want your domain to be easy to remember and easy to type into the search bar without being misspelt.
And the second thing your WordPress website will need is hosting.
What's website hosting?
If your domain is like your address then hosting is your house where your website lives.
It’s a server.
You could technically put your website on your computer and then host it from there (it’s called self-hosting) but you’d have to keep it on all the time and it’s not a good idea if you don’t know what you’re doing and don’t know how to set up your server.
So what most people do is get the server for their blog through a third party, i.e. a hosting company.
I use Hostinger for hosting this blog so in this guide I’ll be showing you how to set up your own WordPress blog through them.
But there are many other different hosts that you can choose from.
I recommend checking out this guide about the best hosting providers for WordPress blogs (it’s based on recommendations from Reddit).
How does web hosting work?
Essentially, a hosting company will set up a server in some country or multiple countries and then put your website’s files in that server for you so you don’t have to do it at home.
They will take care of the maintenance and take your doubloons in return.
Some hosting companies have many different servers across the globe.
When creating a WordPress website through Hostinger you’ll be able to select which server location you prefer.
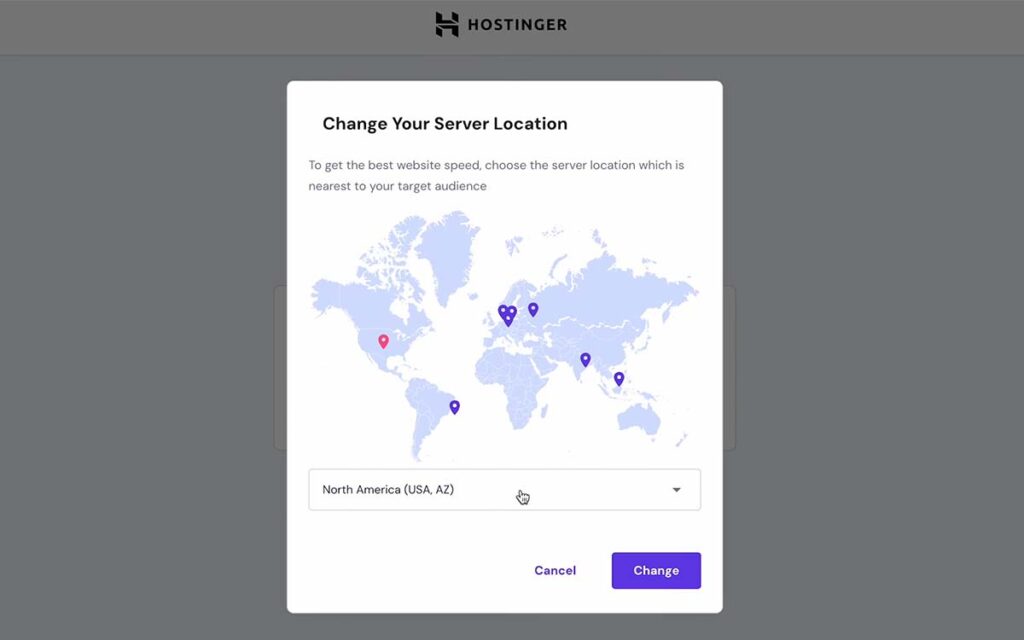
If someone wants to access your website for example from Europe and the server is in the US it’s going to take them a lot longer to load your site compared to if the server was somewhere in Amsterdam.
So to combat this what some web hosting companies do is cache your website which means they just make a copy of your website’s files and put them across all of their servers and they just give the person that wants to connect the closest server so that your website loads faster for them.
You can also achieve this with a CDN (content delivery network) but we’ll talk about it later.
So to recap, your domain name is your website’s address and hosting is the house where your website lives.
Let’s now see how to set that up.
How to set up website hosting?
As I said before I’m going to recommend Hostinger for hosting your WordPress blog because I use it for my website.
The reason I went with them is because they’re cheap and the support is great. I wrote a full Hostinger review here if you want to know more details.
They have a plan where you can pay the discounted hosting price for 4 years and only after that it renews at a normal price.
That’s right, that’s how hosting companies try tricking you into extracting more of your doubloons.
There’s the discounted price and then it changes to the normal price whenever the period for which you bought with the discount ends.
So if you pick this plan (picture at the bottom) for a year after that year ends the next time I’ll pay it will be $6.99 a month instead of $2.99 a month.
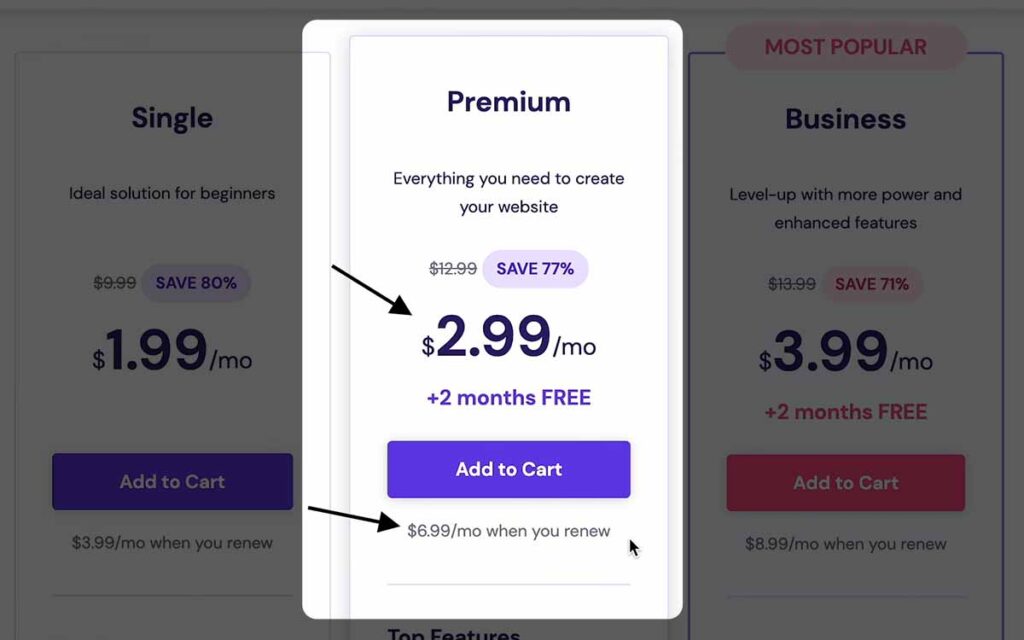
I recommend picking the cheapest plan for the longest available time because (1) you’ll want to hold on to your website for a long time (I’ll tell you why later) and (2) because if your site gets overwhelmed with like 50,000 visitors per month you can always upgrade to a more expensive plan later but I’m not sure if they’d let you downgrade.
Once I choose the plan I want I’ll be taken to the payment page and once it’s complete I’ll be able to move to the next step which is the Domain.
How to set up website domain?
The final thing we need before heading into the WordPress dashboard and customizing our website is a domain.
I got my domain and hosting through the same place – Hostinger, because it’s just easier that way.
It doesn’t matter where you get it from because you can always connect a domain you bought elsewhere to your hosting provider with just a few clicks.
A good alternative to get your domain name is Namecheap because, well, it’s cheap.
.Com domains should cost up to $15 per year.
But there’s one thing you should keep in mind when buying a domain.
WHOIS Protection.
It’s a database where you can look up who owns the domain (including their address). Yikes.
And that’s where WHIOS protection comes in. It hides your name and your home address from the world.
Some hosting companies where you can also buy domains such as Bluehost will charge separately for domain protection whilst others like Hostinger won’t.

Once I’ve paid for my hosting plan I’ll be taken to the Hostinger dashboard and here I can go to domains, check if it’s available and purchase it.
I chose my billing period for the domain to be 3 years because I already got hosting for 4 years so it doesn’t have to renew every year.
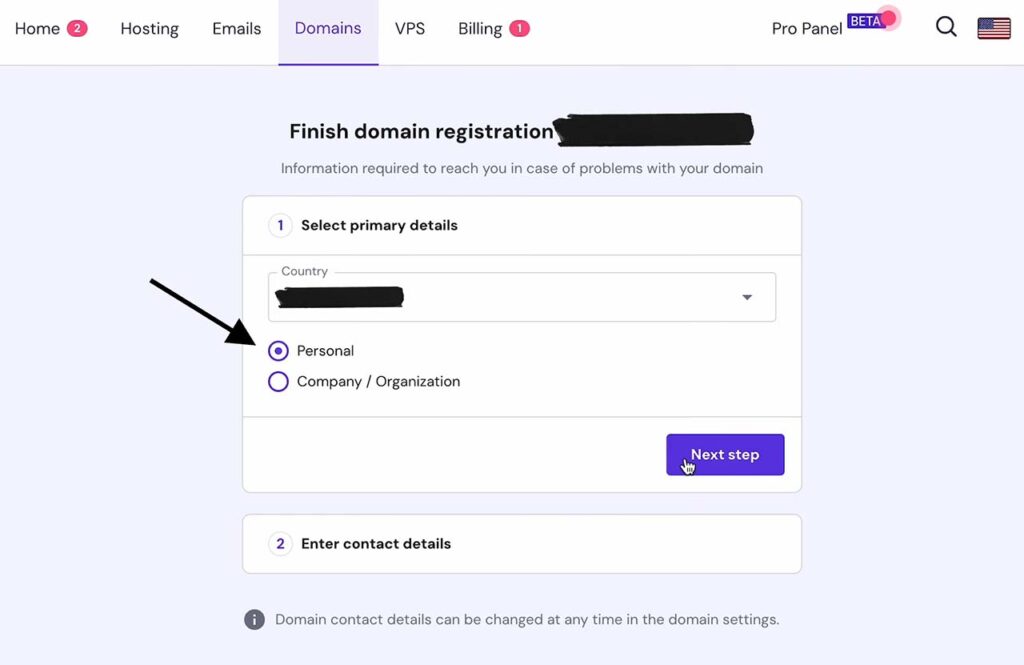
We’ll finish the domain registration by choosing “personal” -> “next”. Then entering our details (remember they won’t be shown publicly because we got the free WHOIS domain protection) -> and clicking “finish registration”.
How to create a WordPress website through Hostinger
To set up a WordPress website click “Hosting” at the top of your Hostinger panel and click “Set up”.
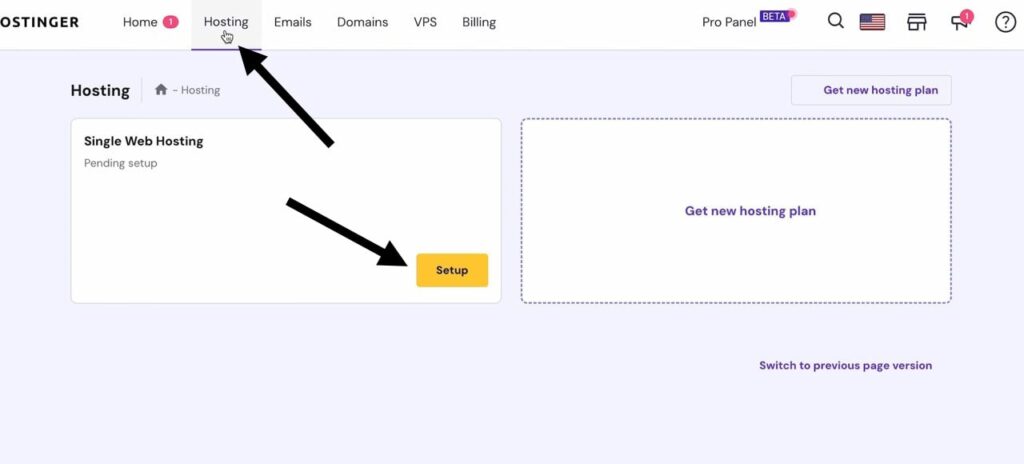
It’ll ask you to answer a few questions about your website and then you’ll be able to click “Create website” -> “WordPress”.
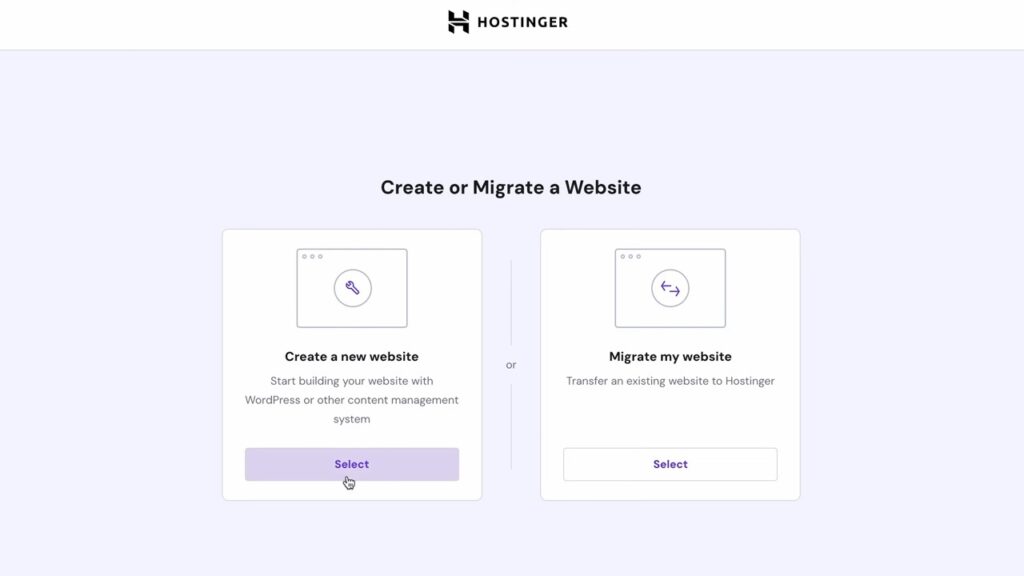
Next, you’ll be asked to create a WordPress account login.
This is separate from your hosting account and if sometime in the future you decide to change your hosting to another company just know that your website is a separate thing that you can move elsewhere. That’s why there’s a separate account and login.
You’re just linking this Hostinger account to your website but you can link another one anytime.
Make sure you create a super strong password that you don’t use anywhere else and you’ll have created your WordPress account.
WordPress is where you’ll be able to edit and customize your website.
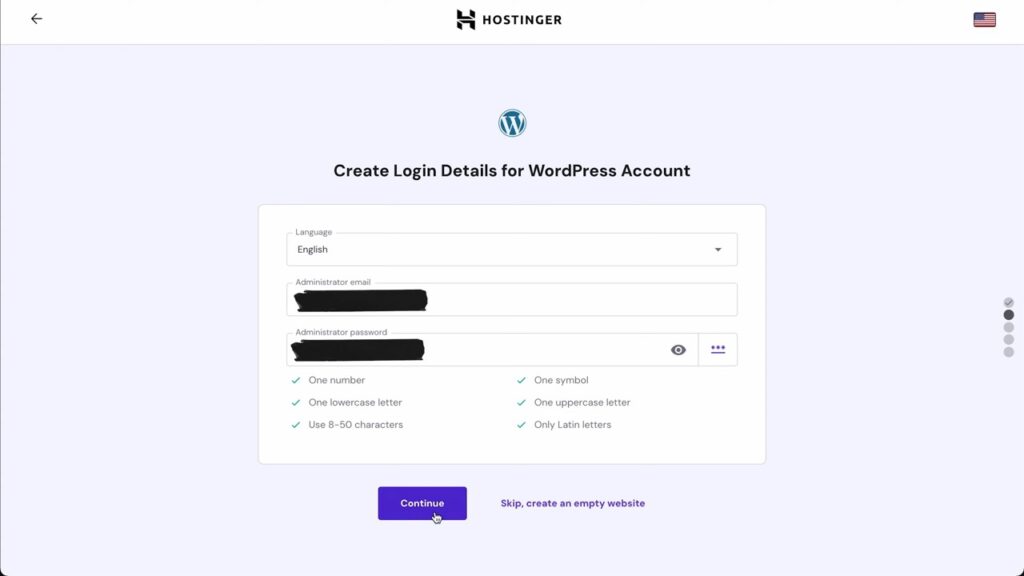
Next, Hostinger will offer to automatically install some plugins into your website (we’ll get to what they are and what they do later), but for now, let’s deselect everything apart from Google Sitekit because that’s the only one we for sure want to have on our blog and then click “Continue”.
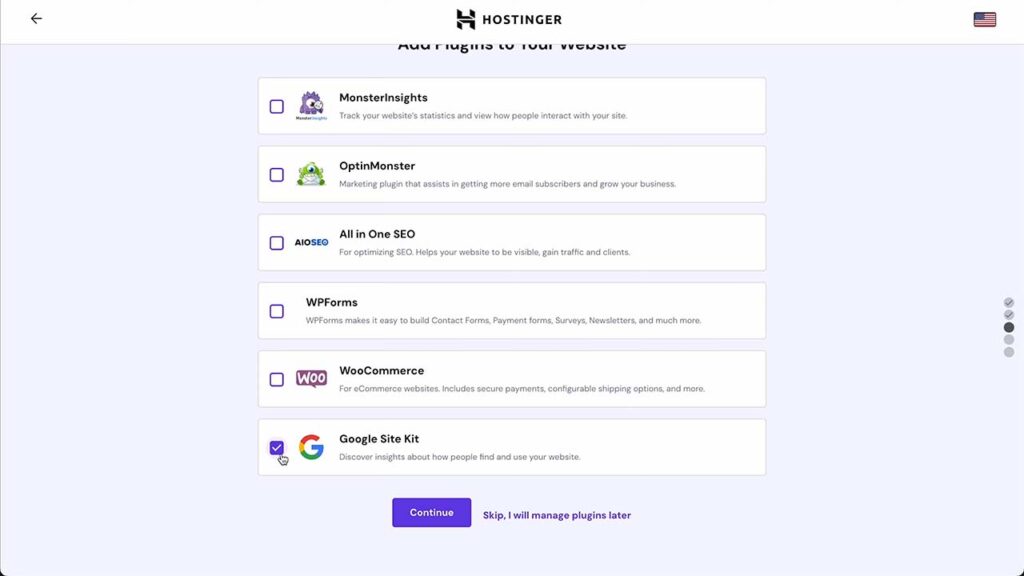
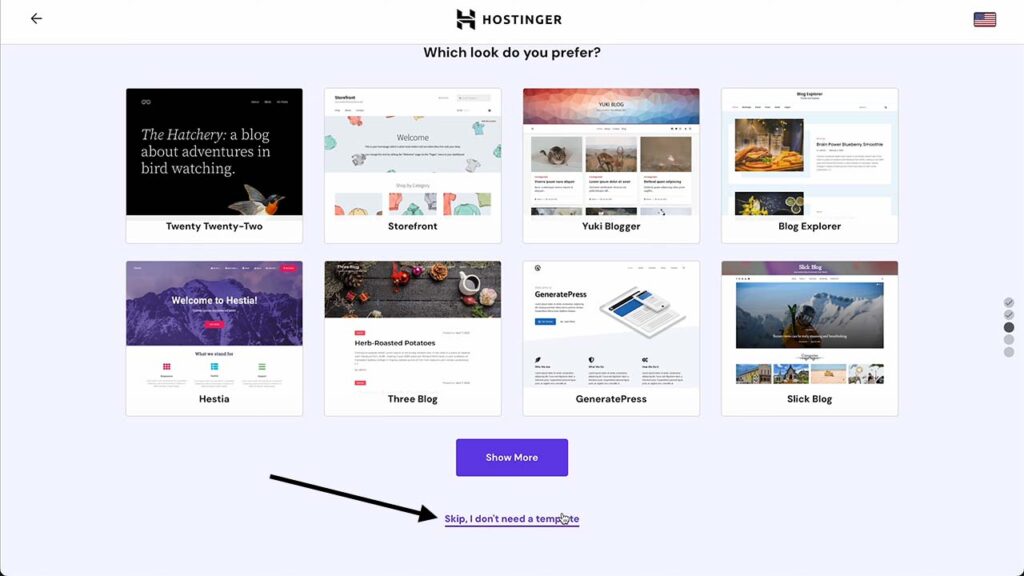
We’ll skip the “which look do you prefer” step because we’re going to use a very specific theme and a cool plugin later that will make our jobs a lot easier when writing blog posts and customizing our website.
Next, you can select a domain that you just bought through Hostinger ge or if you bought it somewhere else you can choose to use an existing domain.
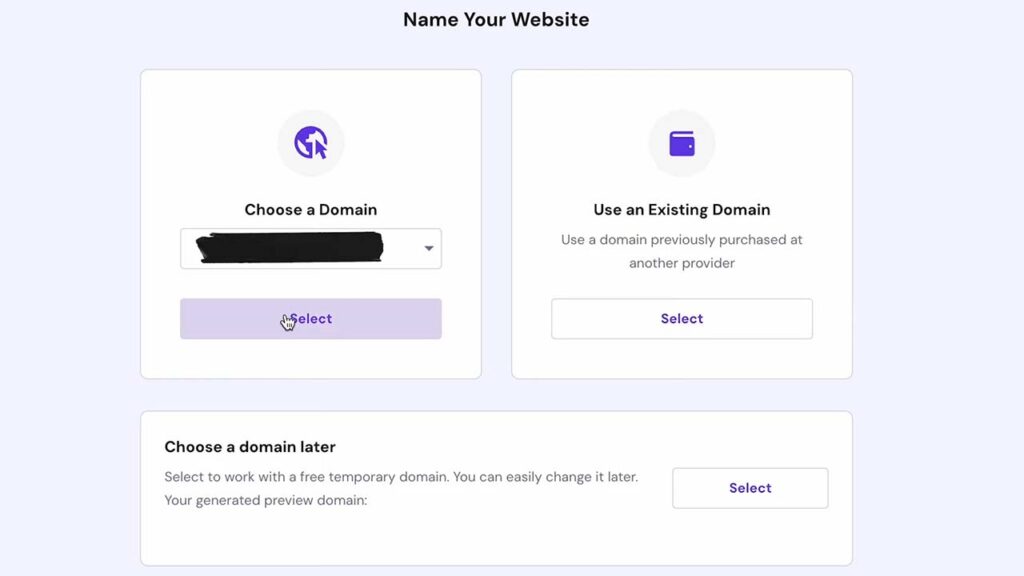
Make sure your email and domain are correct and next you’ll be able to choose your website’s server location.
The location matters because if you choose your site’s servers to be somewhere in Europe and most of your website traffic comes from India, then the website will load slower for your visitors.
If you’re going to be writing blog posts in English choose either the UK or the US as your server location. If not, choose a location that’s closest to your country.

Once this step is complete we have everything set up and we’re ready to customize our site and start writing blog posts.
2. Configure your WordPress dashboard settings
Instead of going to your WordPress admin panel through Hostinger, you can go there yourself so that you don’t have to log into your Hostinger account every single time that you want to write a blog post.
Remember, WordPress and your hosting provider are two different things and they’re just linked together that’s why you can go to WordPress from your host’s website.
To get to your WordPress dashboard type yourdomain.com/wp-admin into your browser (“WP” stands for WordPress).
Of course, replace “yourdomain.com” with your website’s domain.
If you’re doing this for the first time you’ll have to log into your WordPress account with the credentials that you created before when setting up your website’s hosting.
1. Set your permalink structure to post name
From your WordPress dashboard go to “settings” and then “permalinks”
Permalinks are links that get automatically generated when you publish a new blog post or create a new page on your website.
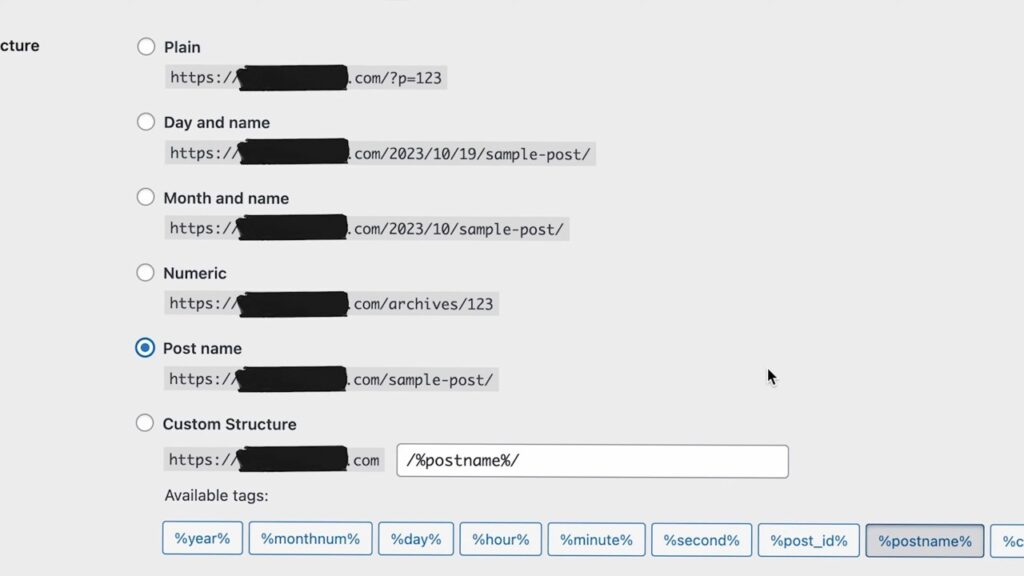
For example, looking at the permalink structure the first link type is called plain. It will have your domain name then a slash and then your post number.
So if you publish 10 blog posts the 11th one will have a number p=11.
The second one will have the date as well as your post name or the title and so on.
But the setting we want for our blog is “post name”.
Yourdomain.com/post-name.
For example, if your blog post is “How to create a course” the link will be “yourdomain.com/how-to-create-a-course”.
I’ll show you how to customize these to make them shorter later.
The post name link structure is good because it’s going to be a lot easier for you to remember your post URL when it has the blog post name in it rather than just a random number.
Another reason for choosing this permalink structure is so that when Google robots scan your page and try to determine whether to rank it high in search results or not, they will look at your post’s link and search for your target keywords and based on that (among many other things that I’ll get into later) it will determine what your blog post is about and whether it should appear in search results or not for a specific keyword.
Also, make sure you never change this setting again because it will screw up the whole link structure of your website. Change it once and don’t come back to the setting again.
2. Configure general settings
Next, we’ll go into “settings” -> “general”.
Here we can change our site title (think of it as your social media handle). You can just leave it as your domain or delete the .com and only leave your site’s name.
Then, there’s the tagline that you can fill and this explains in a few words what your website is about. For example: “Everything skydiving”.
You can also leave this empty and don’t bother with it.
What’s important inside of the general settings is that our WordPress address URL and site address URL are both set to “https”.
If it’s “http” just add an “s” to it.
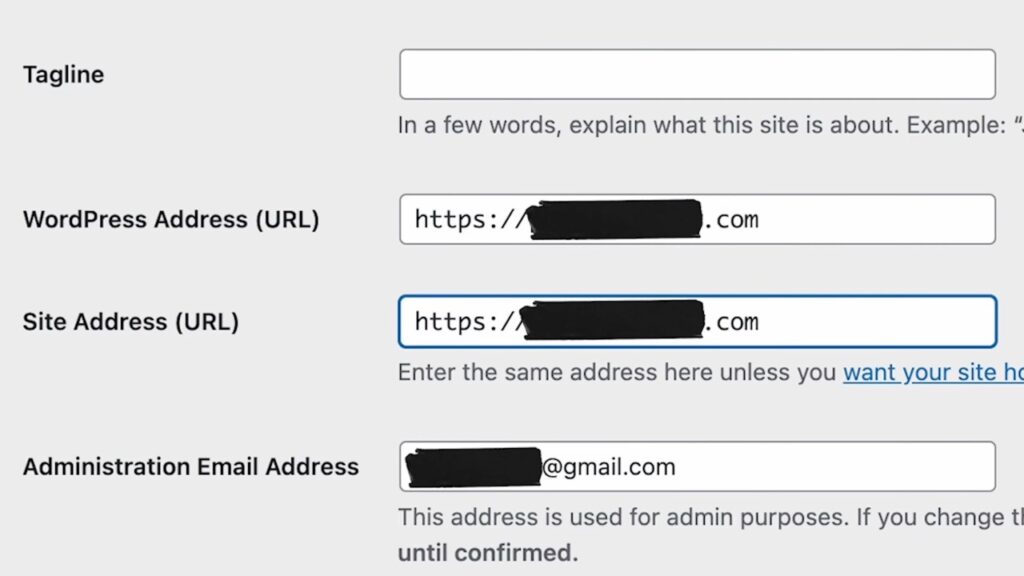
An “https” connection makes it more difficult for hackers and anyone else to intercept a connection between the user and the website.
So if there are any passwords or credit card numbers shared it will be more difficult for someone to intercept that information.
And we want our website to be secure so that’s why we add “https”.
Also, when people notice “http” in the site title they tend to trust the website less. We want the people who read our blog posts or visit our website to trust our website and that’s why we put “https”.
Here in the general settings, you can also change how dates appear on your website. They will show up when you publish a blog post.
Then make sure to scroll down and click save changes.
Once you’ve configured all the WordPress dashboard settings you can forget about them because you probably won’t ever need to change them again.
Next, let’s move on to themes.
3. Install a theme
Most WordPress websites have a theme.
And so a theme adds a nice design foundation to your website so that you don’t have to build it from scratch.
Most of them are free but some are paid. I would recommend just using a free theme.
What most themes will do is add bonus pages and design elements to your website such as a “privacy policy” page or “contact us” page. Of course, you can delete all these bonus pages if you want.
What a theme will also add are design elements such as the header of your website, which is the top bar that has all the navigation elements, and a footer, which is a bar at the bottom of the website which also has some different navigation elements.
A header and a footer are usually displayed across your whole website so no matter which page the person is on you’ll probably want them to see the header and the footer for easy navigation.
So here’s how to install a theme to your WordPress website:
Go to appearance -> themes -> select add new -> and search for a theme that you want.
Once you find a theme you want click “install” and once it’s installed click “activate”.
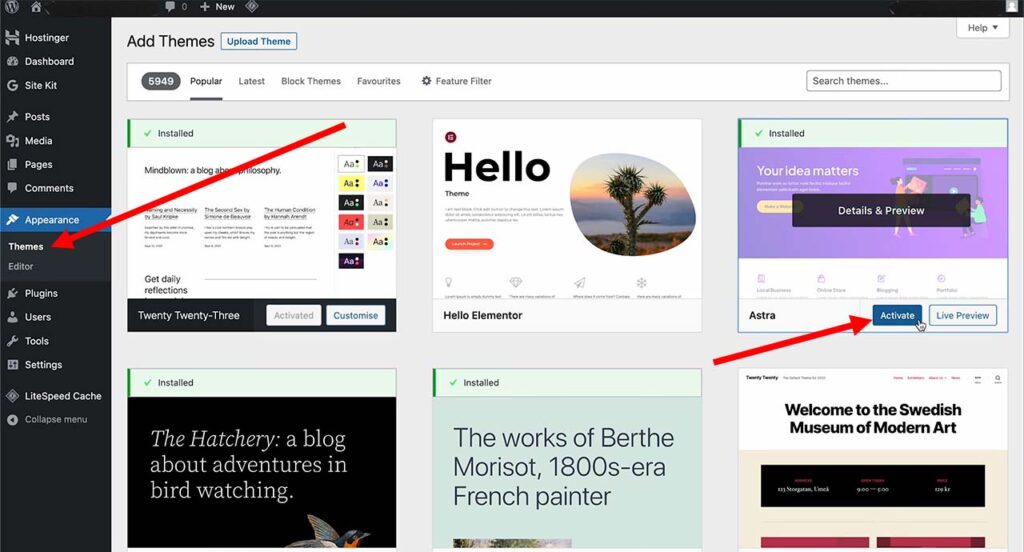
For my website, I use a theme called Astra because it nicely interacts with a plugin called Elementor that I also use.
Many other ones work with Elementor too this is just the one I use.
WordPress themes and plugins need to be activated once you install them.
Also, it’s probably not a good idea to change the theme once you have your website all nice and customized because it will screw up a bunch of things that we don’t want to fix later.
From your WordPress dashboard you can go to “appearance” -> “customize” where you’ll be able to customize your theme.
But before we get to that let’s first install some essential plugins.
4. Install essential plugins
You’ll find all of your website’s plugins by going to “plugins” from your WordPress dashboard.
Plugins are add-ons to your website that add various features.
If you got your website’s hosting through Hostinger then you’ll see here that Hostinger automatically pre-installed two more plugins that we didn’t ask for.
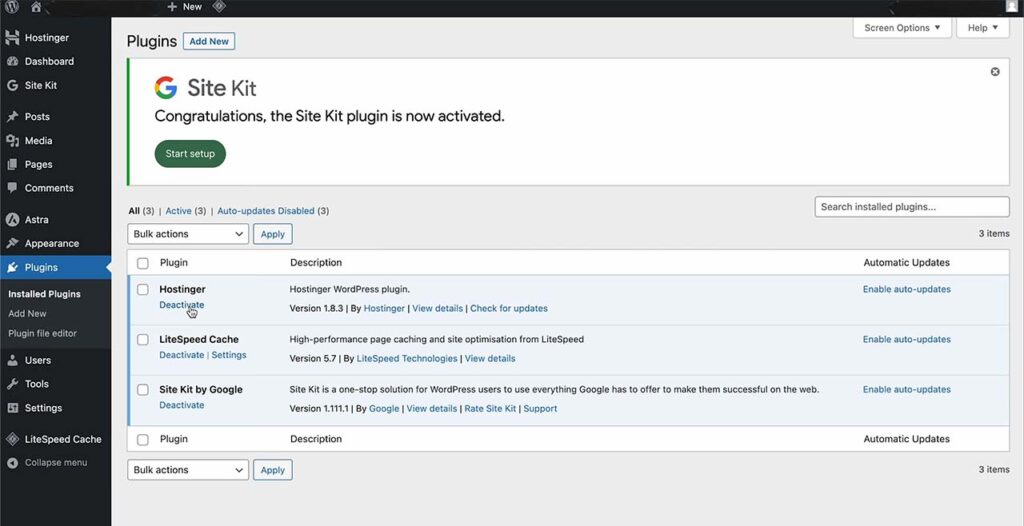
Luckily for us the “Lightspeed cache” is pretty useful so we’re just going to yeet the Hostinger plugin out of the way.
To uninstall a plugin first you need to “deactivate” it and then you can click “uninstall”.
Once you install a plugin it’s not going to be activated by default so you’ll have to activate it.
So let’s see how to install a WordPress plugin:
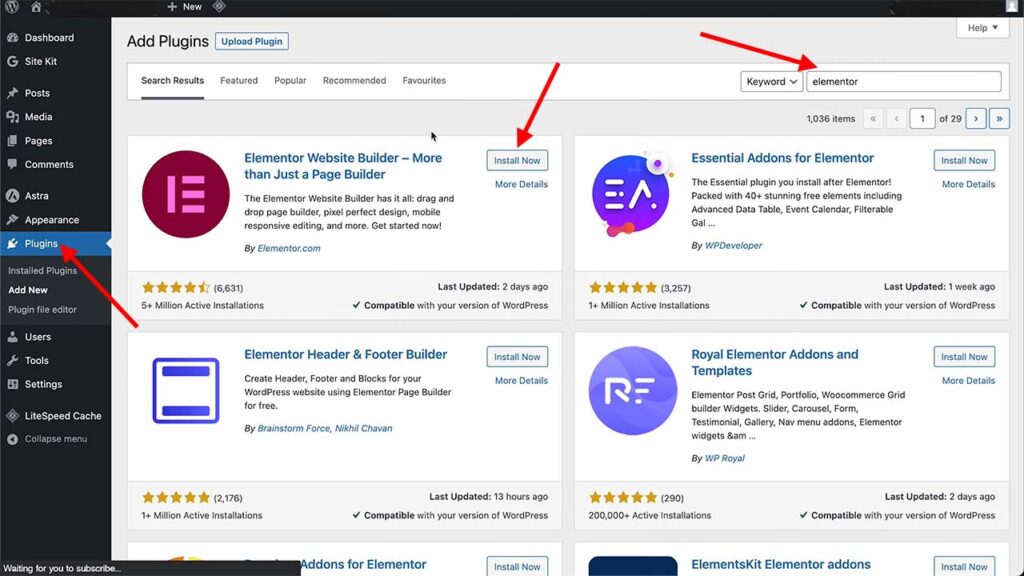
Inside your WordPress dashboard go to “plugins” -> click “add new”, and then you’ll be thrown into the plug-in marketplace here you can use the search bar and search for any plugin that you can think of.
The general rule with plugins is that you want to have as little of them as possible because the more plugins you have the more laggy your website will be. Also, some plugins can conflict with other plugins.
You can also validate if a plugin is legit by looking at how many active installations there are as well as the star rating. So if there are a bunch of installations and the star rating is above four then you know it’s a legit plugin that a lot of people use.
Also, you’ll notice that when you install a plug-in they will add additional menus to your WordPress dashboard. This just makes it easier to access that plugin and change its settings.
Here are the essential plugins that you’ll need:
- Elementor
- LiteSpeed Cache (alternative: Hummingbird)
- Yoast SEO
- Site Kit by Google
Elementor plugin
Elementor replaces the default WordPress content editor with a better one.
I mentioned before that I was going to show you a cool theme and plugin synergy that will let you build your website more easily.
And Elementor is that plugin.
Here’s what it does:
By default, when you create a new post in WordPress you get a WordPress editor which looks like this:
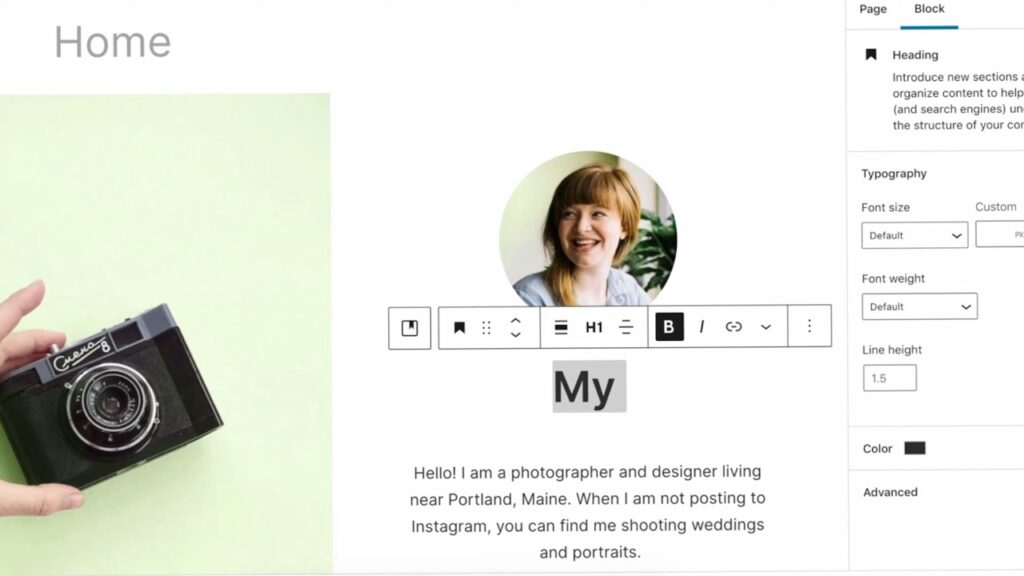
But it lacks quite a few features that can make your website super fancy, and it’s generally not super intuitive to use.
Elementor essentially replaces the default WordPress editor with a better one that adds a lot more options for customizing how your website looks.
Once you install Elementor you’ll see an “edit with Elementor” button as soon as you try to edit a blog post or a page. That button will let you edit your blog posts or pages within a separate editor that works with picking the thing you want and just dragging it into your website.
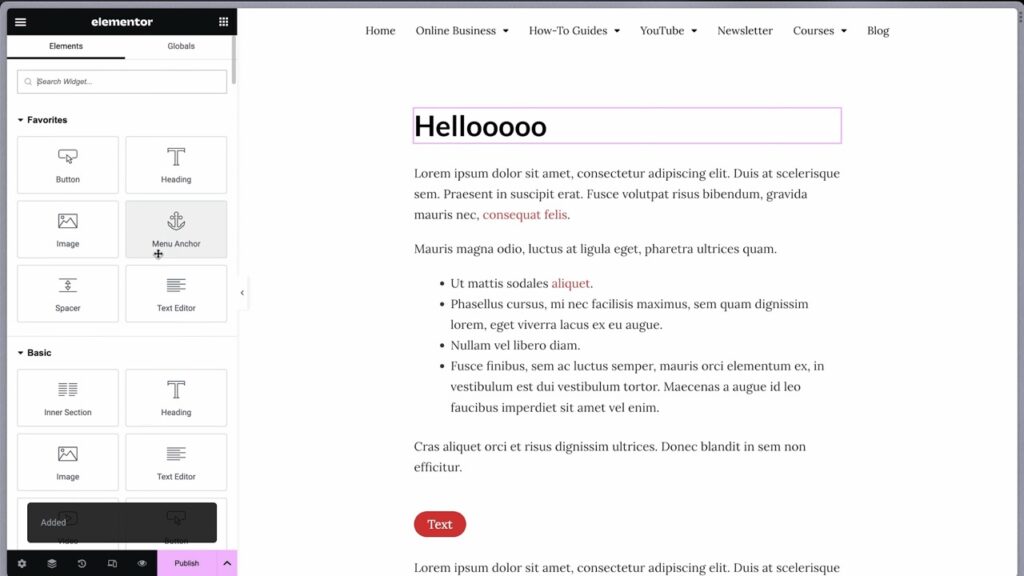
On a side note, some plugins can be paid plugins.
Elementor is completely free to use but some features will be locked (I use the free version myself so it’s not a big deal).
But Elementor also has hosting plans. So you can host your website directly through Elementor and not Hostinger which is cool because they include the pro version of this plugin with all of their hosting plans. (Although it’s more expensive than hosting).
So if you’re planning to buy the pro version of Elementor you can consider hosting your website through them which will automatically give you the pro version included in the hosting plan.
LiteSpeed Cache plugin
LiteSpeed Cache is a caching plugin which will help speed up your website.
Hummingbird is also a great alternative.
A cache plugin makes it easy for returning visitors to access your website content faster by eliminating the many steps a browser takes to generate pages dynamically.
You want your website to load faster because page load speeds are an important metric that Google looks at when trying to determine whether to rank your blog post high on Google search results or not.
YoastSEO plugin
Yoast SEO will help with all things SEO-related.
SEO stands for search engine optimization.
If your blog post is optimized for SEO it means that Google can quickly figure out what your blog post is about and show your blog post to people who search for that topic on Google.
I’ll talk more about how to use this plugin to its full potential later in this guide.
Site Kit by Google plugin
This plugin helps Google index and discover your website.
It’s also where you can view all of your analytics such as how many visitors your website gets and what do they type into Google to discover your blog posts.
I’ll show you how to set it up and use it later in this guide.
But this is probably a good time to explore how Google works and why people write blog posts in the first place.
5. Understand how google works
Google says “We use a huge set of computers to crawl billions of pages on the web the program that does the fetching is called Google bot also known as crawler robot bot or spoter google bot uses an algorithmic process to determine which sites to crawl how often and how many pages to fetch from each site”.
Source: Google.
What all of this means is that Google has tiny computers that scan websites to see what they’re about and what content is inside of them.
Once it determines that the content of that website or a blog is good enough to show in search results it’ll put that website inside of search results.
Google uses many different scanning algorithms to figure out what your blog is about including how many times and which keywords are used, what’s the title of the article, what’s the link, and so on.
For example, if your blog is about skydiving and you write an insanely good resource for beginner skydivers, Google crawls it and sees that there’s a bunch of information about skydiving and it’s really good, it will then put your resource on Google search results and see if people like it.
If they do your blog post about skydiving will rank higher in search results (which is very good for you) and if they don’t, your resource will be demoted to some other page on Google that very few people look at.
So the main goal for blogging is to write a bunch of really good resources about the same niche or the same topic.
Once you do that Google will see you as an authority on that topic and rank your blog posts or those resources higher than everyone else’s.
And so what happens then?
As people type things related to your keyword into Google they will see your blog post and click on it.
And once they come to your blog post they bring money with themselves. In terms of seeing ads on your website, buying your digital products, clicking on affiliate links that you recommend within your blog post and earning you a commission if they purchase a useful product for them that you recommend.
But you might be wondering, how long will all of this take?
How long does it take to rank on Google?
When a website is new Google doesn’t trust it.
There’s a sort of incubation period where even though you will be writing articles no one will be able to see them because Google is still trying to figure out what your website is about and if they trust you.

Also, you don’t get a lot of their crawling budget right from the beginning.
But as you write more articles Google will slowly start to scan your website and test your blog posts with real people to see if they find it useful or not.
The typical time that takes for a new blog post to fully establish its position on Google is 8 to 10 months.
So quite a long time.
A good number of articles that you should aim for about a specific niche or topic is around 100.
That’s what a lot of WordPress blogs do. They write 100 articles in one year and then they write no more.
And depending on their topic, most blog posts are timeless. Google can show them 1 year from now, 2 years from now, or 10 years from now.
So sometimes all that bloggers have to do once they do all the heavy lifting and write those 100 articles is just update some of them from time to time.
But they still earn a consistent passive stream of income every single month.
how many pageviews is good for a website?
You can probably earn a full-time living by blogging with 50,000 page views a month.
So if you have 100 articles written that’s 500 pageviews per article per month.
This amount of monthly pageviews is more than achievable within the first 2 years of blogging.
Also, this is how much blogs typically earn per 1,000 page views:
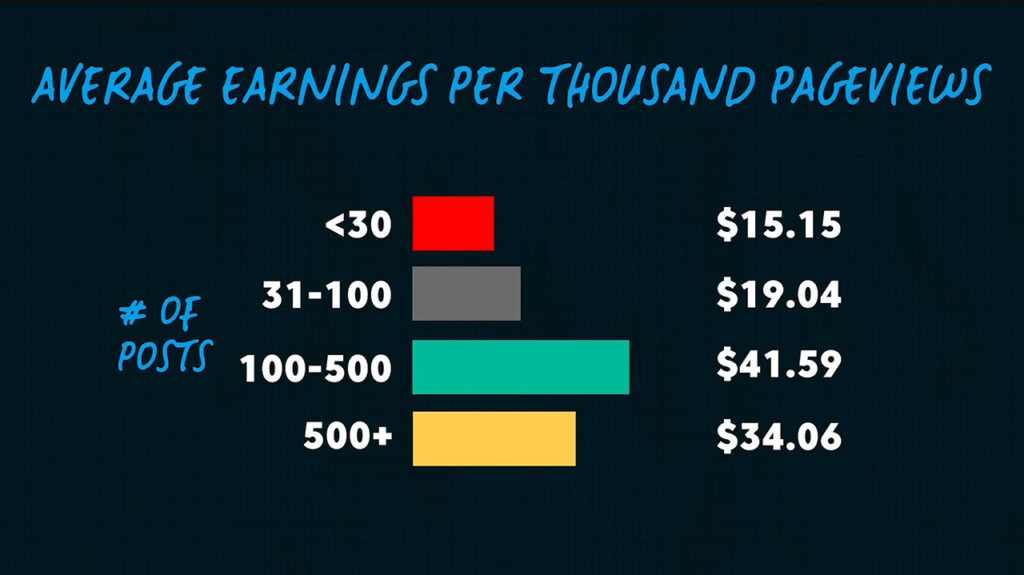
Source: Income School.
So if you wrote around 85 articles and you get 50,000 page views per month that’s $952 (19.04 * 50) every month that you could earn from having your blog on average.
If you have 100 to 500 articles and you get 50,000 page views you’ll make $2,000 a month on average.
And that’s just the average.
Here’s the roadmap to making money blogging:
- For the first year write 100 really good resources each around 1,000 to 2,000 words long.
- Make sure you’re covering every detail of your niche to become an authority on that topic.
- Create a course, or a digital product, or add affiliate links to your blog posts to monetize.
Or at least, that’s the simplified version.
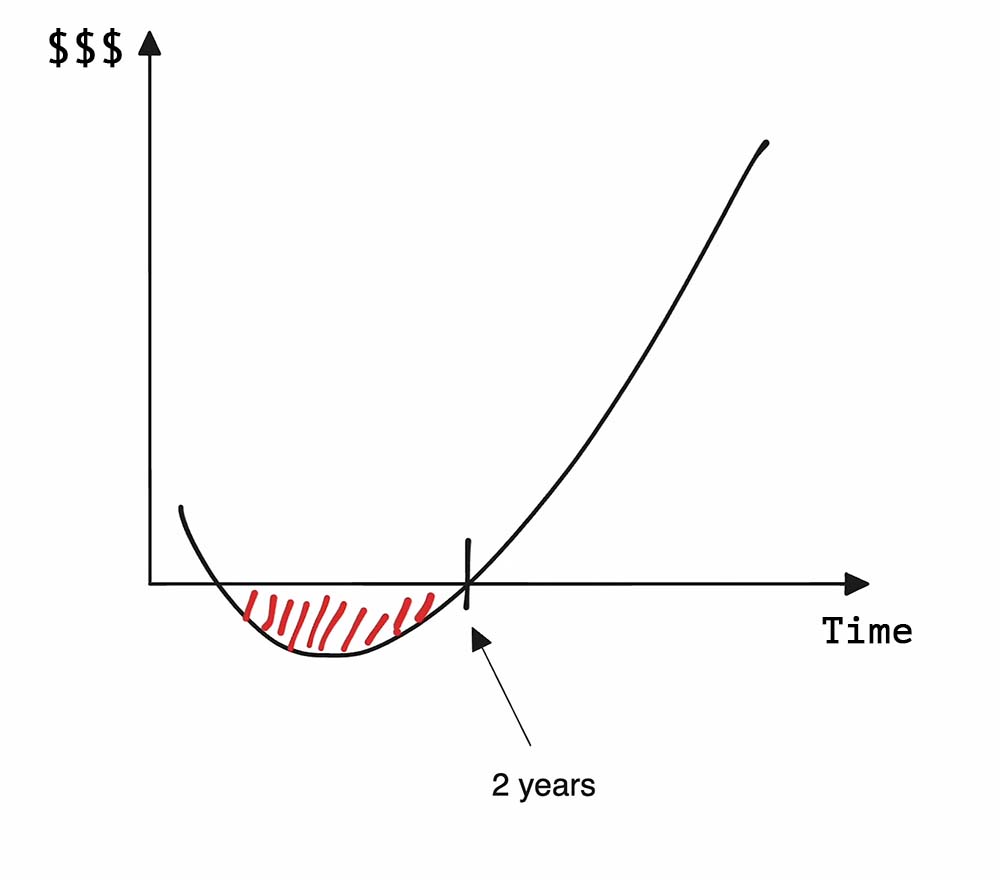
Since your website is new for the first 8 to 10 months it’s not going to get a lot of traction but in the second year that 8 to 10 month period for a blog post to fully rank on Google will be over and that’s when the results start to show themselves.
Blogging is a J-curve business.
You put in a lot of time and resources in the beginning, you sink them down the hole, and if you can stick through it then it will pay off in the long term.
And if it doesn’t pay off you lose like 100 bucks and you learn to write on the internet, which is a skill that you’ll never regret having anyway.
I typically write on my website for half an hour every single day.
It takes me around 5 to 7 days to finish an article.
So that’s around 70 articles per year.
In the beginning I wrote an article every 4 days and I managed to write around 90 articles in one year (which is pretty close to the goal of 100 articles).
What’s good here is that it only takes half an hour a day and if you do it right then in 2 years you can earn a full-time living from it.
This is what fascinates me about this business model the most.
And that’s why people create websites and blogs.
So let’s see let’s go back to the WordPress dashboard and go over how to start writing blog posts and building your website.
6. Start writing blog posts
Inside of your WordPress dashboard, there are two places where you can create new pages and blog posts: its pages and posts.
Pages are things like your “privacy policy” page, your “contact us” page, your “homepage”, or your “blog page” where all of your blog posts will be listed.
And posts are your blog posts.
1. Create a new page or post
To create a new page go to pages -> create new page.
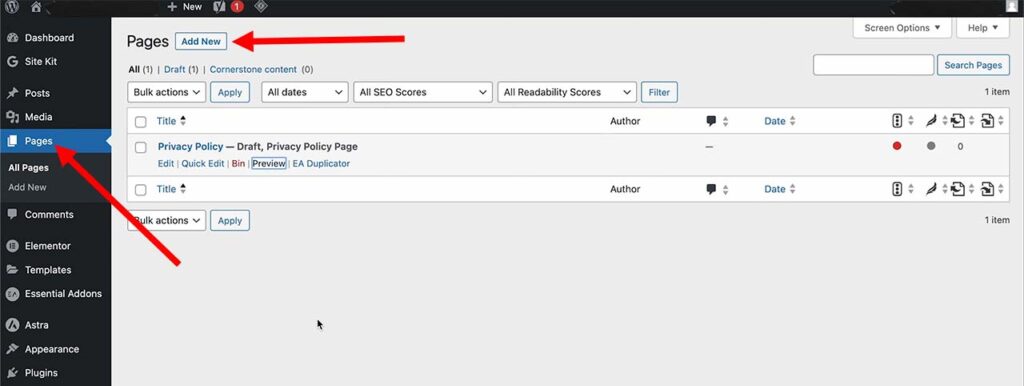
There might already be existing pages that WordPress or your theme automatically generated for you and you can choose whether you want to leave them or not.
You’ll then be taken to a page which will let you customize the settings of it.
To start writing a blog post you’ll have to go to posts instead of pages inside your WordPress dashboard.
The interface afterwards will look the same as for pages.
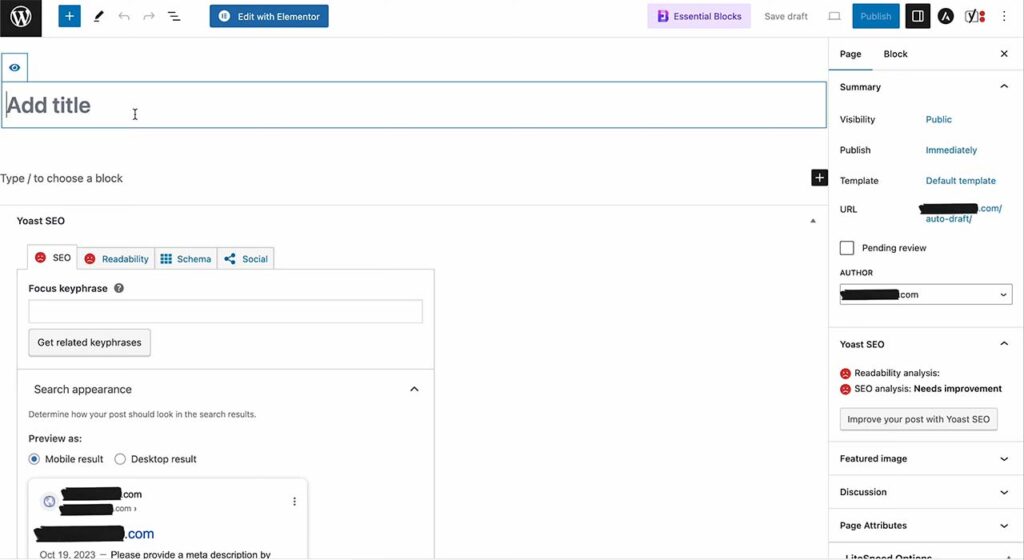
Let’s go over what these buttons and all the things on the screen do.
At the top, you can put in your page/post title (or H1 heading). I’ll talk about what headings are later when we talk about the blog post structure.
On the right, you’ll find the URL of your blog post and this is where you can customize it. But before you can do that for some reason you need to click “save draft” and then once it’s saved you’ll be able to click inside of the URL and change it.
For your homepage, I recommend having “home” as your URL.
On the left, you wouldn’t be able to see anything if you didn’t install the Yoas SEO plugin.
This panel is here because of YostSEO and it helps you do a little bit more customization to your page or post.
Inside it, you can enter a keyphrase that you’re aiming to rank for with this blog post (it’s not necessary but if you do it will show you your post’s SEO score). This is pretty useful for blog posts but not really for pages.
You can also toggle between a mobile and desktop result to see how your website’s pages appear on different devices on Google as well as change the formatting of your title.
I like deleting every variable and only having the title show up in search results.
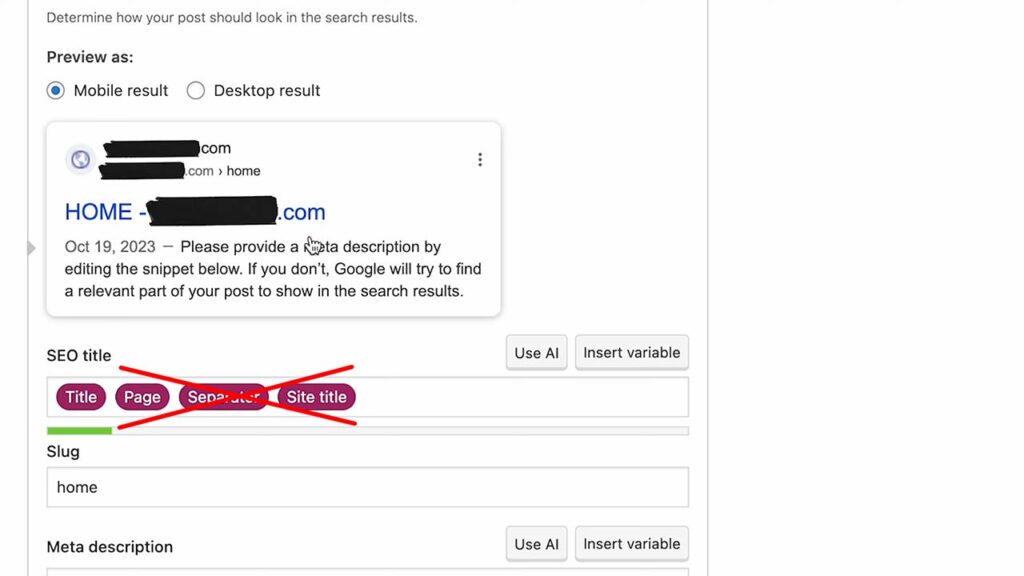
Also, if you type in a title that’s a little too long Yoast SEO will show you that with a green bar which will turn red if the title is too long.
If it’s too long that means that people won’t be able to see the full title of your blog post in search results which is not very good.
Once you make any changes make sure to click “save draft”.
So next, let’s explore how to use Elementor to craft your pages and blog posts:
2. Build the page with Elementor
Once you have customized your blog post on the edit page you can click “edit with Elementor” which will take you to Elementor (the plug-in we installed before) and you’ll be able to customize your page or post.
So here’s the overview of what you can do with Elementor:
On the left you’ll see the editing area and on the right – the blog post area.
You can either click the plus button to add a new section to your page or pick up the element that you want to add from the left and drag it onto your page.
Elementor works with different blocks or elements. So for example, if you want to write some text you’ll have to add a “text editor” block, and if you want to add an image you’ll have to add an “image” block.
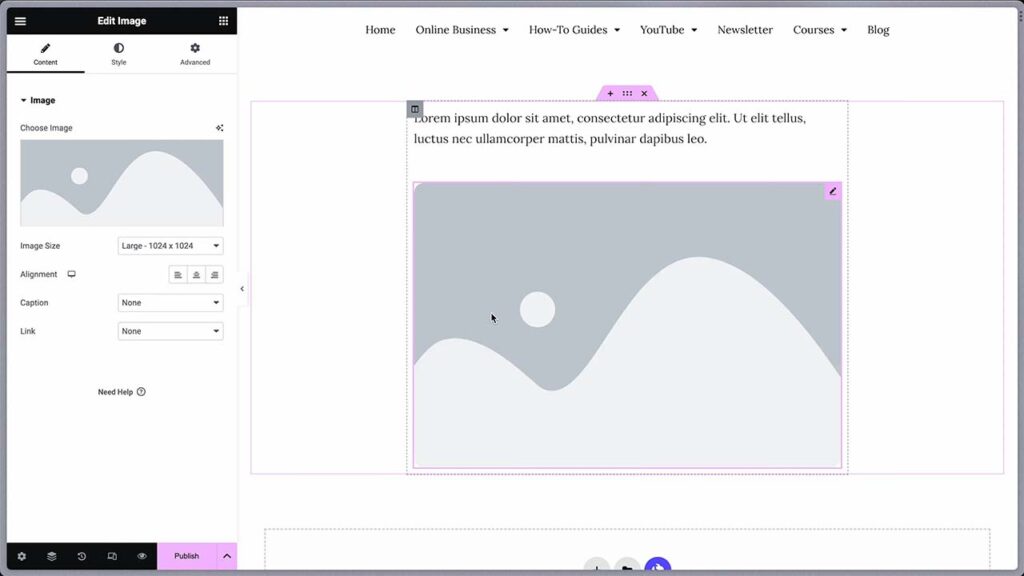
You’ll also notice that once you add a block the menu on the left changes to the settings menu of that specific block.
If you want to go back to see all the available blocks click the hamburger menu on the top left twice.
And if you want to see the settings again, just click on that block inside of the blog post area.
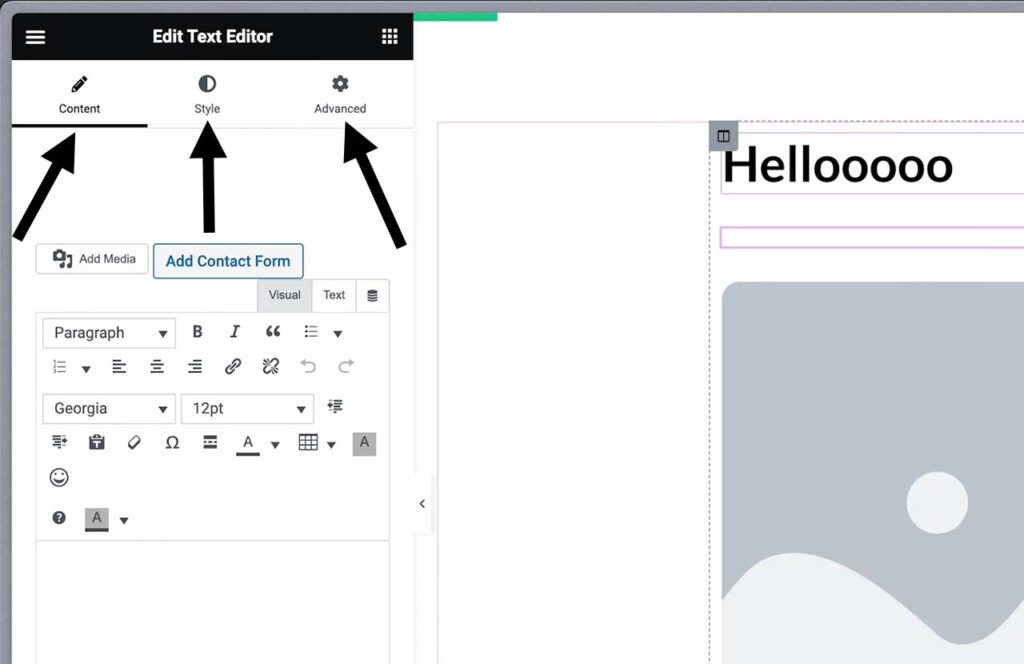
For each Elementor block that you add you’ll be able to customize the content, the style and the advanced settings.
But more often than not the default settings work just as well.
You can also change the position of different blocks by picking them up with your mouse and dragging them to another place.
The blocks that I most often use for crafting my blog posts are:
- Heading – helps structure your website with H1, H2, H3 and H4 headings (I’ll cover how to use them later when we get to the blog post structure).
- Spacer – lets you add a space to help visually separate different elements or sections of your blog post.
- Text Editor – adds a field where you can type text. You’ll be using this block the most when writing blog posts.
- Button – adds a button that allows you to specify a link to which it will take your website’s visitors once they press it.
- Image – allows you to upload and add an image to your blog post.
- Menu anchor – helps visitors quickly navigate to different parts of your blog post.
Also, you can also right-click on an Elementor block and choose “add to favourites” and it will show up at the top of all your blocks in your favourites section. This is useful for the main blocks that you’ll be using for every single blog post so that you don’t have to scroll and search for them.
But let’s talk more about the menu anchor.
How to use a menu anchor
A menu anchor is invisible to viewers of your page.
It acts as a place on your page where you can quickly take your viewers (for example, it’s useful for when someone presses on your blog post’s table of contents you want them to be taken to that place in your blog post).
Here’s an example to better illustrate how to use it:
I’ll add a menu anchor above an image and input some text in the field on the left (what the text says doesn’t matter as long as you can remember it):
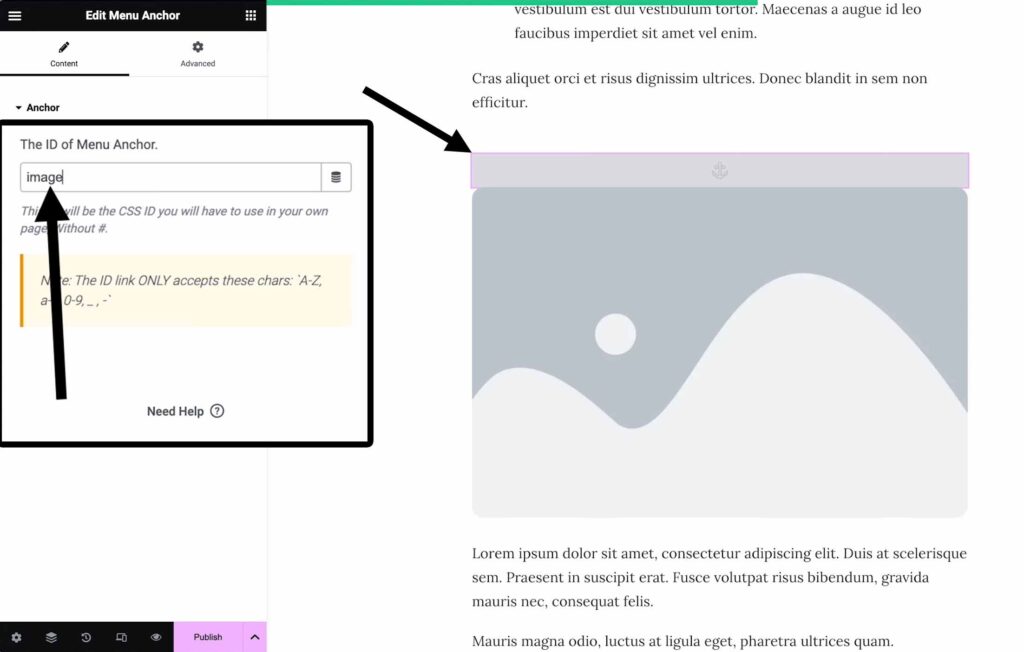
Then I’m going to scroll up on my blog post and highlight a word or a phrase that I want for people to be able to click and then be taken to that image.
Next, I’ll type in a hashtag (#) symbol and the word that I typed into the menu anchor before.
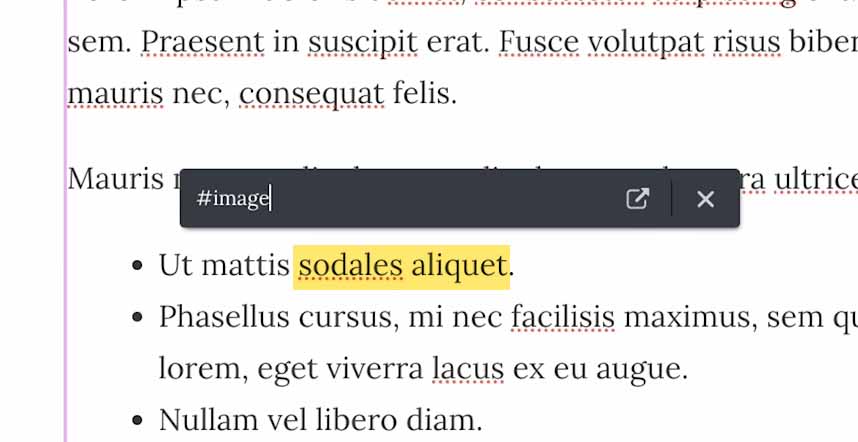
And now once I click on this link it automatically scrolls the page down and takes me directly to this image on my blog post.
Using menu anchors is useful if you have a table of contents that you want your user to be able to click and go directly to that place on your blog post (just like I had for this WordPress beginner guide).
Customize your default elementor settings
If you mess around with the style or any other attributes of an Elementor block and you want to go back to default, you can right-click on the pen icon and choose “reset style”.
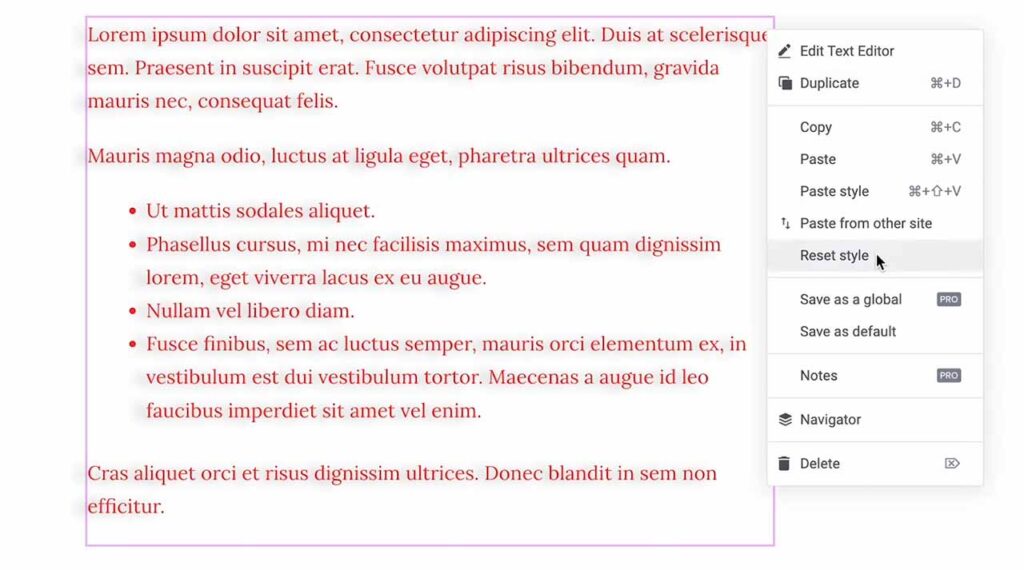
But what’s the default style?
If you go into the hamburger menu (top left) you’ll see an option called “site settings”. This will control how different elements look by default across your whole website.
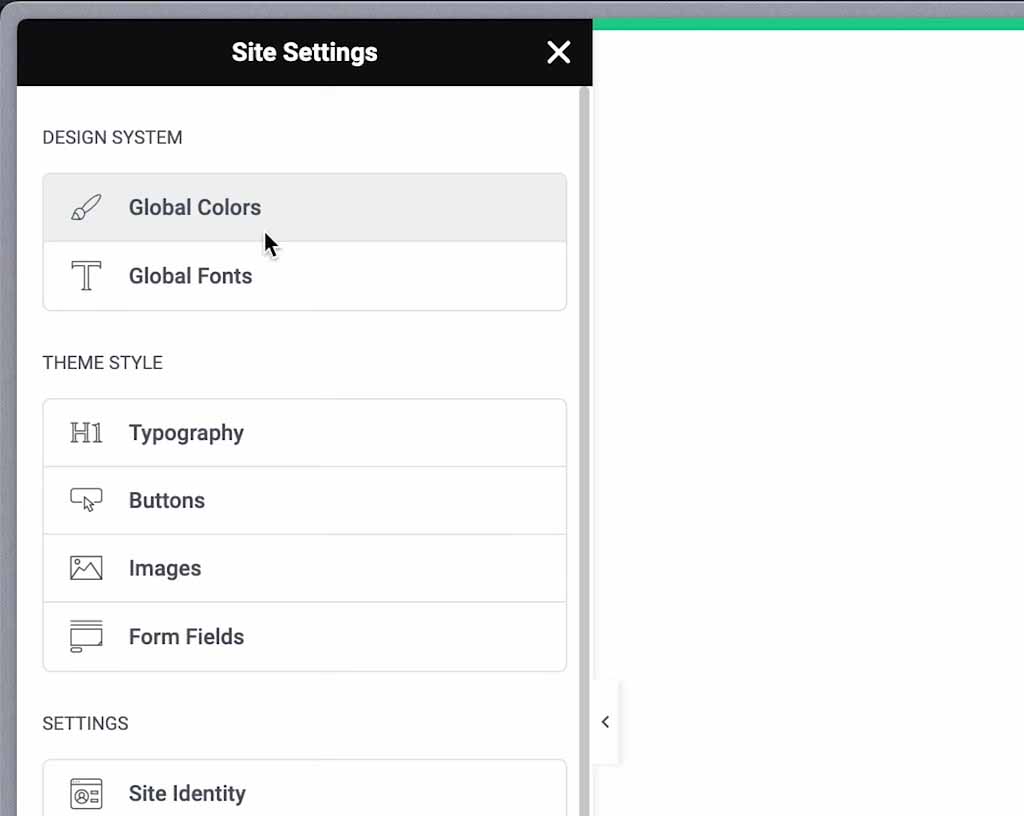
Unfortunately changing the default Elementor settings for a specific element doesn’t always work because you have both Elementor (the plug-in) and your theme that control how your website looks.
So in some instances, you might need to go into your theme settings (WP dashboard -> appearance -> customize) and customize the default appearance from there.
Most themes come with decent-looking designs out of the box and at a certain point it’s the more important thing is the actual helpfulness of your content rather than how good your website looks.
Here are a few more useful things that you can do within the Elementor content editor:
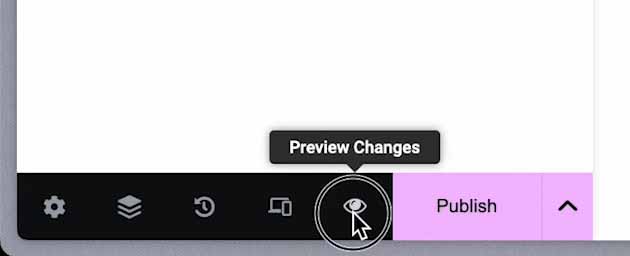
If you want to preview your blog post you can click the little eye at the bottom and it’ll take you to a new tab where you’ll be able to see a live preview of your post or page.
Most users that will come to your website will probably be from mobile so it’s useful to know how your website looks on mobile. To do that click on the responsive mode at the bottom and toggle mobile at the top.
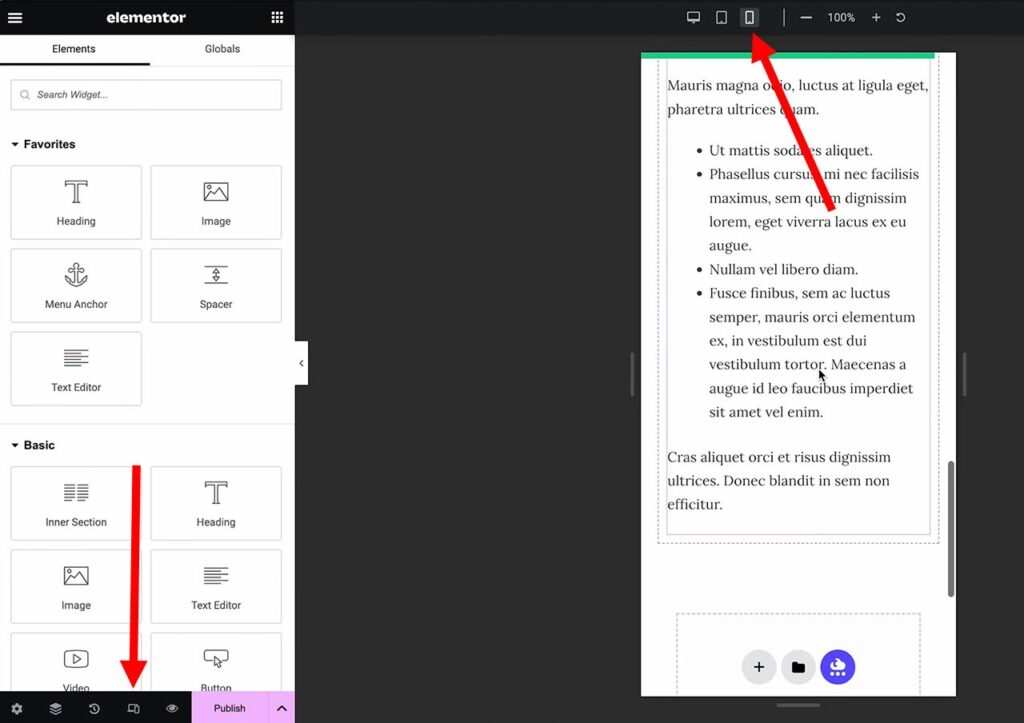
If you like how an element looks on the desktop version of your site but you don’t like how it looks on mobile you can highlight that element in mobile view and then customize it the way you want to.
You’ll then notice that if you go back to the desktop version the element will retain the new style and position only on the mobile version of your website.
But once you get all of your appearance settings dialed in you’ll want to start writing content for your blog.
So let’s talk about the blog post structure:
7. Use the right structure for your blog posts
The best way to structure a blog post is by using headings.
There are two reasons for this:
- It helps Google better understand what your blog posts are about and rank them for appropriate keywords on search results.
- It makes your content easily skimmable which means that readers can easily get the information that they came for by just glancing at the article instead of having to read through a massive block of text.
This is probably what you do anyway: when you open up an article on Google you just scroll through and look at bold headings and stuff that stands out and just skim the article.
You never actually read the full article word by word.
And that’s what most people do.
No one will read your full blog post.
You want your article to be as helpful to the user as possible so if your article is easily skimmable that makes it easy for someone to find the information that they’re looking for without having to read everything.
Here’s how to use a heading to structure your blog posts:
- H1 – The title. There will always be only one H1 heading inside your article and it’s reserved for the title.
- H2 – Chapters. Think of heading 2 as a chapter name for your blog post just like a chapter in a book.
- H3 – Section of a chapter. Think of heading 3 as a subsection of your chapter.
- H4, H5, H6 – Subsections of sections. These are used less often and H2 and H3 headings are often enough to structure a blog post.
I made a Google Doc with an example blog post structure.
Example 1:
H1 – Ultimate Skydiving Guide For Beginners
H2 – Best Gear To Use
H3 – Parachute
H3 – Helmet
H3 – Shoes
H3 – Pants
H3 – Glasses
H2 – Best Places To Go Skydiving
H3 – Place 1
H3 – Place 2
H3 – Place 3
H2 – Which Weather Conditions Should You Look For
H2 – 5 Things To Know Before Your First Jump
H3 – Thing 1
H3 – Thing 2
H3 – Thing 3
H3 – Thing 4
H3 – Thing 5
H2 – Conclusion
Example 2:
H1 – Best Gear To Use For Skydiving
H2 – Parachute
H2 – Helmet
H2 – Shoes
H2 – Pants
H2 – Glasses
As you can see if you can’t segment chapters of your blog post further then you can only use H2’s.
Also, you can go into any website that has a blog and highlight any of the headings -> right click -> and choose “inspect”. You’ll then be able to see on the right side which type of heading it is.
If you select normal text it’ll show you <p> which just means that it’s not a heading.
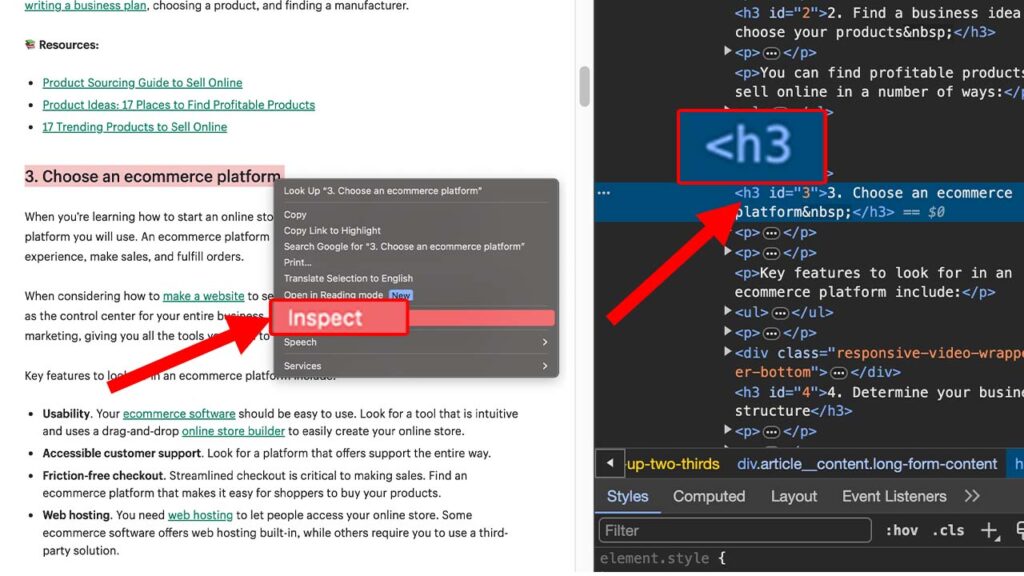
So you can just go on different blogs select their heading text, click inspect and see how they structure their blog posts and do something similar for your website.
Understanding bounce rate
Bounce rate is the percentage of visitors to a website who navigate away from the site after viewing only one page.
One of the many ways that Google sees if your blog post is helpful or not is by looking at the bounce rate bounce.
People “bounce” when they come into your blog post, read a little bit and then come back to Google results to search to search some more.
This is bad.
It means they didn’t find a complete answer to their question and they’re going to keep looking elsewhere.
You want someone to come into your blog post, read through, it pick the information that they need and then close Google completely.
This behaviour means that your blog post was good enough to solve that person’s problem and they don’t need any more information.
If they come to your article and they can’t immediately find the answer that they’re looking for they’re going to go back and go to another article that gives them the answer faster. And google will see this and your blog post will sink to the bottom.
Which is not what we want.
That’s why we want to make our article as easily skimmable as possible.
You want to make the most important points bold, you don’t want to have long paragraphs (some bloggers just click enter after every sentence), and you want to include segments that make it clear what the current section is about instead of having just a plain block of text.
Also, using headings to structure your website makes it very easy for Google to understand what your article is about and rank it for appropriate keywords.
Google will look at keywords that you use in the title of your blog post, in the H2s, in the introduction and in the other headings to determine who this article is for and for what keyphrase it should appear on Google search results.
Set categories for blog posts
You can also assign a category for your blog posts.
If you write 100 blog posts and then categorize them within your website it’s just going to be easier for you to navigate your website and Google may also use these categories to figure out what your blog posts are about.
To create a new blog post category from the WordPress dashboard go into posts -> categories.
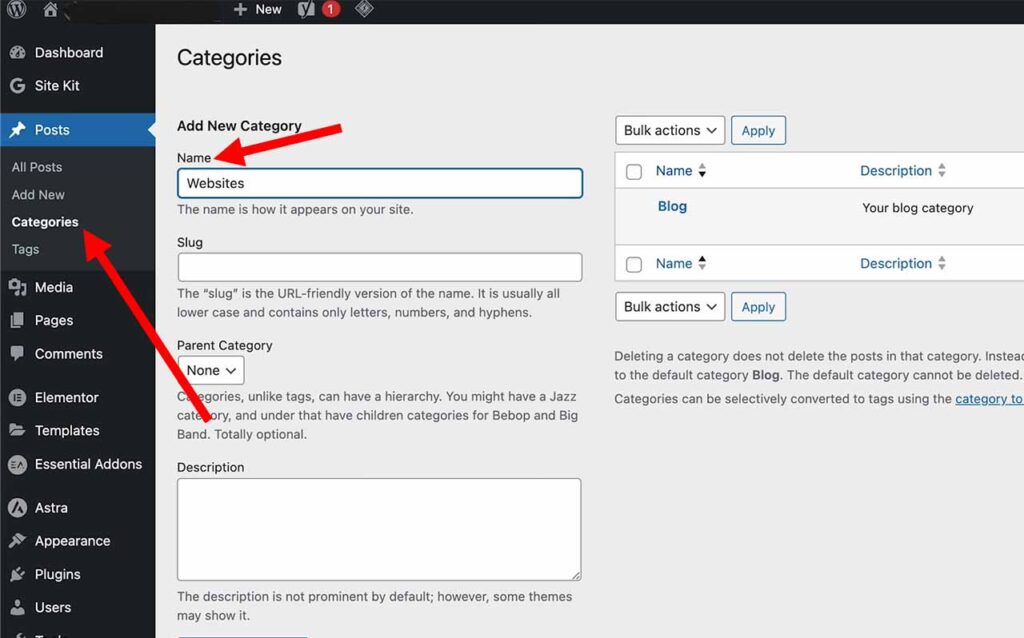
Here you can put in a name and then a slug (a slug means what goes after the slash in the URL of your category).
Once you create a category you’ll see it appear as soon as you click “edit” on one of your blog posts.
8. Focus on people's search intent
Search intent is the main goal a user has when typing a query into a search engine.
There are just two types of blog posts: transactional and informational.
This is not either or – it’s a spectrum.
Informational blog posts are usually “how to” blog posts:
- How to prepare for a skydiving session
- How to take a screenshot
- How to make your first YouTube video
Transactional blog posts are where people are looking to spend their money:
- Best computers to buy for students
- Best video editing software
- Best software for screen recording
- Premier Pro VS Final Cut Pro
- Wireless VS wired headphones
- Macbook VS a Windows laptop
- Mouse review
- Table review
- Mountain bike review
These are more transactional. People are looking for information that will help them buy a product.
What usually happens is that there are a lot fewer people searching for transactional posts and they’re a lot more competitive compared to informational posts.
So a good strategy to employ is to write informational blog posts about something and then from those blog posts link to transactional blog posts.
You want visitors to transactional blog posts because they usually bring you a lot more income through affiliate links (we’ll talk about how to find those later).
However, the structure of your blog post remains the same whether the post is transactional or informational.
You will always want to have your H1 heading as the title and then if there are no H3s you’ll only have H2s, and if you can segment H2s further you’ll have H3s.
9. Create a blog post template
Since you’re going to be writing a lot of blog posts you’ll probably want a nice template that you can use so that you don’t have to keep inserting all of the headings and text fields every single time.
To create a blog post template from your WordPress dashboard go into “templates” and click “add new” at the top left, then select the template type to be “page” and choose a name.
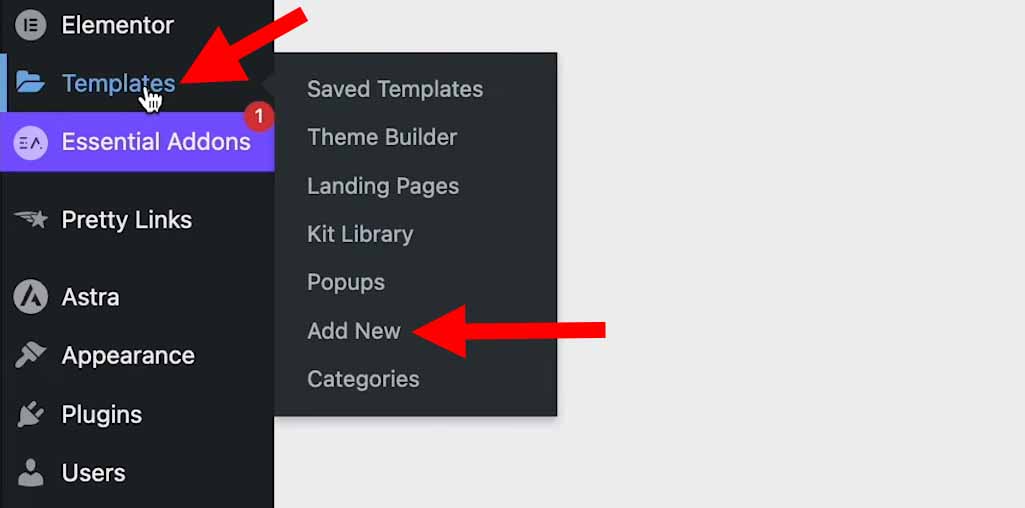
Once you click “create template” you’ll be thrown into the Elementor page builder to be able to create a template.
What I typically do for my templates is add a heading then duplicate it a few times, add some H3 headings and also duplicate them as well as insert a text field below each of the headings.
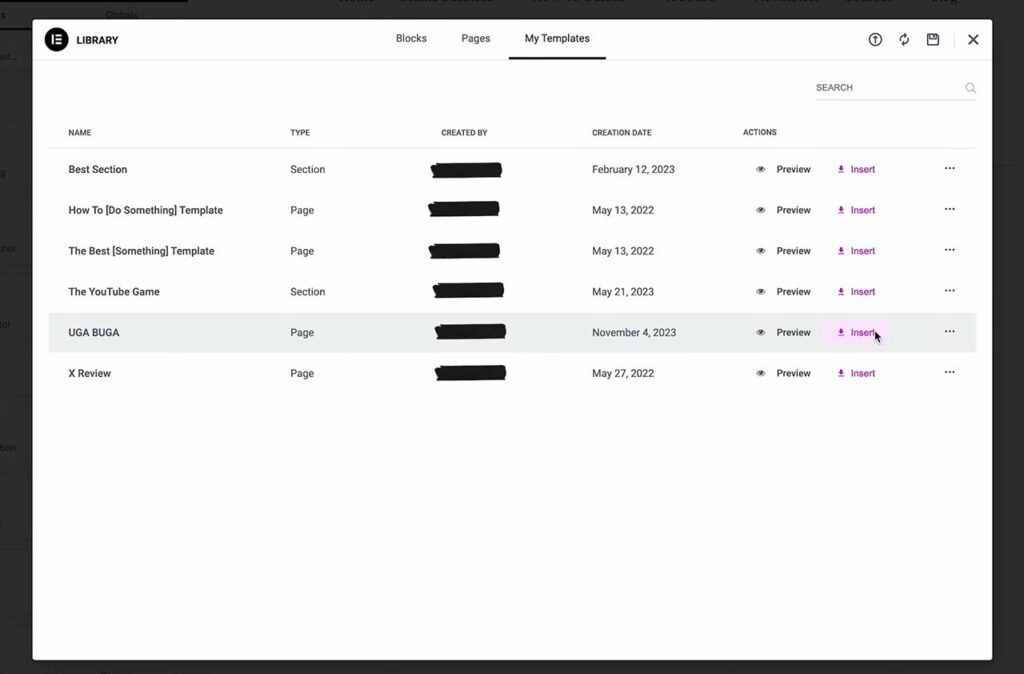
And after I have a template published, when I’m creating a new blog post I’ll be able to click the folder icon (inside of the Elementor editor) and choose from all my templates.
So you can create multiple templates to quickly fill out the structure of your blog post without having to do it manually every single time
10. Optimize images for faster load speeds
If you continue to explore through the WordPress dashboard menus you will land on “media”.
This is where all of the images that you upload to your website will be located.
You want to add images to your website because they make it easier for someone to skim your blog posts and it’s just generally a good practice to include images whether they’re only for aesthetics or they show some cool useful information.
But the problem with images is that they make your website load slower.
Because they usually take up a lot more space and require a lot more resources to load compared to simple text.
So I’ll show you how to optimize images on MacOS:
Firstly, if you click “command + i” it will show you the information of any file including its size and if it’s an image, its resolution.
On Windows, you have to right-click and go to “properties” to see how much space an image takes up.
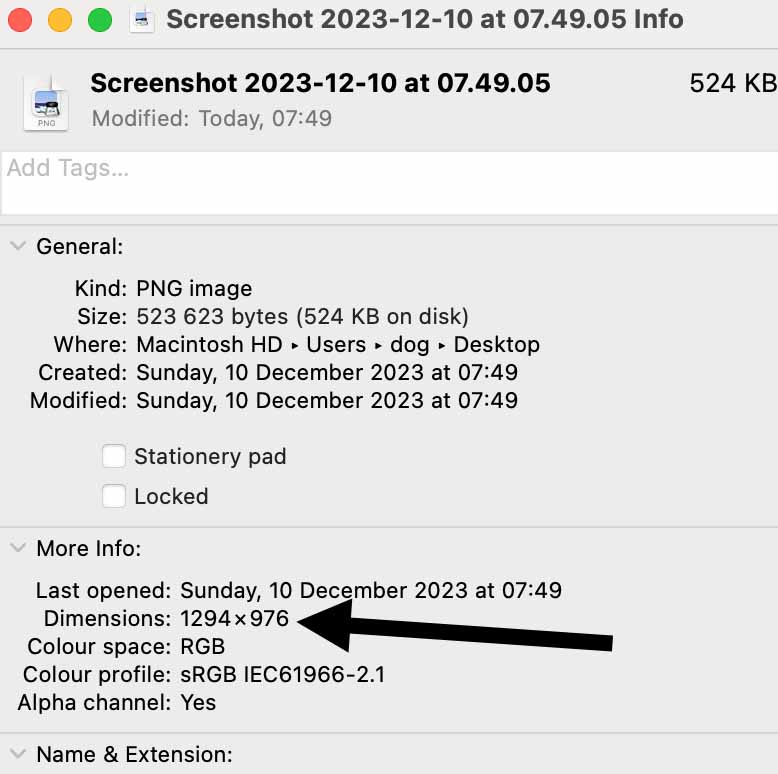
Ideally, you want all of your images to be less than 100 kilobytes.
There are two ways to decrease image size:
- Lower the dimensions of the image (decrease the resolution)
- Compress that image and optimize it
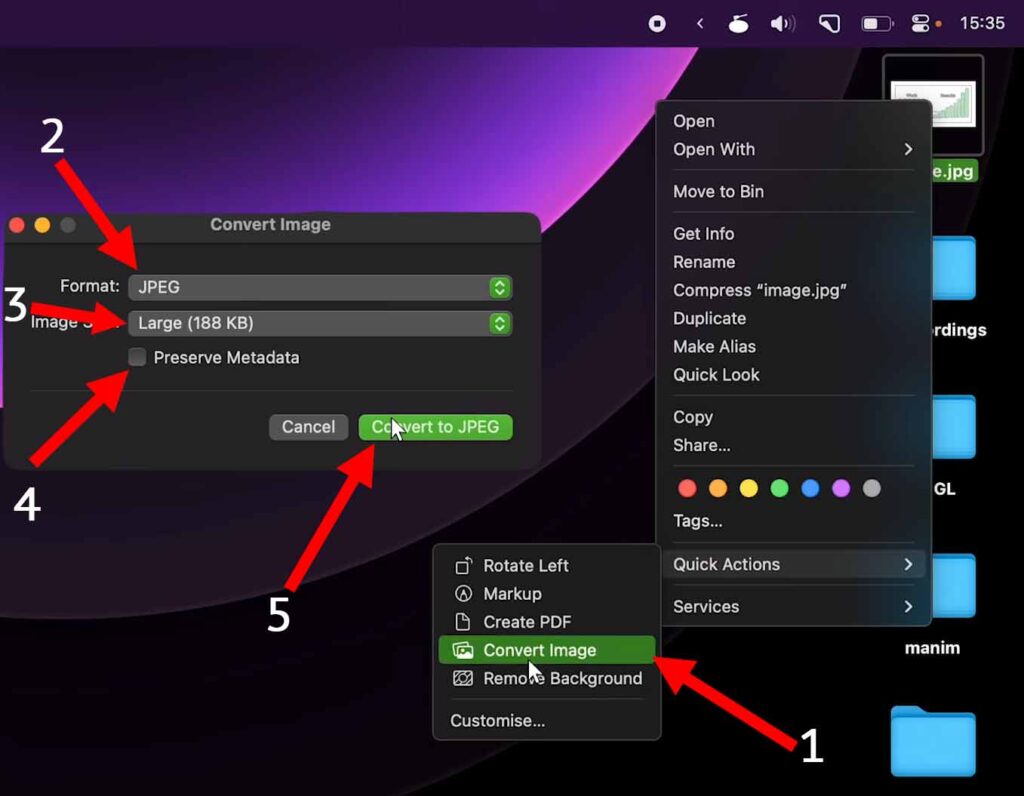
To decrease image size on a Mac right-click on an image -> go to “quick actions” -> choose “convert image” -> then deselect “preserve metadata” -> choose “large” -> click “convert”.
What I also always do with my images is use an app called ImageOptim.
It’s a free Mac app that you can download and what it does is it lets you further compress your image to save on size.
Once you install it you can right-click on an image -> and then choose “image” optimize”.
Now just drag this image into my blog post and call it a day.
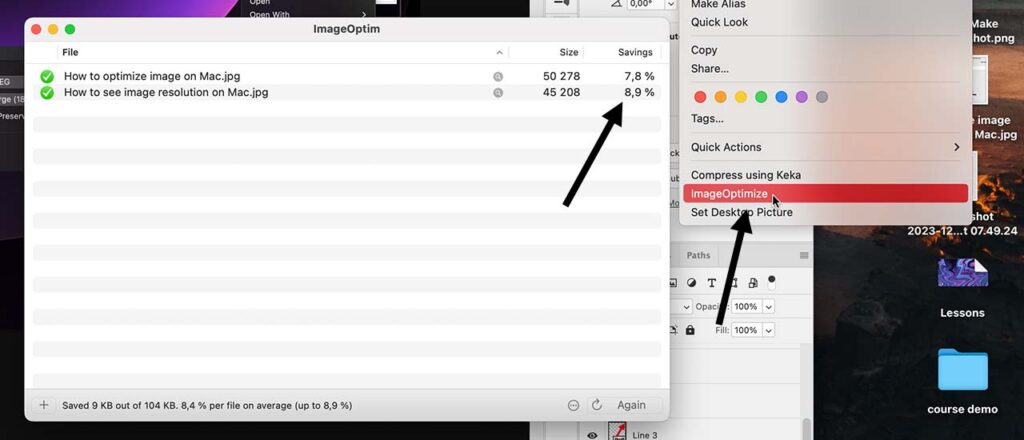
But now as with many things, you can take this one step further.
There is a WordPress plugin that I use called Ewww Image Optimizer and it converts all of the images that you upload to your blog post into .webp images (those that are super annoying to save).
What this format does is it compresses the image even more so that it’s easier to load.
So if you want to make sure that your website loads images super quickly install this plugin and you’re good to go.
11. Do keyword research by using Google
But now that you have learned how to write and structure a blog post you’re probably wondering “What should I even write about? What’s my niche? How do I find my target keywords that people type into Google and search?”.
And this part of the blogging process is called keyword research.
There’s paid software that many bloggers use like Ahrefs but I don’t use it myself so I can’t recommend it.
The easiest method for keyword research is to use Google.
Method 1: using Google
1. Open Google.com in an incognito tab
You want to open an incognito tab in your browser by clicking “command + shift + n” on Mac or “control + shift + n” on Windows.
It should open a private browsing session.
You want to do this because you want to avoid Google suggesting something based on your previous search history (which they typically do).
Once we are in private browsing we’re going to go into Google.com and you want to be on actual Google and not on your new tab, not inside of your search bar. You just want to go to Google.com (yes we are googling for Google).
2. Start typing keywords and look at what Google is suggesting
Now we can type a word or a phrase into the search bar, for example, and once we put a space after the word Google will start suggesting things that are popular search queries.
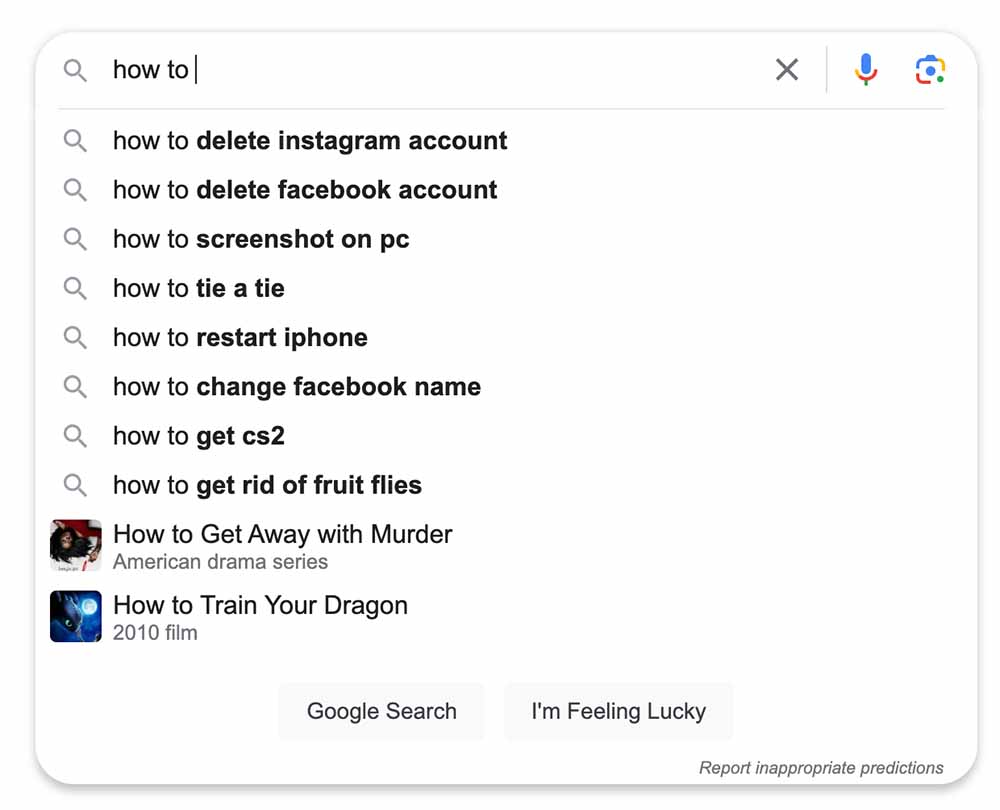
These are still pretty broad so I’m going to come to the beginning and type “How to on Macbook” and then come to the space in between the words “to” and “on” and click space (which tells Google that I want to put something here) and Google will suggest the most popular things that people put in here.
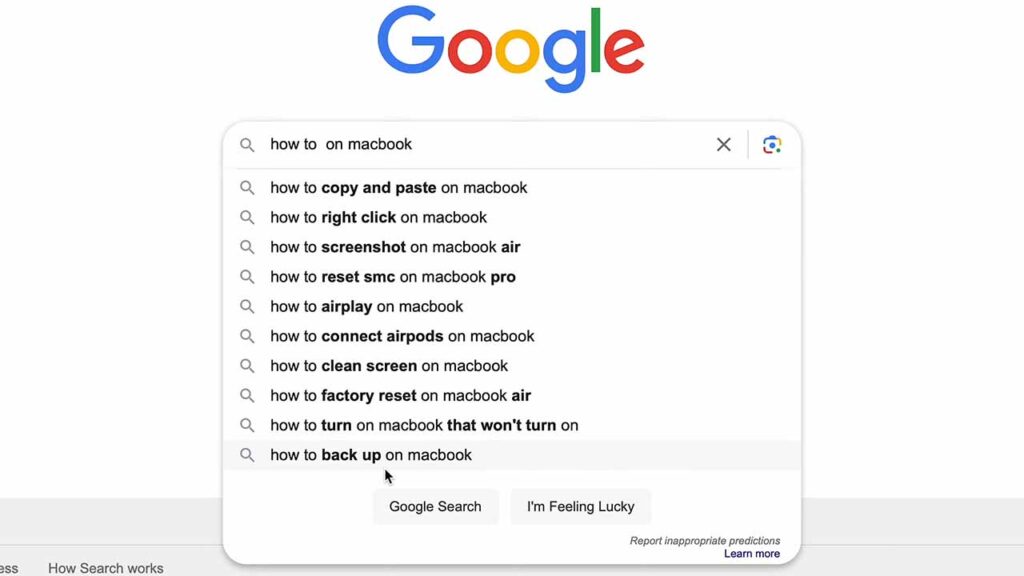
And these are your article ideas.
You can do this for any niche and any kind of keyword that you can think of.
If you’re writing your blog in another language you can do this in English and then translate all of the Google suggestions into your language.
3. Look at the "people also ask" section
Once you find the search query that you think you can write a blog post about you can click on it and inside of Google search results you’re going to look for “people also ask”.
This is another awesome way to find article ideas.
Keep clicking on the same “people also ask section” and Google will keep adding more sections below it.
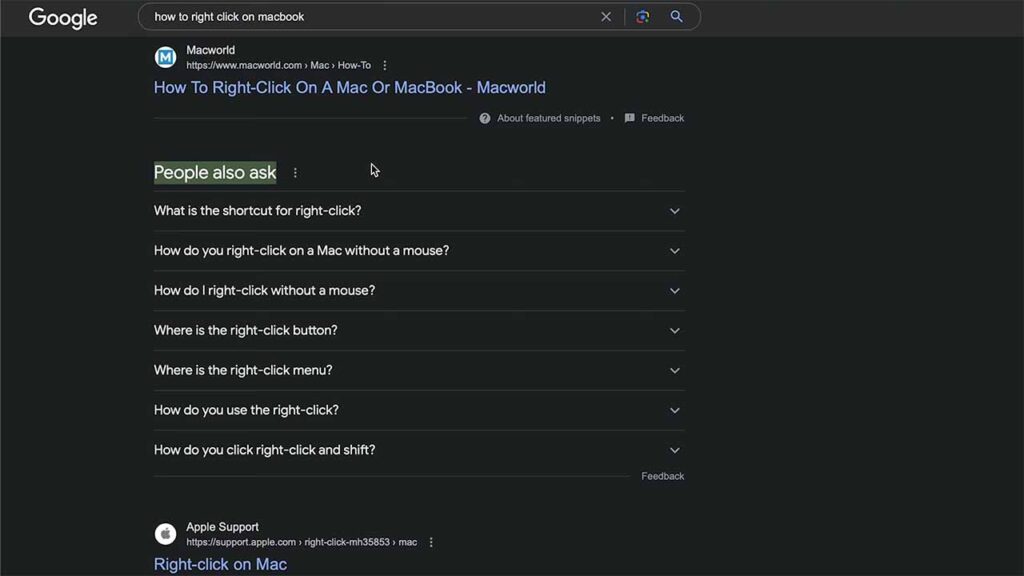
All of these are things that people put into Google that are related to your main search query (that’s at the top in the search bar).
This example was for an informational blog post and not a transactional one. So let’s do another example with a transactional keyphrase.
Again let’s go into Google.com and we’re going to start the search with “best” + space + “for YouTubers”.
And if I put my cursor in the space we can see that Google suggests all of these things:
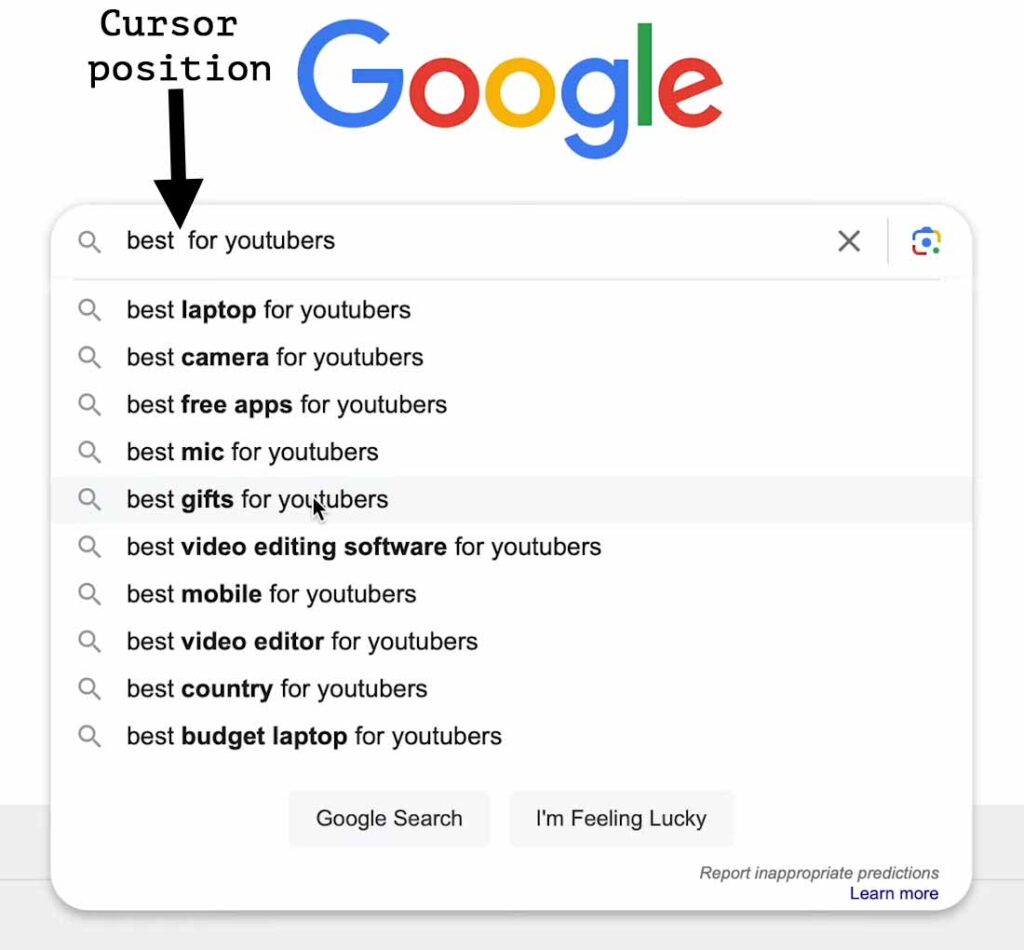
I’ll click on “best mic for YouTubers” and look at what people also search for that’s related to this phrase.
Again, I can just spam click on one of the people also ask questions to get more of them.
And I discovered that people also Google for:
- “Do I need a mic for TikTok”
- “What’s the most high-quality microphone”
- “What’s the best vocal microphone”
- “What audio gear should I use for YouTube”
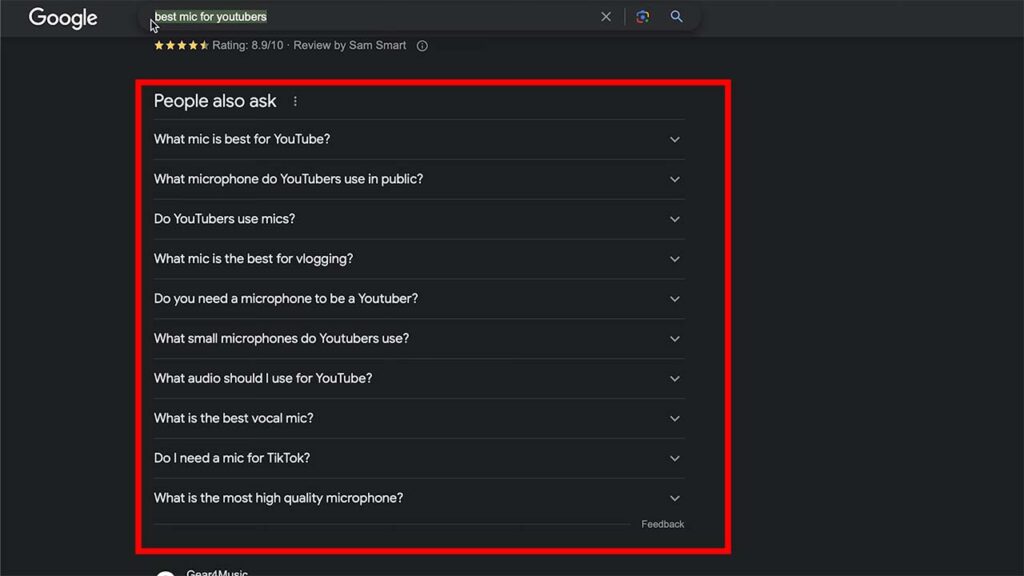
To make your blog posts as helpful as possible you can answer these “people also ask” questions inside of your blog post about the best mic for YouTubers or create entirely new articles based on these questions.
But there is a little problem here because we can’t see how many people look up any of these keyphrases on Google.
And that’s where the second free keyword research method comes into play:
Method 2: using Google Keyword Planner
We can use a free tool made by Google called the Google Keyword Planner to see an estimate of how many people type in a certain key phrase into Google search each month.
1. Go into Google Keyword Planner
Once you go to Google Keyword Planner you’ll just have to log in with your Google account.
You may have to create a free Google Ads account to get in.
And once you’re done you should land on a page where you’ll be able to click “keyword planner” on the left.
2. Look up search traffic for any keyphrase
Make sure your language is set to English and your location to either the country for which you’re writing the blog posts or all locations if you’re just writing in English.
Then put in the keyword for which you want to see the search traffic into the search box and click “get results”.
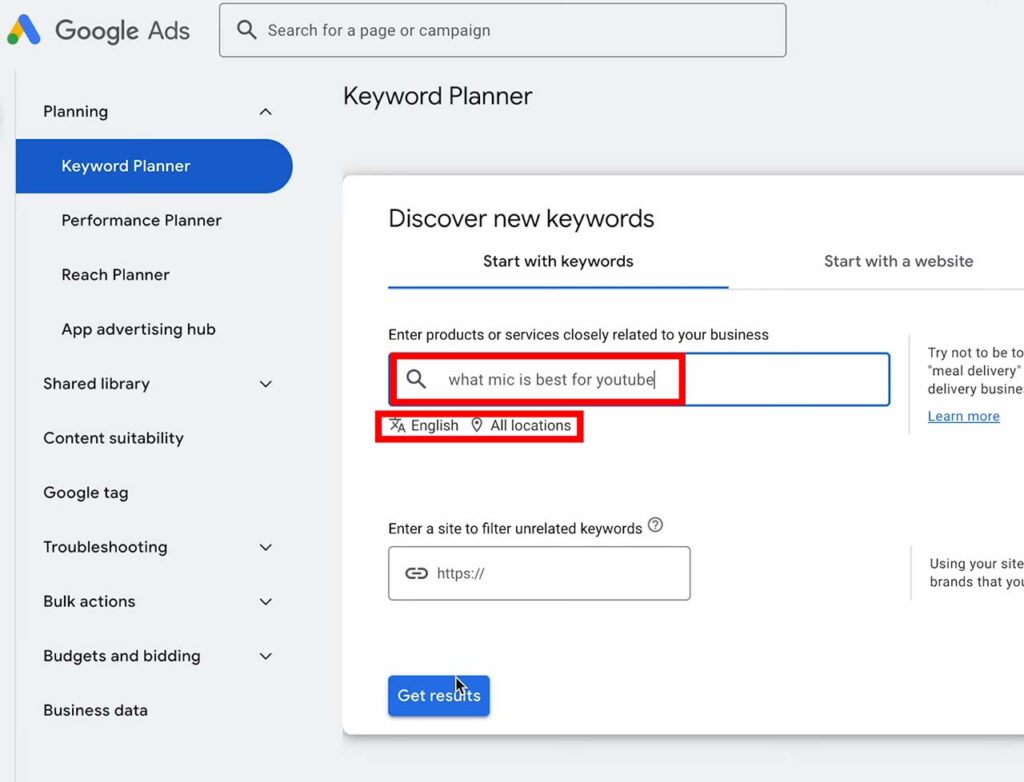
We can see that our average monthly searches for this exact keyword are from 10 to 100:
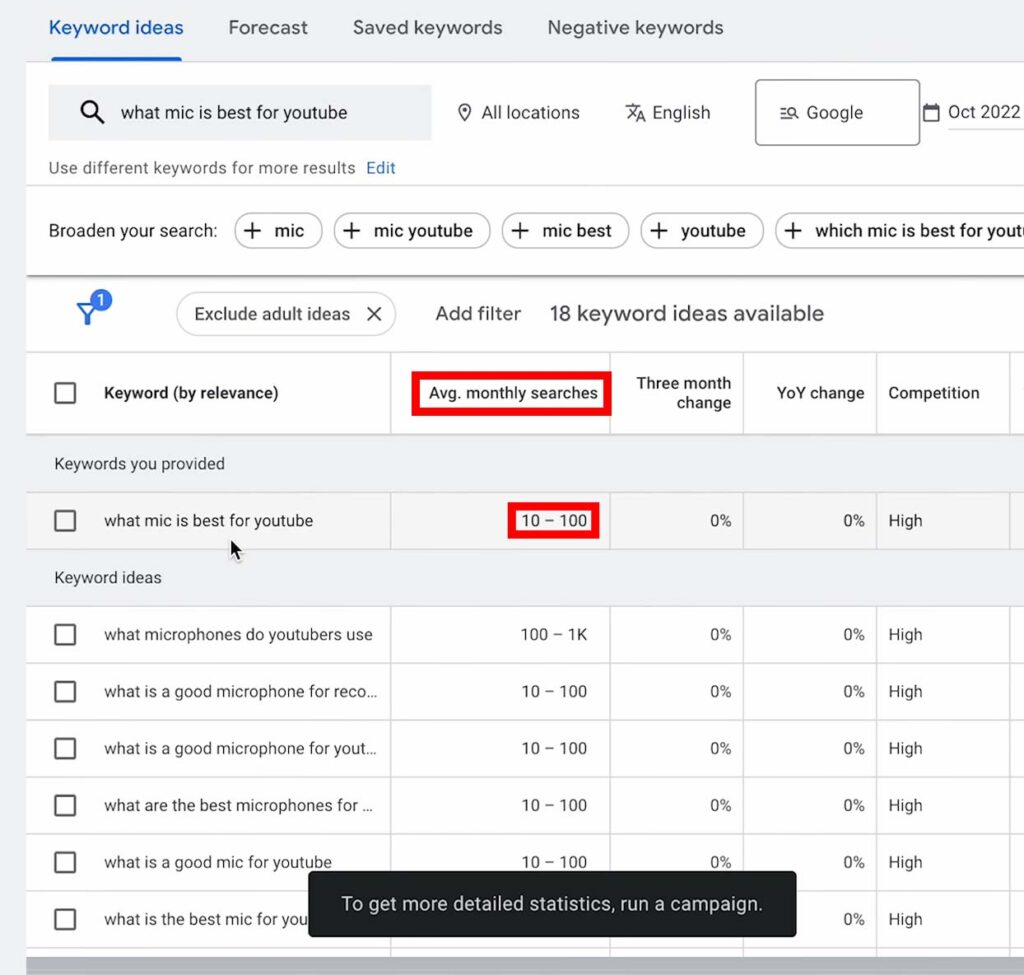
So not too much.
However, when people type this keyword into Google it doesn’t necessarily show them results for exactly what they typed in. Google shows people the most relevant results.
So if you write a blog post about this keyword and it ranks high in Google search results it’s probably going to appear high for all of the related keywords as well.
So in reality, the average amount of people that will see your blog post will be a lot higher than average monthly searches for any one of these specific keywords.
Generally, you want at least 1,000 people looking up a key phrase each month.
So let’s try another one:
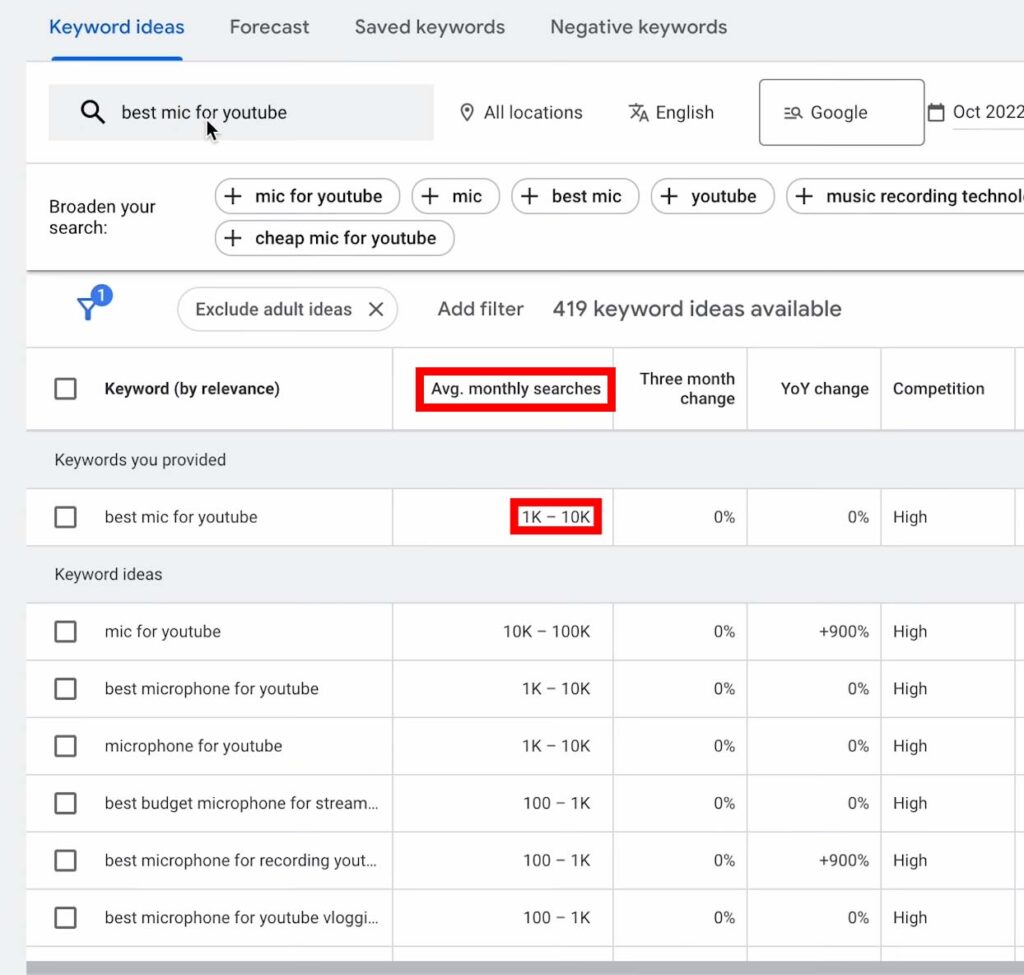
And this one is a lot better.
We just changed the wording from “What’s the best mic for YouTube” to “best mic for YouTube” and there are from 1,000 to 10,000 people looking up this search query every single month.
This means this is a pretty good article idea to write about based on average monthly searches.
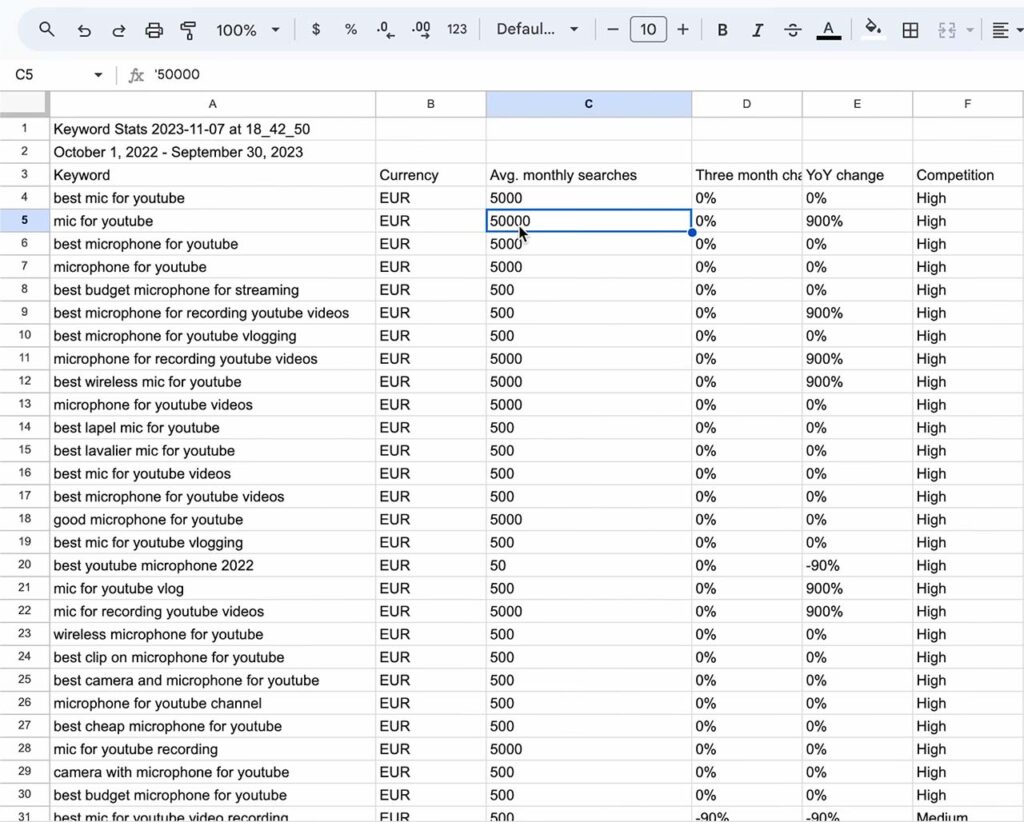
To see a more detailed search traffic estimation you can click the download arrow at the top right of the keyword results and choose “Google Sheets” which will create a new Google Sheets document that you’ll be able to click on and see a more detailed average monthly searches for each keyword:
12. Optimize your blog post for SEO
First and foremost, if you’re writing helpful, well-researched articles about a subject you’ll probably rank on Google without having to optimize your blog post for SEO.
Google’s goal is to show the best possible article for a person who typed in a related keyphrase to that article into Google.
That’s why if you write helpful articles they will eventually end up on the first page of Google.
However, to help Google crawlers understand what the article is about we can make sure that our blog posts are optimized for search engines.
To optimize your blog post for a keyword that you’re writing about it’s best to put your keyword or a variation of your keyword in:
- The URL
- The title
- The meta description
- The first sentence of your blog post
But wait, what’s the meta description?
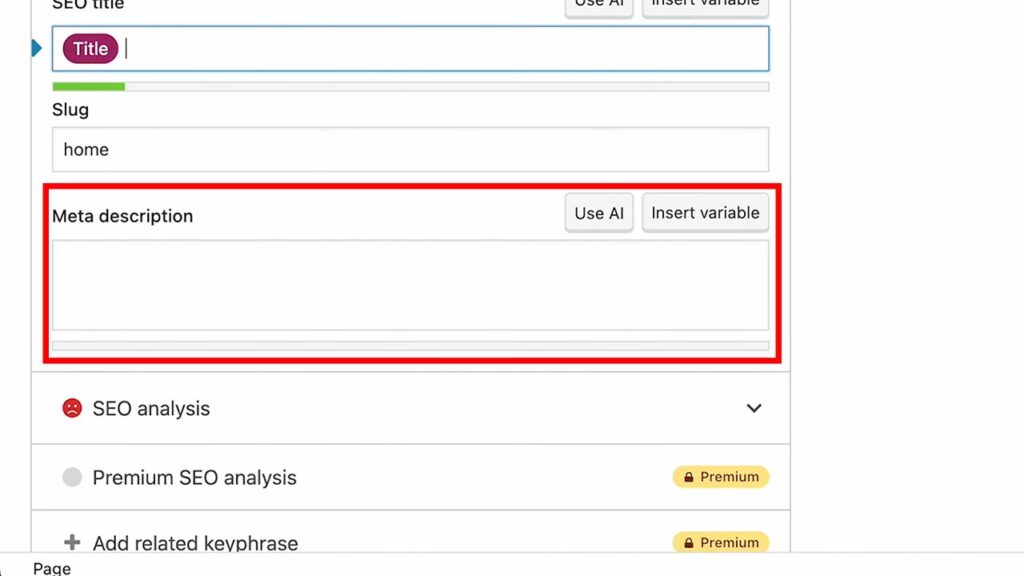
The meta description is the text that you see below your blog post’s title in Google search results.

According to Google, the meta description generally informs and interests users with a short relevant summary of what a particular page is about.
And you want your target keyword inside of this meta description.
If you choose not to write the meta description yourself Google will scan your page and automatically pick a meta description that it thinks is best for your article. So you don’t necessarily have to write it yourself but it’s generally a good practice to do so.
When you click “add new” when you want to create a new blog post you’ll see the Yoast SEO panel on the left that’ll let you customize the meta description.
How to write helpful articles?
Even if you find a bunch of keywords that you could potentially write about by looking at what content is on other websites and frankensteining it together you should probably not do that.
Google really doesn’t like shallow articles that add no value. Nor do your readers.
You should aim to write really helpful articles about a topic you know more about than an average person.
If you have experience with something that maybe your friends or your grandma doesn’t have write about that.
The more experience you have with something the more helpful your articles will be and the more your readers will find them valuable and thus Google will rank them higher.
Don’t be a robot.
Add jokes, tell stories, and just communicate to the reader that you actually know what you’re talking about and you’re not just a random robot who automatically adds a few headings and a few sentences beneath each one generated with ChatGPT.
Be a human, write like a human.
13. Don't make grammar mistakes
Reading a blog post riddled with grammar errors will immediately put your reader off.
You will seem untrustworthy and unprofessional.
You can use a website called the Hemingway App where you can paste text and it will tell you where are the mistakes and what kind of grade level your text is optimized for.
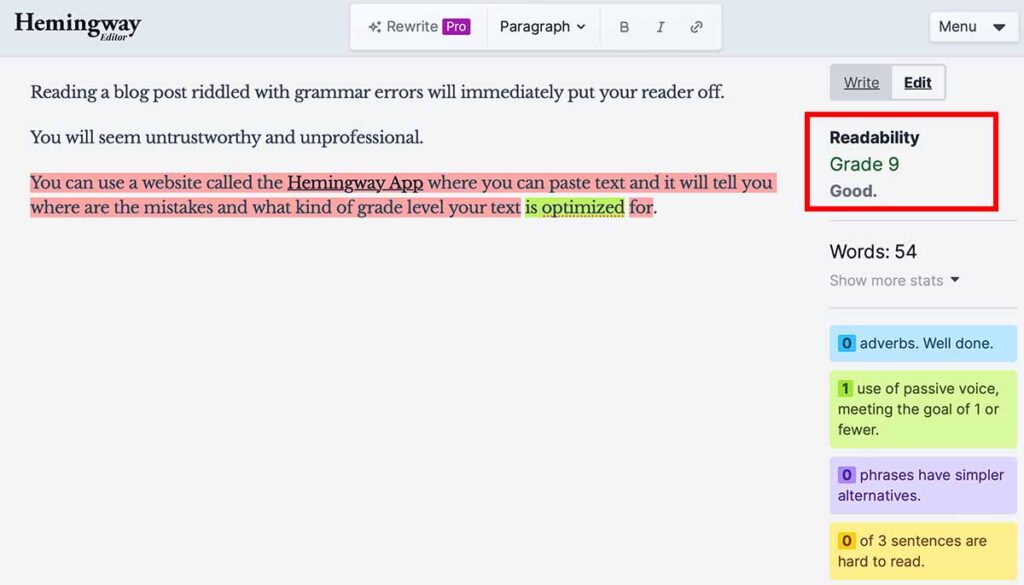
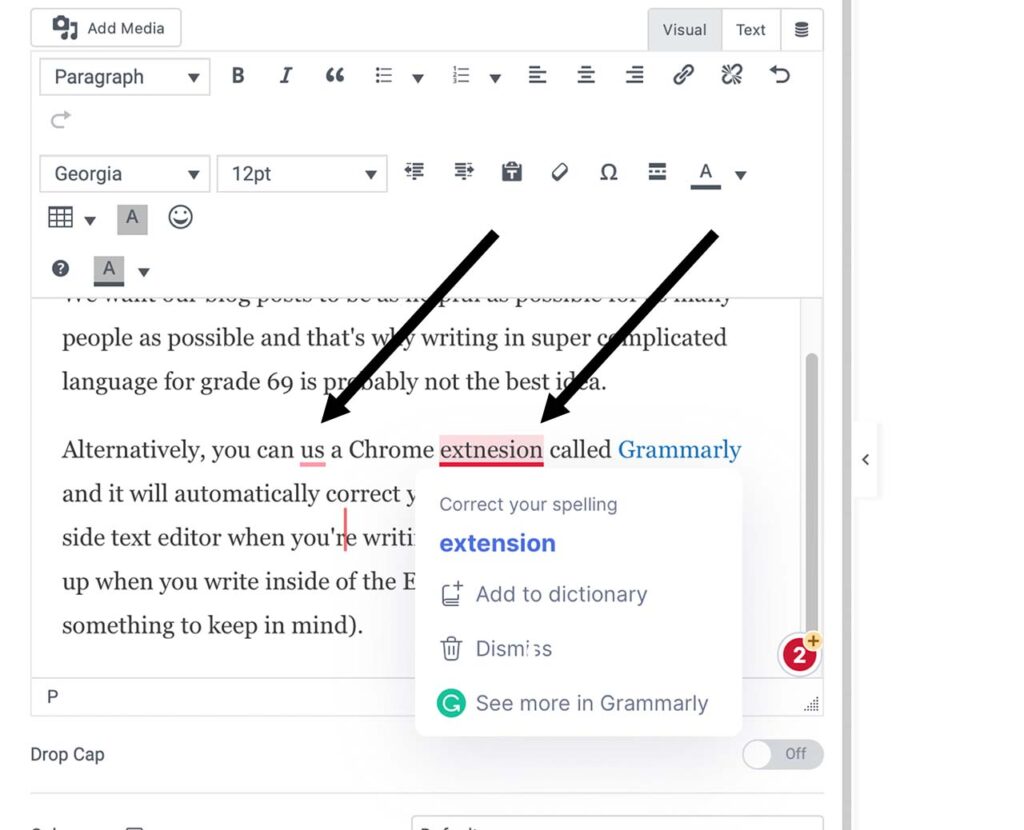
We want our blog posts to be as helpful as possible for as many people as possible and that’s why writing in super complicated language for grade 69 is probably not the best idea.
Alternatively, you can us a Chrome extnesion called Grammarly and it will automatically correct your mistakes inside of the left-side text editor when you’re writing a blog post (it doesn’t show up when you write inside of the Elementor block so that’s something to keep in mind).
14. Set up Google Search console
Once you have a blog post nice and polished and published you’ll want to let Google know that you did it so they can make their robots go to work.
There’s one plugin that we installed right in the very beginning as we were setting up our Hostinger account and it’s Google Site Kit.
Here’s how to set it up:
1. Set up the Google Site Kit plugin
You’ll find your Google Site Kit on your WordPress dashboard on the left.
If you don’t have it installed from your WP dashboard go to “plugins” -> “add new plugin” -> search for “Site Kit by Google” -> click “install” -> and once it’s installed -> “activate”.
It will appear on your WordPress dashboard on the left.
Once you go there you can sign in with your Google account.
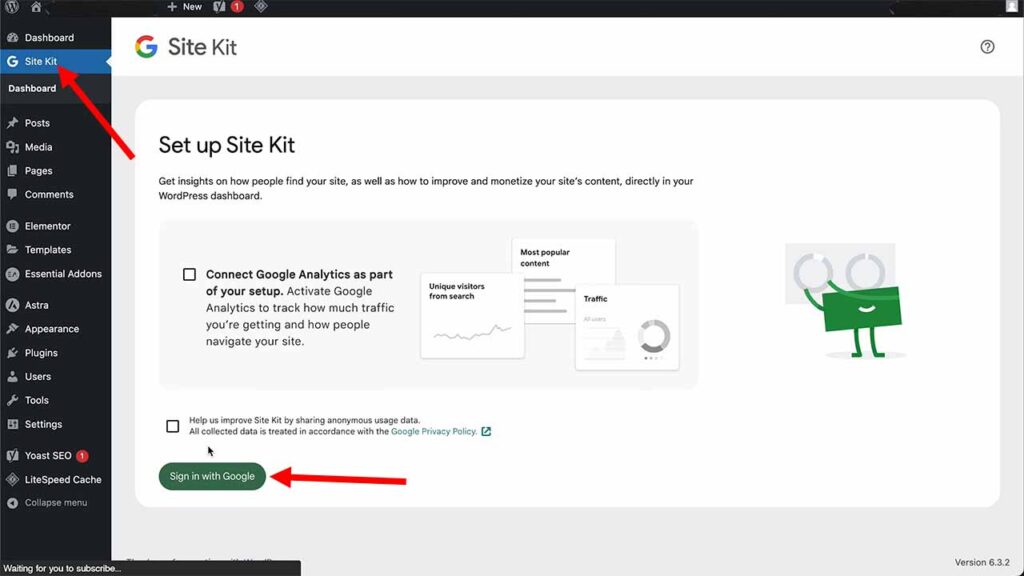
Just choose your Google account and then it will ask for access to a few things which you’ll want to select all and then click continue at the bottom.
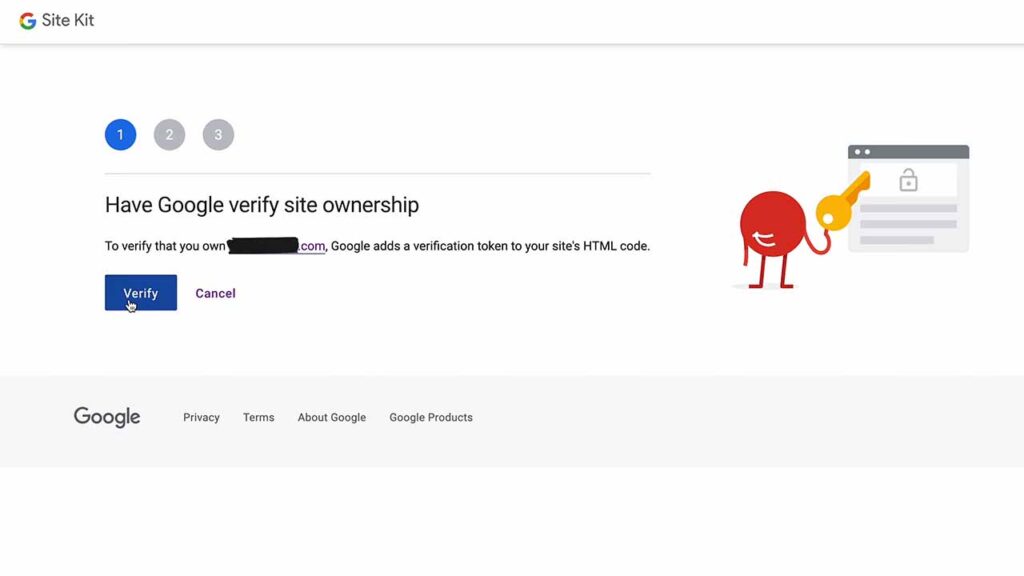
Next, you’ll have to verify that you own your website. It’s as easy as clicking “verify” -> “allow” -> “setup”. And that’s it.
Once it’s all done go to your WordPress dashboard and once you click on Google Site Kit you’ll be able to see your search traffic and various other other data about your website.
But what we’re looking for is a search console link:
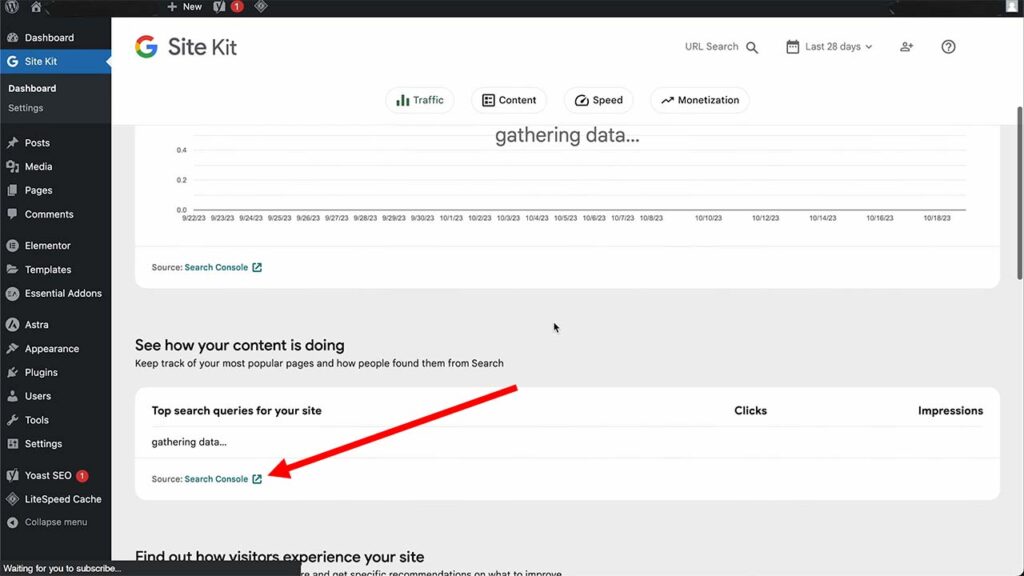
This will take us to the full version of the plugin (it’s a separate website).
This is where you’ll be going to tell Google that you wrote a new blog post and you want them to index it.
But before we do that there’s one thing that we need to set up and that’s called a sitemap.
2. Submit your website's sitemap
A sitemap is used by search engines to map out your whole website and all of your blog posts to help them better understand it and index it.
If you’ve already installed the Yoast SEO plugin then the sitemap will be already generated for you.
If you go to “yourdomain.com/sitemap.xml” you should be able to see your sitemap which is a page that will look similar to this:
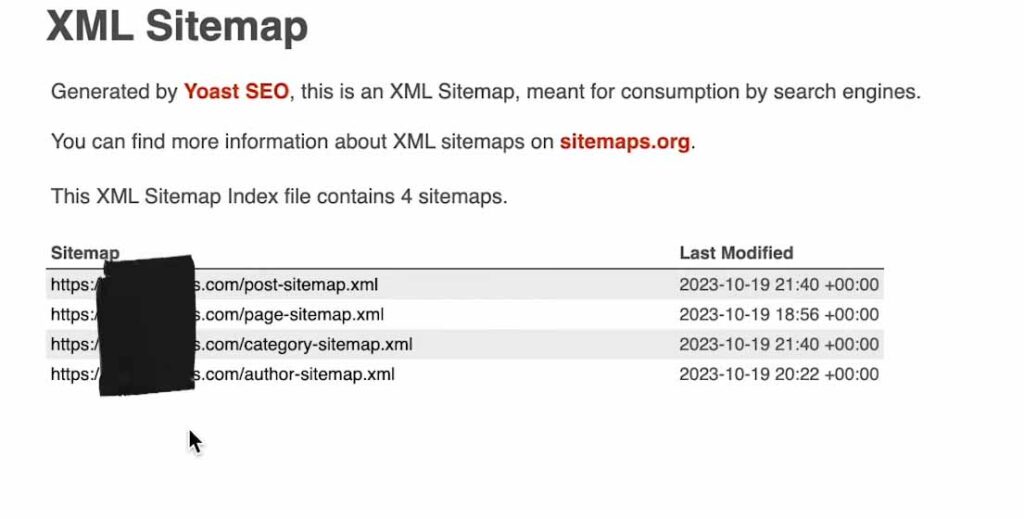
Inside your sitemap, you’ll see all of your posts, all of your pages, your categories and the authors that write your blog posts (which in this case is just you).
If you click into posts you’ll be able to see all of your blog posts in the list.
Again this is only useful for search engines (and one more thing that I’ll show you later) so we can just never go here again.
But we need to give this sitemap to Google so that they can map out our website.
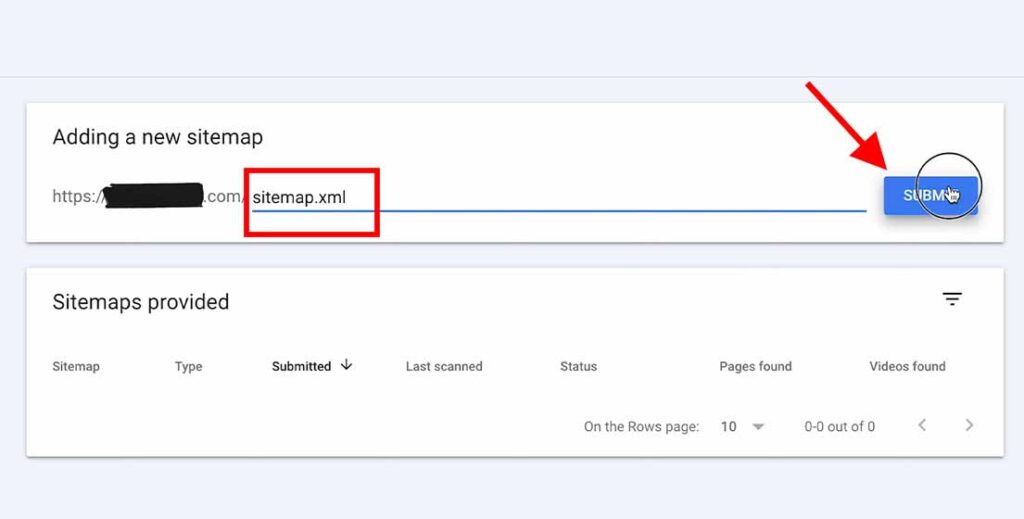
To submit your sitemap go to your Google Search Console -> “sitemaps” -> type in “sitemap.xml” -> and click “submit”.
And that’s it. It’s a one-time thing and you don’t have to ever worry about doing this again.
3. Submit your blog posts for indexing
Once you write a blog post you’ll want to come into the Google Site Kit plugin, go to your Google Search Console, and then paste the URL of your blog post into the top bar.
And then click “test live URL” and once it’s done click “request indexing”.
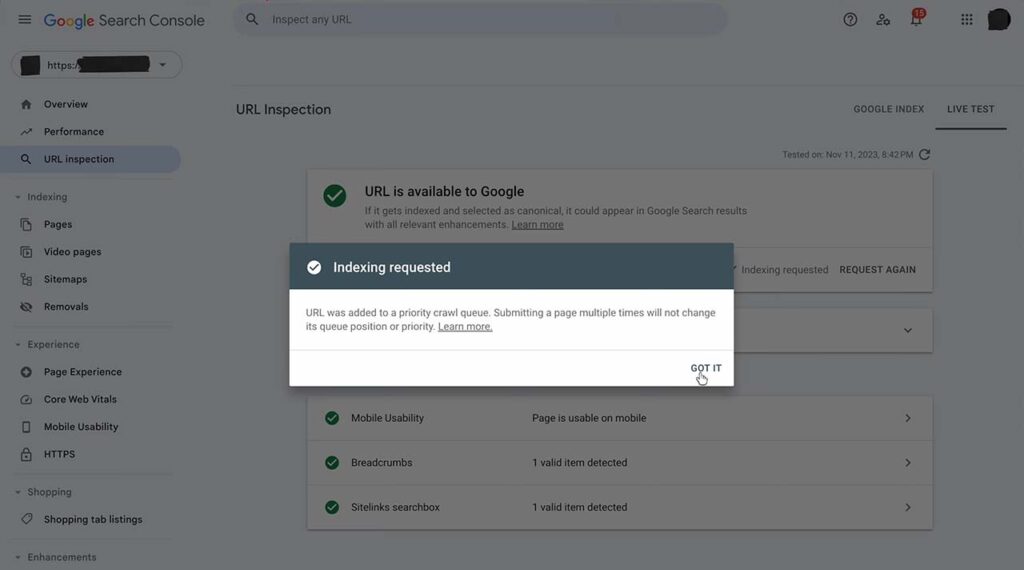
Doing this will tell Google that you just wrote a new blog post and you want them to put it on Google and index it.
Inside the Google Search Console is where you can see your site’s performance inside of the “performance” tab.
One more little trick that you can do with the sitemap is to go on other people’s sitemaps and see what kind of blog posts are they publishing all neatly organized in one place.
So if I go to a random website and then type /sitemap.xml after their domain name I’ll be able to go into “posts” and see all of their blog posts.
It’s just a neat trick so you don’t have to navigate their website to find the blog page.
And with all of this knowledge, you should now be pretty well equipped to start your blog and start writing blog posts.
There’s only one piece of the equation left and that’s making money.
So here are the best ways to monetize your blog:
15. Use ads, affiliate programs and your own products to monetize your blog
As I’ve mentioned before there are three main ways that blogs monetization monetize:
- Ads
- Affiliate links
- Selling products (mostly digital products)
So I’ll cover each of them now:
1. Use ads
You don’t want your website to have ads in the very beginning because well it will probably not bring you a lot of money and annoy the hell out of your users.
A good time to start putting ads on your website is when it reaches from 5,000 to 10,000 monthly page views.
You can put ads on your website through Adsense which is Google’s Ad network but it doesn’t pay the most.
There are other ad networks that you can use.
I use an ad network called Ezoic but there are other ones like Adthrive or Mediawine each with their requirements for what’s necessary for you to have for them to let you in.
But don’t worry about ads until your website reaches around 5,000 to 10,000 page views a month.
Once it gets to that point just sign up to an ad network and they will walk you through how to add ads to your website.
2. Use affiliate marketing
The second, more lucrative way to monetize your blog is through affiliate links.
And unlike ads these you should probably use from the very beginning.
There are two ways to get them:
- Directly through a brand
- From an affiliate network
Affiliate networks work by having a bunch of brands sign up to them and then it’s easier for you to grab an affiliate link from that brand.
Affiliate links are tracking links and once someone buys a product or a service through your link you’ll get a commission for it at no additional cost to the customer.
It’s a win-win-win situation:
- You get paid because you promoted a product
- The customers are happy because they bought the product
- And the brand’s happy because the customers bought from them
How do you get into these affiliate programs?
The first way is to open our good friend Google type in a “brand name” and add “affiliate program”.
If a brand has an affiliate program it will most likely pop up as one of the first search results.
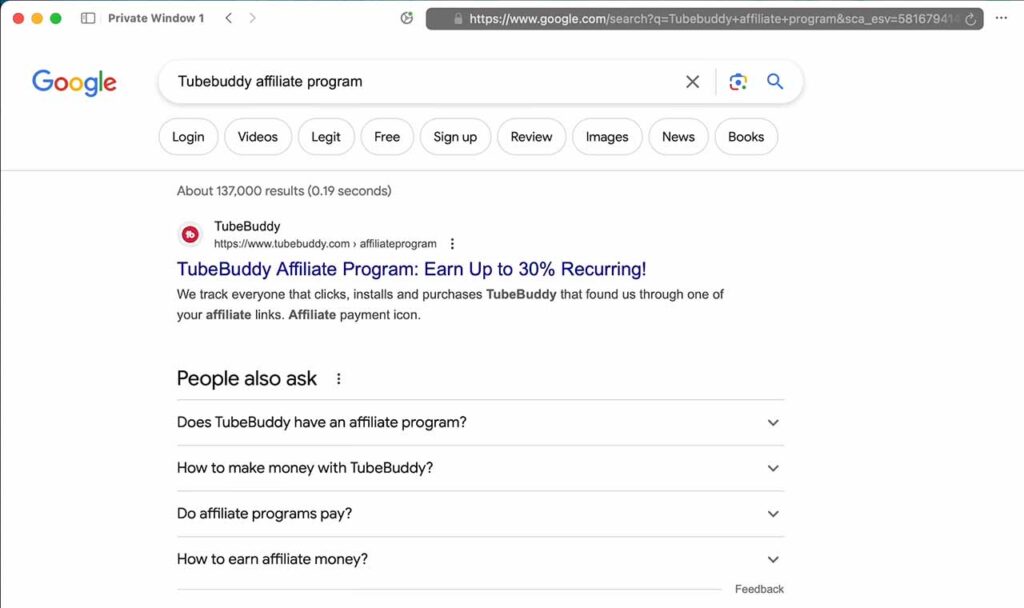
You’ll then be taken to a page where you can sign up to it.
Most brands will let you in their affiliate programs because why wouldn’t they?
You’ll be helping them sell their products and bringing them new customers.
The second way is to sign up for an affiliate network where they have a bunch of brands inside of them that you can choose from.
There are two main affiliate networks that I use – Impact and PartnerStack.
So for example inside PartnerStack you can go to “Marketplace” and choose from all of these brands that you’d like to be an affiliate for.
Then click “Join” and submit your application.
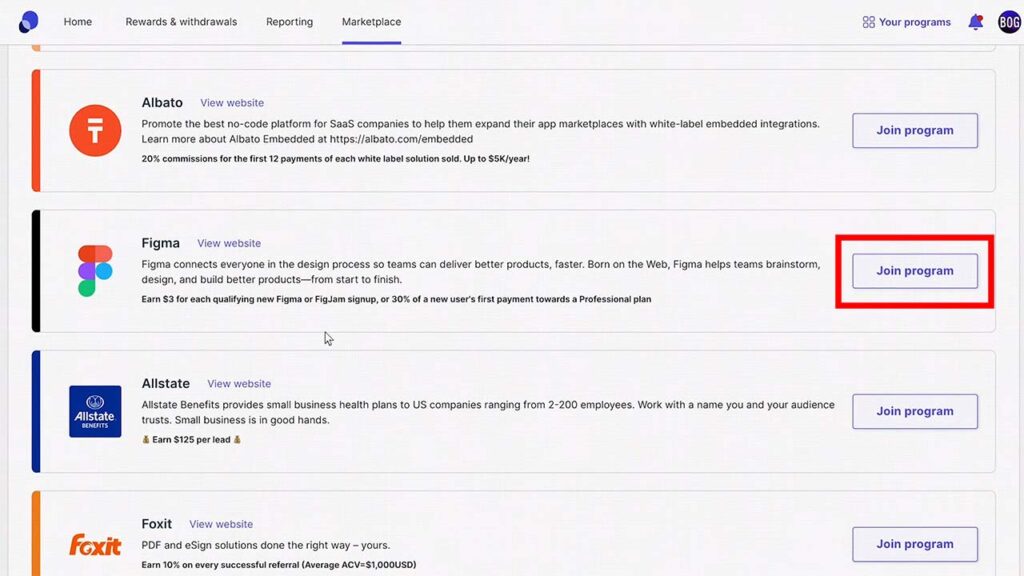
If you get accepted you’ll then get a custom link that you can put in your blog post and once someone buys something through your link you’ll get paid a commission.
Affiliate marketing is one of the best most passive ways to make money online and you should utilize it in your blog posts.
Also, there’s this brand that you may or may not have heard of called Amazon and they have the largest affiliate program that you can join.
It’s called Amazon Associates.
Then you’ll be able to copy a link of any product on Amazon and get a tiny commission if someone buys it through your link or if someone buys anything else on Amazon and they got there through your link.
Generally, software affiliate programs pay the most, and also things like credit card or life insurance or investment affiliate programs but it’s a lot harder to get accepted into them.
3. Create and sell your own products
But the most OP way to monetize your blog is to sell your products, whether they’re digital or physical products.
There’s a whole new world that opens up when you’re trying to sell your products so I’ll briefly go over the basics.
If you want to dive deeper into this topic I have two separate videos one about how to sell digital products and the other one about how to make a course (which essentially is one of the best digital products). So I recommend checking them out.
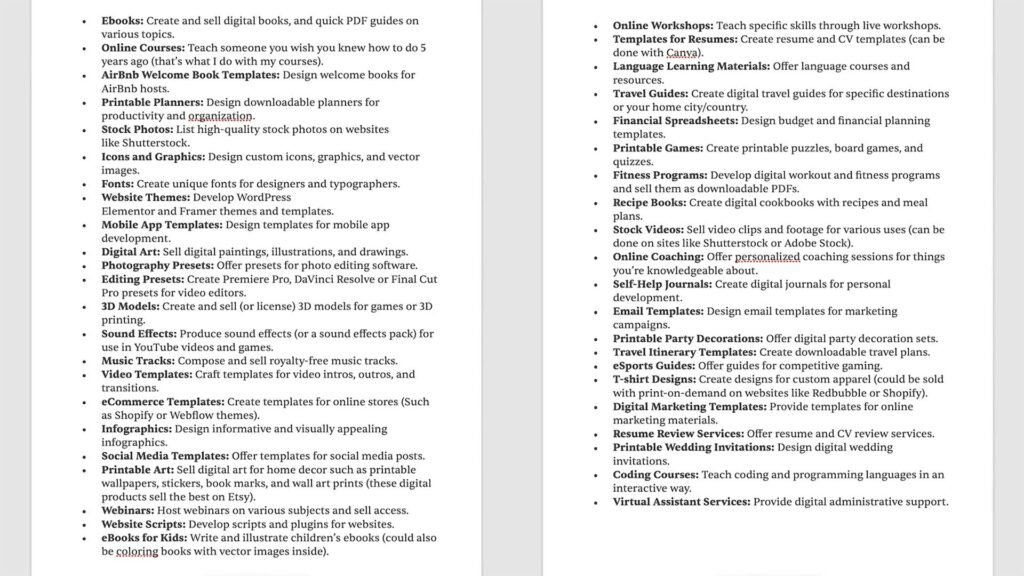
Here are a few popular digital product ideas that you could use for yourself and sell them your audience:
1. Pick a platform to sell products
What you’re probably going to need no matter what kind of digital product you’re selling is a platform to sell it on.
Here are a few recommendations:
1. Payhip:
It’s free so you can sell unlimited amounts of digital products but they have a 5% transaction fee on every sale.
You can upgrade to $29 per month and they reduce the fee to 2.5% or $99 a month and they reduce the fee to zero per month.
Payhip is the best if you’re not selling a huge amount of digital products or if you’re just starting.
Because if you don’t sell anything they will not charge you anything.
It’s completely free you can list any sort of template or any downloadable digital product.
I’ve made a YouTube Video Course which teaches students how to make studio-quality YouTube videos at home in their bedroom without even having to show their faces while saving hundreds of dollars on expensive studio gear. And I’ve also put this course on Payhip.
I uploaded all of my course lessons onto YouTube, made them unlisted so that no one can view them without the link and simply embedded the video lessons into Payhip (it’s very easy to do).
So if you’re a complete beginner just use Payhip because it doesn’t have an active subscription that they charge you to sell digital products.
2. Shopify:
This platform is paid and starts at $24 a month but you can get a free trial to test it out.
Shopify is an all-in-one platform: you can do dropshipping, and sell digital and physical products, and it integrates well with everything.
It’s also made to be super simple to use for anyone even with complete zero technical knowledge.
I recommend checking out this guide on how to set up a Shopify store if you’re thinking of using this platform.
3. Podia:
Podia is also an all-in-one platform but when it comes to digital products.
You can create courses with it, do email marketing, and create a community alongside selling digital products.
You can also try it for free which will allow you to list one digital product for sale as well as draft courses and set up your website’s landing page.
However, the free plan has an 8% fee on every sale that you make so it’s it’s more than Payhip’s 5%.
If you’re planning to use the free version just use Payhip instead of Podia because of the lower fee. But you can do a lot more with Podia.
And that’s the blueprint. Create a relevant digital product for your audience, then list it on one of these websites and then recommend it within your blog to help better solve your reader’s problems.
2. Design a product that solves a painful problem
The more you give away for free the more likely the person is to buy from you.
If the free stuff that you put out there is as good as someone’s paid stuff then how good must your paid stuff be?
Just give away as much free value as you can before trying to sell anything. Don’t hold anything back.
One of the best things to sell as a blogger is a digital product that acts as a done-for-you product. Let me explain with a real example:
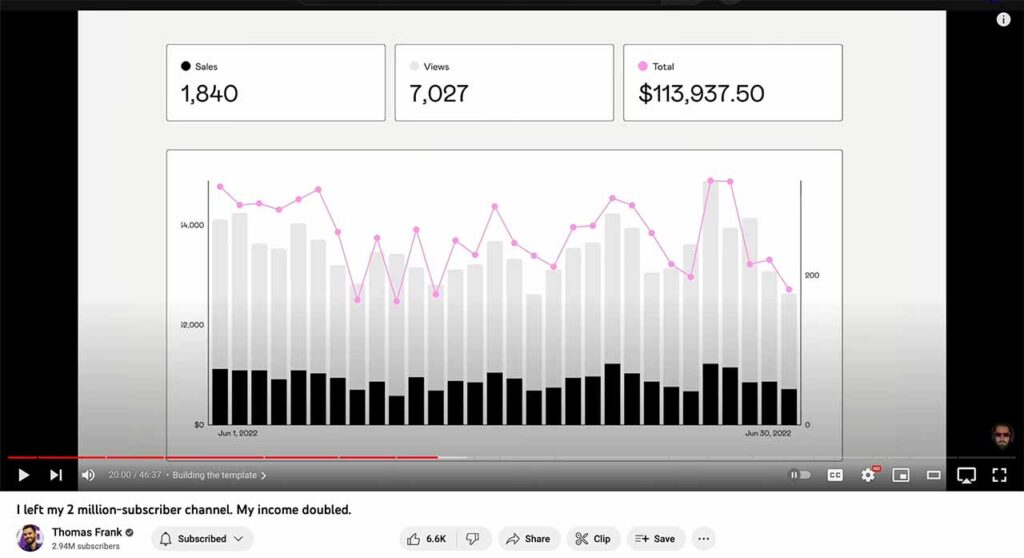
I love how Thomas Frank does it. He makes an hour-long YouTube video showcasing how to make a Notion template from scratch but then sells that Notion template as a done-for-you product so that people who don’t want to make it themselves can just get it already made for them.
And this method makes him $100,000 per month so it probably works.
3. How to make a course that sells
In terms of selling a course write 50 blog posts related to the problem that your course solves and and promote your course as a solution.
I can’t put any numbers on it but if your content and the course are good and solve a legit problem for your target customer then it would be so unreasonable for your course not to succeed and earn you passive income while you sleep.
Also, people usually don’t buy courses because of the information that’s inside them.
They pay for convenience and countability not just information.
Think about Uber.
It takes the same amount of time as a taxi but cost costs more.
So why is Uber a multi-million dollar company?
Because of convenience.
It’s just more convenient to call an Uber than a taxi you know how long it will take to arrive you know it’s here just for you and you know that it’s going to be waiting for you outside as soon as you step out the door.
For example, with my YouTube Video Course, I teach how to edit videos in Premiere Pro and also the strategy behind YouTube: how to approach it, how to make videos, and what mindset you need to have to make it unreasonable that you fail.
But guess what?
There are hundreds of free Premier Pro tutorials on YouTube. There are tons of videos about YouTube advice but it’s repetitive and not in a single place.
So do people buy this course?
Because it makes them accountable and it’s convenient. They know that all of the information that they need is in one single place and they’re more likely to follow the advice in the course because they spent money to buy it.
So don’t think if you haven’t won a Nobel prize or you haven’t invented a new chemical on the periodic table that you can’t make a course.
You can.
Also, the best way to monetize your blog is to combine all of the three monetization methods. So ads + affiliate marketing + selling your products. This is the best way to diversify your income with your blog and also the best way to make the most money possible
16. Interlink your blog posts and become an authority on a topic
Interlinking, authority on a topic, and clusters or categories within your website are very important to Google.
You must cover a topic on your website thoroughly.
For example, if you have a skydiving category inside of your blog don’t write two articles about it and then call it a day and then create a new category all about airplanes.
You want to cover skydiving thoroughly, every aspect of it.
Cover how to jump, how to prepare, what to do the day before, what’s the best parachute, what’s the best place to skydive, and everything to do with it.
And then link the pages about skydiving together.
This will probably happen naturally but as you write similar blog posts about the same category or a topic you’ll have places in your blog post where you can link to other blog posts on your website with a similar topic.
Don’t forget to do that.
Google will look at which pages on your website have the most links linking to each other which means that those blog posts are heavily related to each other.
Which then also means that you have covered a category or a topic very thoroughly and because of that, Google will give your site more authority and your blog posts will rank higher in search results.
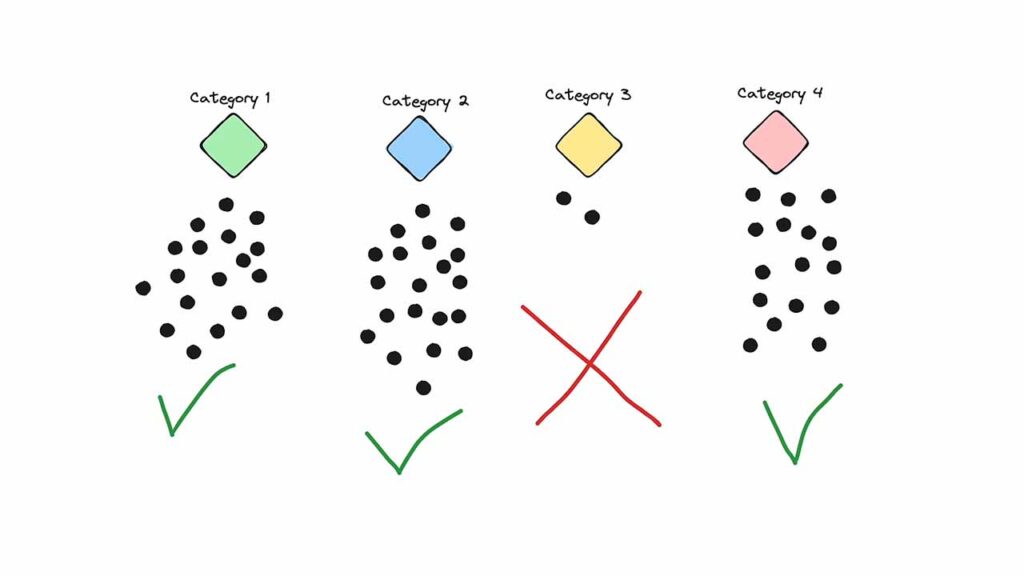
All of this means that even if a keyword doesn’t have the most traffic going to it you should still write about it if it helps fully cover the topic that you’re talking about in your blog.
Similarly, if a keyword is mega-competitive and there’s probably no chance that your blog will rank for it you should still write a blog post about it.
It doesn’t matter if it doesn’t rank right now all that matters is that you provide the best most helpful information to your readers which means covering a topic in and out without caring if it appears on Google’s first page or not.
To summarize, you want Google to see your website as an authority on a topic or multiple topics. If you write about a specific category inside of your blog post you want to cover it thoroughly. Write about everything that has to do with that category, even if that blog post will not bring you affiliate income or help sell your product. It will help boost your other blog posts that do make you money.
17. Set up a CDN (optional)
A CDN stands for content delivery network. It helps load your website faster if your visitors come from different parts of the world.
Most hosting providers will have your website on one specific server for example, in the United States or somewhere in Europe.
However, if a lot of people all around the world visit your blog post (which usually happens if you write in English), then it’s going to take longer for your website to load for those people compared to if the server of your website was closer to their location.
And this is what CDSs do.
Essentially, they have a bunch of servers all across the world and they put copies of your website inside of those servers.
So if someone’s connecting from Indonesia, they will connect to the closest possible server which will load your website faster compared to if your website was on just one server somewhere in Washington.
There’s a free CDN that I use called Cloudfare and here’s how to set it up:
1. Create a Cloudflare account
First things first, you’ll want to go to Cloudflare and then click “sign up” to create an account.
It’s going to require an email and a password.
2. Connect your website to Cloudflare
Next, you’ll be able to click “Add a website or application” and then input your domain name, and then click “Continue” -> “Next”.
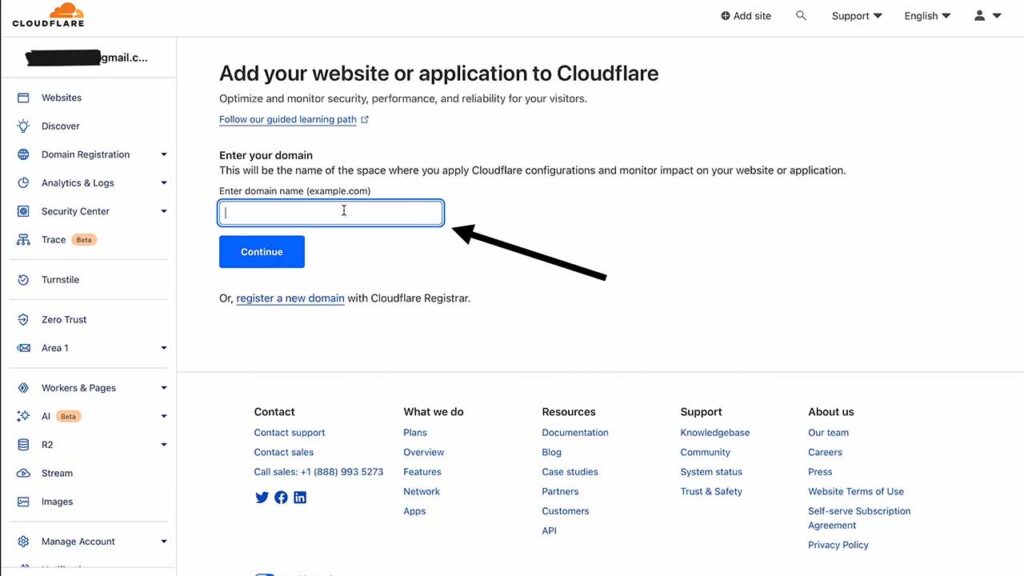
3. Choose the free pricing plan
You’ll then see that there are three pricing options available but if you scroll down you’ll see the free option.
Select the free one because it’s free and it’s more than enough, and click “Continue”.
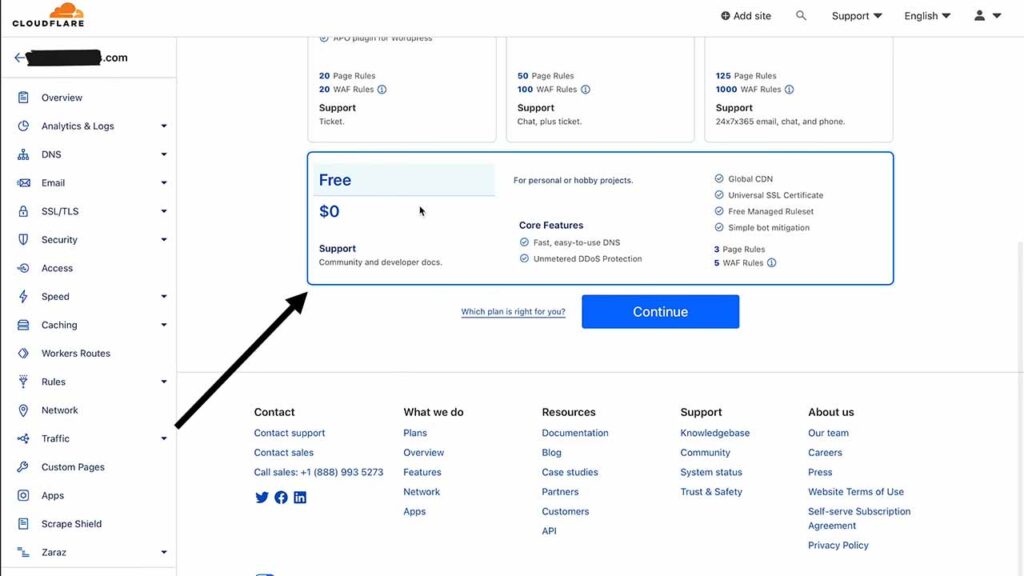
4. Point your domain's nameservers to Cloudflare
Next, you’ll have to point your domain name to Cloudflare name servers. It all sounds confusing but it’s pretty simple:
1. Go into your Hostinger account or whichever hosting provider you’re using, then next to your domain name click “manage”, and here you’ll see nameservers. Select “Change name servers” instead of “Use Hostinger nameservers”.
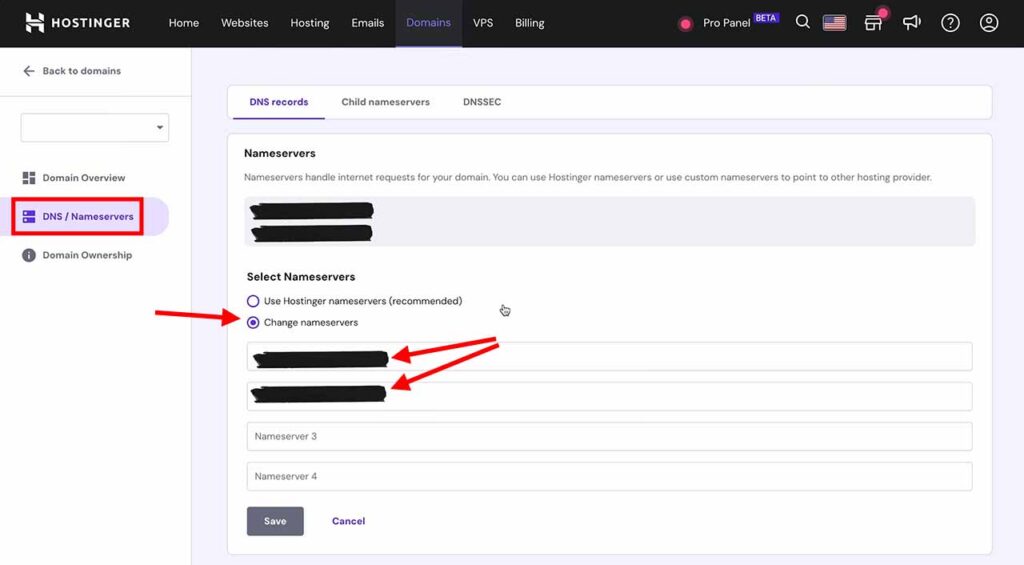
You want to change these name servers to the nameservers that Cloudflare provided.
2. Inside of nameserver 1 you’ll want to use the first one from Cloudflare and inside of the second one you’ll want to copy and paste the second one.
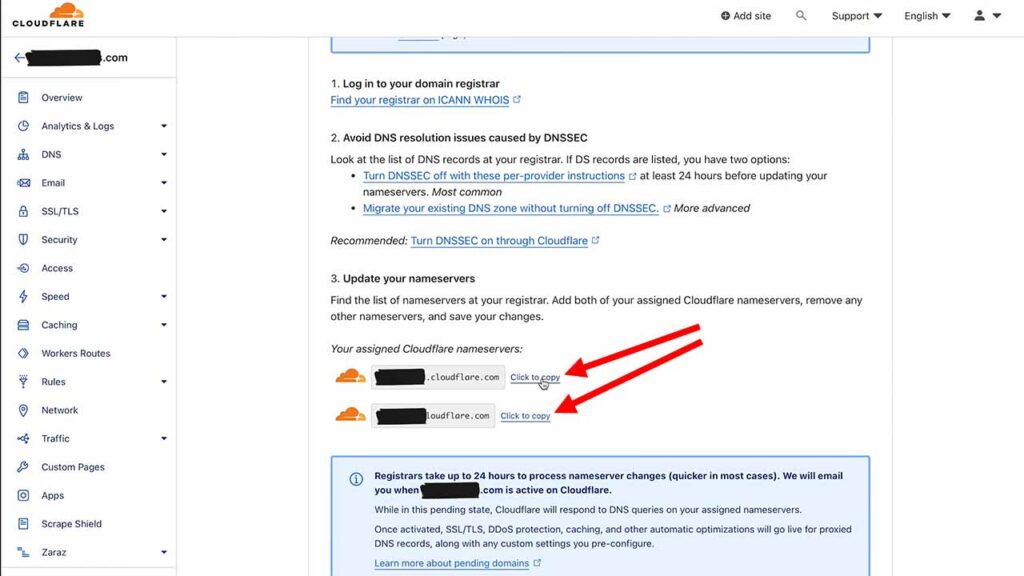
And once that’s done, click “Continue” and then click “Save”.
There are many different settings here that you can explore inside of Cloudflare but generally, the defaults work just as well.
Brief Summary
This guide was pretty long so I’ll summarize how to create a WordPress website in a few actionable steps:
1. First, you need a domain name and hosting. A domain name is your website’s address and hosting is the server where all of the files of your website live. You can get hosting and a domain through the same provider. I chose Hostinger for my website because it’s cheap.
2. Next you’ll want to go into your WordPress dashboard and install some essential plugins such as:
Yoas SEO which will help with SEO
Elementor which will replace the default WordPress content editor with a better one.
A caching plugin like Hummingbird or Lightspeed cache to help improve the speed of your website.
And a theme that works well with Elementor. I use the theme called Astra.
3. Then configure your WordPress settings so that your permalink type is set to “post name”. This is the best option for SEO and convenience.
4. Next, you’ll want to start writing blog posts.
It’s best to pick a niche or a sub-niche and then write the best possible resources about that niche for the reader.
One thing that can help us do this is to structure our blog post so it can be easily skimmable by separating content inside of our blog posts with H1, H2 and H3 headings.
5. Next we’ll want to aim for around 100 blog posts around a similar niche or category within one year. We’re also going to be adding affiliate links to our website through affiliate networks or directly from brands and also creating products such as courses to promote in our blog posts to maximize the potential earnings.
6. Speaking of monetization we’re going to write blog posts based on the keyword research that we do with Google keyword planner as well as Google itself by typing in different phrases into Google search and looking at what it suggests as well as by looking at the “people also ask” section.
Ideally, we want to aim for low competition and high search volume keywords.
7. Once we write a blog post we’re going to go into the Google search console and submit that page for indexing so that Google knows we wrote a new blog post and we want it to appear on Google search results.
And we want it to appear high.
8. That’s why we’re going to be writing the most helpful articles possible. It’s best if we have some prior experience with the things that we’re writing about but it’s not necessary because we can do research ourselves.
9. To make our blog posts even more helpful we’re going to add images that don’t take a lot of space so that our website’s pages load fast.
Our goal is to have a website that has a bunch of resources and is considered an authority on a topic.
That way Google will rank our blog posts high in search results bringing us consistent traffic and passive income.
So I hope this WordPress guide was useful and I’ll leave you with a few more similar guides that will hopefully help you make money online:
Thanks for reading 👋.