Selling your knowledge through a digital course is one of the best ways to make passive income online while also having a positive impact on the world.
Best of all, you can do it from home and with very little upfront investment.
Once your course is up and running (and if you have a passive way of driving traffic to the course page) you have to do very little maintenance to keep this business model going.
So in this article, I want to give you a step-by-step blueprint of how to make an in-demand course that (1) sells even when you’re asleep, (2) gives your students the results they desire and most importantly (3) gets you closer to living a freer and more flexible life.
P.S. If you’re looking for a quick guide to creating an online course this is not it. This is an in-depth A to Z guide and if you actually go through and apply the things you learn I guarantee you’ll create a course people will feel stupid not enrolling in. You can watch this video if you’re looking for a quick beginner’s guide.
With all that said, let’s jump in.
How To Create An Online Course Step-By-Step
Here’s the full guide on how to create a online course and make money with it.
Outline:
1. Define your customer
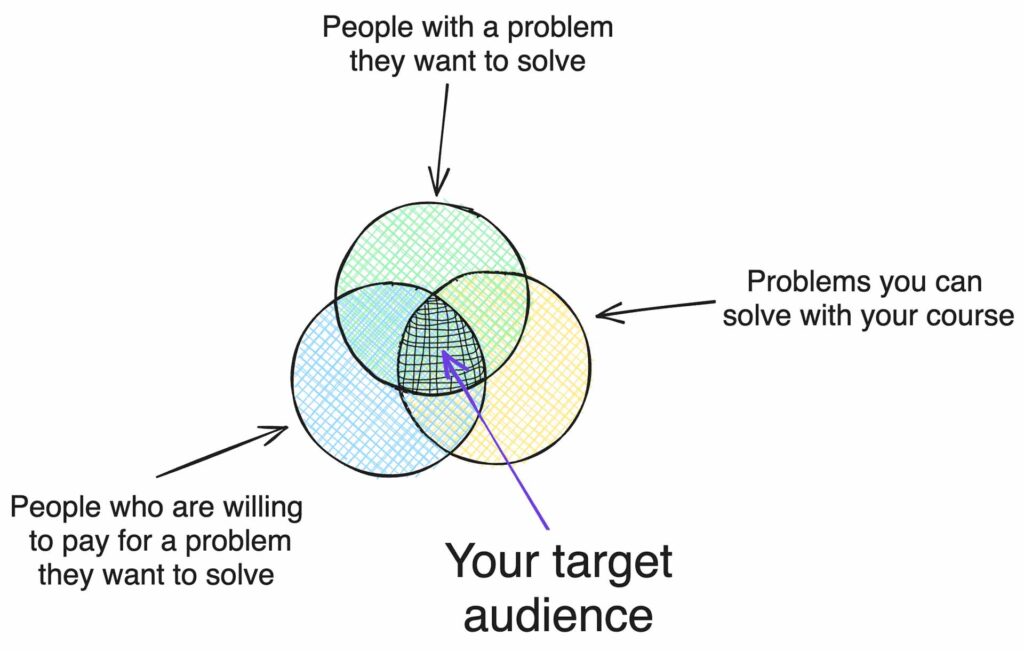
In order to create an online course that sells you need to know who are you creating this course for.
Why is that useful?
Money is an exchange of value. People pay for value. The more value you provide to the marketplace the more you’ll get in return.
But value is subjective.
A course about gardening might be a goldmine for someone who wants to know how to improve their gardening skills but it’s completely useless for someone who struggles with parenting.
That’s why defining who you’re providing value to is key.
Example:
35-40-year-old male, has kids, money, has little time. The main problem: wants to make a side income.
Example 2:
A 65-year-old woman, who lives with her husband, has a lot of time on her hands, doesn’t enjoy going out much, and loves to relax and take care of her body. The main problem: can’t find a hobby.
Those two are completely different avatars. A course about making money online would fit the person in the first example and a course about re-discovering your passion late in life would fit the second example.
Defining your customer also means that you’ll know their pain points, how to talk in their language and how to help them solve their problem best.
But you don’t have to guess who your target customer is.
For my editing course, for example, my ideal clients are me 1 year ago or me 5 years ago.
I’m serving who I used to be. Who I was before I learned the things I’m sharing in my course. You can do that too!
2. Pick a course topic
People don’t want information they want a transformation.
Instead of looking for a course idea look for a problem that you can solve.
Ask yourself these three questions:
- What problem can you help solve? (literally any small problem, anything you have overcome in the past).
- What goal or what dream can you help expedite?
- What can you create to give your target avatar a shortcut to succeed?
Niching down more lets you charge more for pretty much the same product.
Example:
Course about time management VS course about time management for b2b gardening sales reps.
One is just a generic course and another is a specific course that solves a specific problem. Therefore, people who that course is designed for are willing to spend a lot more on it. Because it’s made just for them.
Don’t assume that what you know is obvious to others.
What’s crystal clear to you might actually be groundbreaking to someone else.
It’s called the curse of knowledge, and it means that when you know something in and out, you might not realize that others have no idea what that thing even is.
But there are so many courses made by industry experts that you will never be able to compete with right?
Wrong.
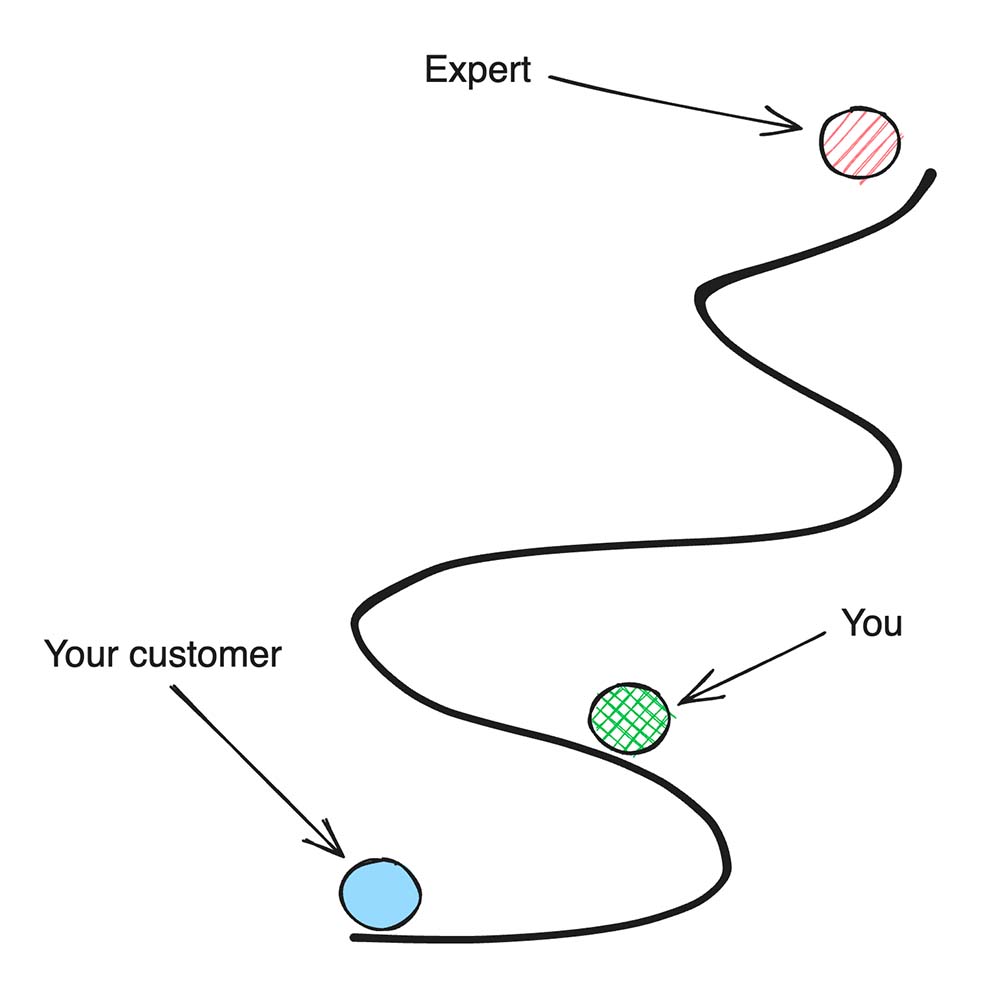
The best person to learn from is someone who’s just ahead of you. Not someone that’s 100 steps ahead of you.
That’s why a good problem to try to solve with your course is a problem that you’ve overcome in the past yourself. You don’t have to be an expert. Just a problem solver.
It’s also important to know that most of the market is occupied by beginners. And a beginner knows almost nothing about a topic.
That’s why when you’re creating your course try to explain everything thoroughly and carefully. Assume that you’re talking to a 6-year-old.
“If you can’t explain it to a six year old, you don’t understand it yourself.”― Albert Einstein
3. Pick a course platform
You don’t have to create your own e-learning website to host your course. There are so many great course platforms out there that tailor to your specific wants and needs.
Here are the best ones:
- Payhip – best for hosting your course for free (5% fee on every sale).
- Skool – best for building a community alongside your course.
- Podia – best overall (allows for selling courses, customizing their sales page, doing email marketing and creating a community as well as selling other digital products).
These are great if you want to host your course on a platform that doesn’t have an audience already built in. This means that there are no guidelines as to what your course should look like.
You can set your own pricing, and upload however many course chapters or lessons that you want.
But the hard part is that you’ll have to market your course yourself (more about that later).
Another alternative is making your course for a course platform that already has an audience hungry for courses.
There are two main players in this category – Skillshare and Udemy.
Skillshare:
- Lets you upload a course that’s as short as 10 minutes long (just like a YouTube video).
- Has strict guidelines as to what topics and quality get accepted.
- Pays teachers based on watch time.
Related: How Much Does Skillshare Pay?
Udemy:
- Minimum course length is 30 minutes.
- Guidelines are not as strict as Skillshare’s.
- You can set your own course pricing (but Udemy takes a big cut).
Skillshare and Udemy are very competitive. There are thousands of courses on these platforms fighting for customer attention.
That’s why you can choose a hybrid option.
It’s what I’ve done with my YouTube Video Course. I hosted the course on a platform that doesn’t have a built-in audience but I took a few chapters, modified them a bit, and put them on Skillshare. So my Skillshare Video Editing With Premiere Pro For Beginner YouTubers course is essentially just one module of my larger course.
That way you can capitalize on the benefits of course platforms that already have a built-in audience and enjoy the flexibility of those that don’t.
4. Test the market
Instead of creating a large super massive course create a mini-course to test if the market wants it.
It can even be added to your bigger course later as a chapter or a lesson.
Mini-courses are usually priced between $10-$100 and they cover a very niche subject of a broader topic. The typical length for a mini course is anywhere from 20 minutes to an hour.
And they’re great for testing out if your audience wants it.
The problem that most beginner course creators run into is that they make a course no one needs. It doesn’t solve a painful enough problem for the customer.
That’s why instead of investing weeks or months into a large course you can test out the waters with something that takes you an afternoon to film and a few days to edit.
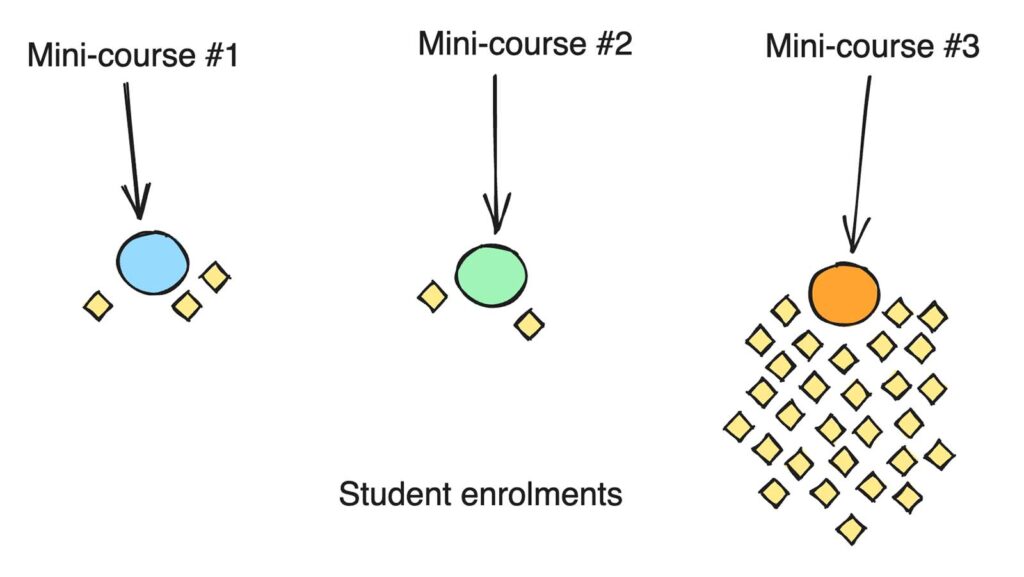
It will tell you if there’s demand and if there’s not – you can just pivot and test out the market with another topic.
One more great way to test out the market for your course is to use Udemy’s Marketplace Insights tool. All you have to do is create a Udemy instructor account (which is free) and you’ll get access to it.
The Marketplace Insights tool allows you to enter your course topic, for example, “Video Editing” and allows you to see (1) student demand (2) the number of courses that exist on that topic (3) the median monthly revenue that teachers make if they have a course that topic and (4) the top monthly revenue for the most successful courses.
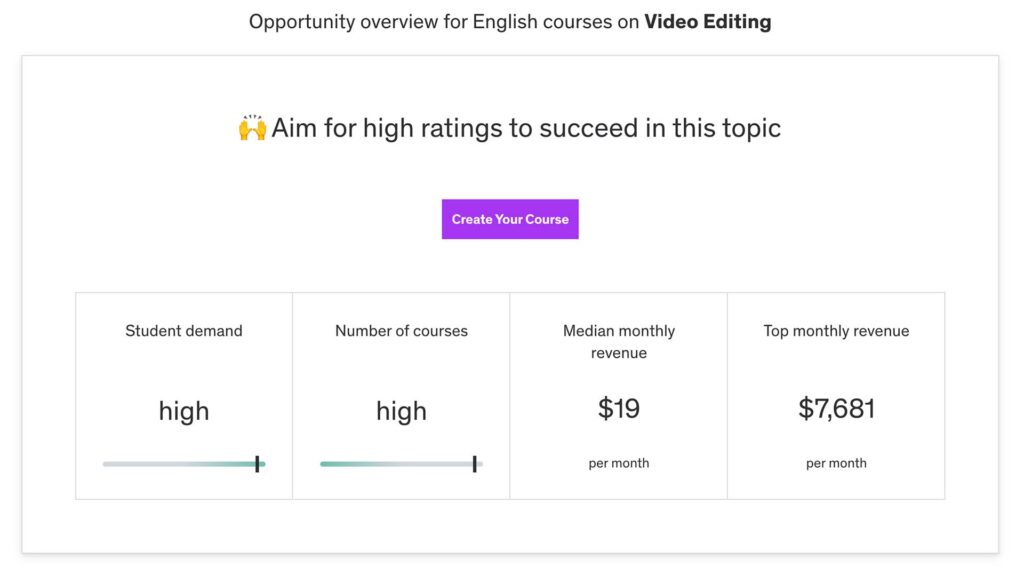
In my opinion, the most relevant column to look at is the first one – student demand.
This one indicates if your course topic can do well.
The other columns can be misleading because the Marketplace Insights tool shows stats for Udemy which is a competitive platform where there are thousands of teachers and over 10,000 courses.
Moreover, even if you make a course about a competitive topic and list it on Udemy, if it solves a problem for your target audience super well, it’s going to slowly build up and compound over time.
Even if you’re not planning to list your course on Udemy, this tool can be a great indicator of whether your course topic has high student demand or not.
5. Create a Course outline
Here’s where the actual making of the course starts.
Notice, that this step is 5th on the list and most people start with it as the first. Don’t make that mistake.
The first 4 steps set the direction of the plane and the rest fly and operate the plane.
One degree of course means that your plane will be off by a mile for every sixty miles that you travel.
Imagine that your airplane flies in a straight line from Los Angeles directly to Rome. Such a flight would take around 12 hours. But, if your airplane is pointed just 1 degree off course, after 12 hours you will land in Tunisia, Africa!
That’s why setting your direction is so important. Tiny changes in direction at the start add up to massive differences in the long run.
What I did for my YouTube Video Course outline was split it into chapters and then those chapters into lessons.
Here’s what it looks like:
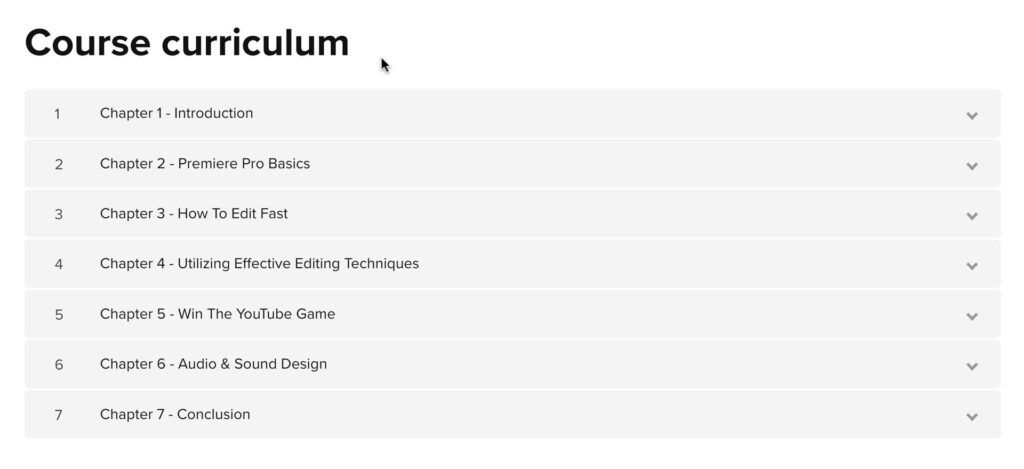
So if you’re creating a big course with many lessons it’s best to split them up into chapters.
Each chapter typically has anywhere from 3 to 20 lessons.
If you’re creating a mini-course usually there’s no need to split the lessons up into chapters because (1) the mini-course will not have that many lessons to begin with and (2) each lessons itself acts as a mini chapter.
Your full course outline could look something like this:
Course Outline Example:
1. Chapter 1 – Introduction
Introduction
Before We Start
2. Chapter 2 – Premiere Pro Basics
Creating A New Project
Anatomy Of Premiere Pro
Importing Footage & Housekeeping
Creating A Sequence
FPS – What Is It And How Much Should You Use?
Mastering The Timeline
Duplicating Clips Fast
Tools & Basic Keyboard Shortcuts
3. Chapter 3 – How To Edit Videos Fast
Mastering Ripple Delete
The Q And W Keys
Cutting Footage Fast
Setting Keyboard Shortcuts The Smart Way
All My Keyboard Shortcuts For Fast Editing
Moving Clips Inside The Timeline
Scaling Images
Chapter 4 – Utilizing Effective Editing Techniques
Masking
The Transform Effect
Colour Correction & Color Grading
Creating A Picture-In-Picture Style Video
Marking Your Footage
Chapter 5 – Win The YouTube Game
The Compounding Nature Of YouTube
Small Changes Remarkable Results
3 Qualities Of A Successful YouTuber
The Upside Of Becoming A YouTuber
Channel Growth Examples
Picking The Format
Importance Of Pacing
Storytelling
Chapter 6 – Audio & Sound Design
The Recording Environment
Optimizing How You Speak
Best Audio Export Settings For YouTube
Enhancing Audio
Balancing Audio Loudness Levels
Adding Music To Emphasise Key Points
Syncing Audio
Mastering Sound Effects
Chapter 7 – Conclusion
Conclusion
Bonus Resources
Survey
Once you have a rough outline of your course you can start creating the lessons one-by-one.
If you don’t create an outline beforehand you’ll have a lot of trouble separating what you talk about into different lessons, your lessons will be a lot longer than they need to be there will be a lot of repeated information. Which we don’t want.
It’s best to put one core idea inside of one lesson.
Not separating the course into bite-size lessons will also mean that if a student wants to rewatch a lesson, he or she will have a harder time finding it fast.
6. Make your course interactive
The best way to learn is by doing.
That’s why it’s a great practice to include some practice material or a project at the beginning of each chapter that the student can work on in the background.
It can be as simple as a bonus lesson telling the student about what to expect to learn from the current chapter as well as what to do as “practice” as he or she progresses through it.
Think of projects that your students can do while taking your course and make it as interactive and as hands-on as possible.
At the end of the day, you want to give your students the best transformation possible.
Making them put what they learn into action is one of the best ways to help them achieve the transformation that they expect to get after going through your course.
For example, if you’re making a course about video editing, and one of the chapters is about editing and enhancing audio, then you could give students an unedited version of the audio file and ask them to edit that audio with you as they go through the chapter.
7. Record your course material
Here are some tips for recording your course lessons:
- Write down bullet points or even a full script for each lesson. This will make sure you don’t ramble and get the information across in a structured way.
- Talk in simple language.
- If you’re using terminology that a beginner in the subject wouldn’t understand make sure to explain it.
- Repeat and emphasise the most important parts.
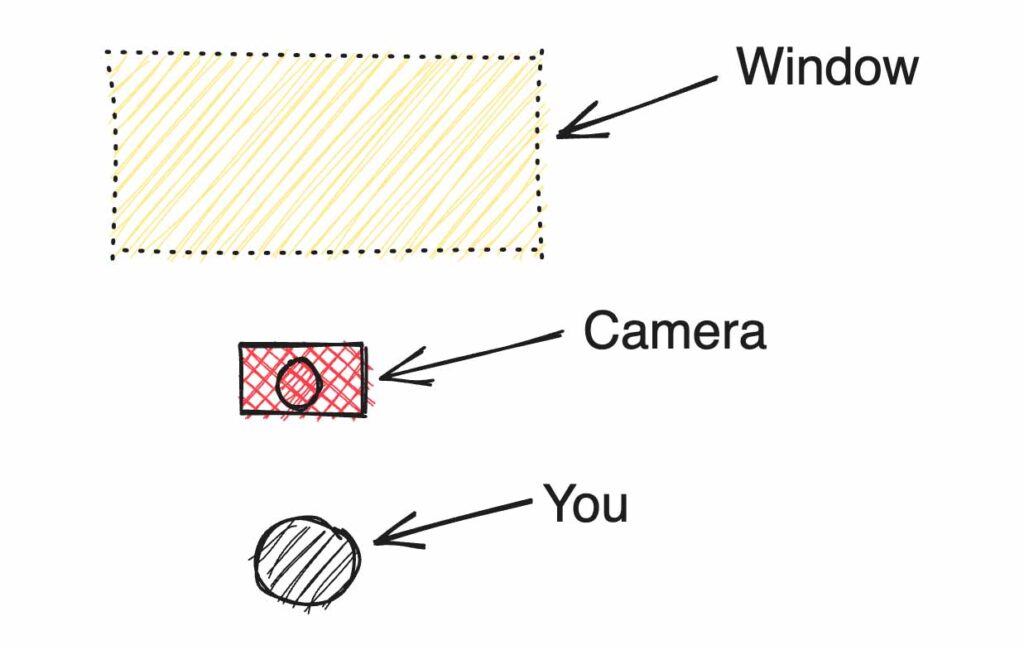
- If you’re going to record yourself not just a voiceover then make sure you’re in a well-lit environment.
- Make sure your camera doesn’t face the window (instead, you can be facing the window for great light while you record).
- Don’t stress too much about video quality, good audio quality is a lot more important.
- Talk roughly 6 inches (15 cm) away from the microphone.
- Make sure there are no noises in the background when you’re recording (if you want to learn how to record professional-sounding audio with just your iPhone I recommend checking out my voice-over mini-course on Skillshare).
- Remove distractions.
- Do it in small steps. Don’t rush. Work on the course every day. You can set a timer to act as your limit for how long you can work on the course so you don’t burn out and end up quitting the course entirely.
- Don’t be afraid to make mistakes and restart while you’re recording, we’re going to cut them out later when we edit the lessons.
- If you mess up repeat the whole sentence, not the word you messed up on (this is going to make your job easier in the editing phase).
- Don’t overthink it. You don’t need to have perfect equipment to start. I recorded most of my courses with an old iPhone 8. You can always change or re-record lessons later once the course begins to get more traction.
Related: How To Record & Edit A Voice-Over
8. Edit course lessons
Once you have all your course material recorded it is time to polish it up in the edit.
If you’ve never edited a video before don’t be scared of this step because you’ll only need to know the very basics to get it done.
The first thing you’ll need is any video editing software.
I use Premiere Pro to edit all of my YouTube videos and course lessons. I highly recommend learning it because video editing is such a great skill to have in your arsenal. You can literally have an idea pop into your head and transform that idea into video form within hours.
If you want to learn how to edit with Premiere Pro I recommend getting my editing course. It’s mainly aimed at editing videos for YouTube but 95% of it can be applied to editing courses.
Other software that you could use:
- iMovie – best free editing software for beginners who have an Apple computer.
- DaVinci Resolve – the best free advanced video editing software.
- Veed – best editing software that works in your browser
Regardless of the video editing software you chose here are the things to focus on when editing the course lessons:
- Make sure to cut out all the empty space (all the “uhs” and “umms”).
- Consider adding light background music to make the learning more enjoyable (don’t make it too loud as it can get annoying and distracting). You can license music and get stock footage for your course with Envato Elements.
- Remove all the mistakes and places where you repeat yourself or ramble too much about the same thing.
- Balance the audio so that your voice can be heard clearly.
- Make sure to export your footage in HD quality.
- Add text titles and transitions for each lesson.
- Add annotations that emphasise the most important points. You can get various professional-looking templates and presets through Motion Array.
Related: How To Learn Video Editing (Best Tools & Resources)
9. Package your course
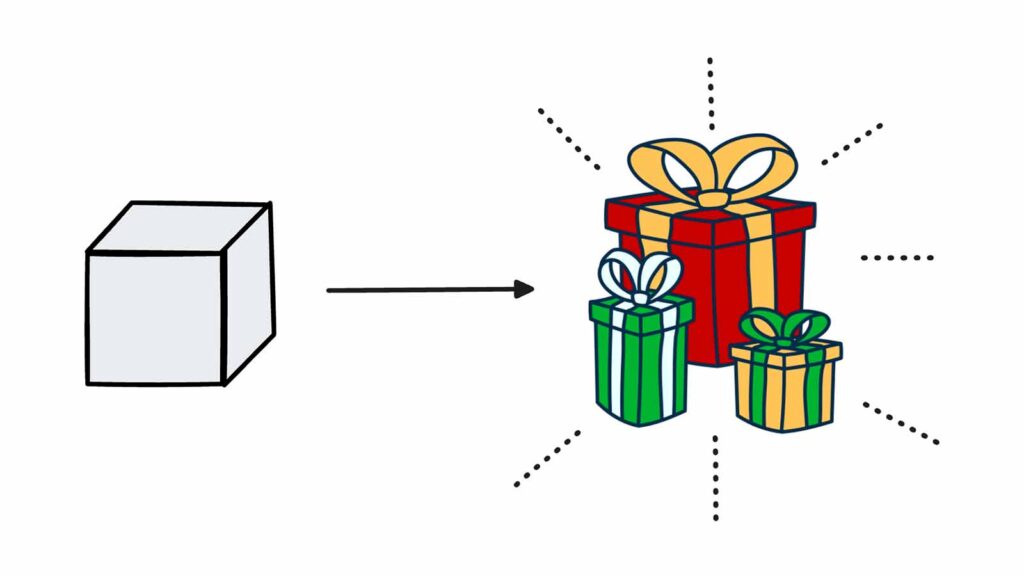
Packaging is as important as the course itself.
If the packaging isn’t welcoming your conversion rate (percentage of people who view your course and decide to enrol) is going to be terrible.
So creating a compelling landing page is a must.
Packaging also consists of optimizing your course for SEO.
SEO helps search engines such as Google, Udemy or Skillshare (that’s right, course platforms with search features have their own search engines built in) show your course to the right audience.
A well-SEO-optimized course can lead to completely passive enrolments and no extra work on the marketing side.
In fact, most popular courses on Udemy and Skillshare rely on SEO (and also on good reviews) to earn most of the revenue for the instructors.
When done well it’s so powerful.
Here are some tips for packaging your digital course well:
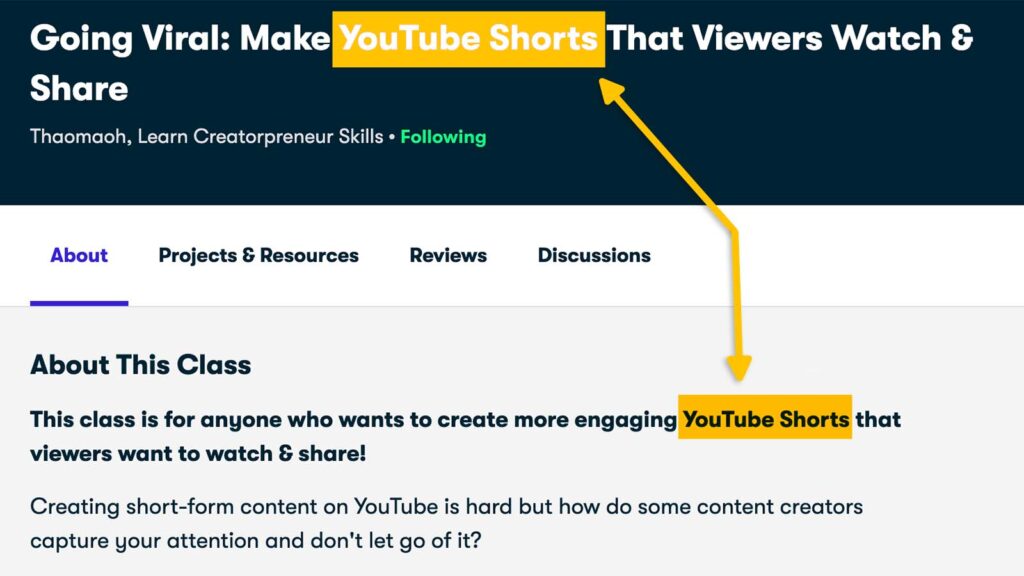
1. Include your main search keyword in the title and the first sentence of the course description
Your main search keyword is a phrase that you want people to type into a search engine to find your course i.e. a keyword that your course is centered around.
For example, a course about Photoshop basics would have “Photoshop for beginners” as their main keyword.
Here’s the title and description of my YouTube Shorts course on Skillshare:
2. Include semantic keywords in your course description
Semantic keywords are phrases that are related to your main “target” keyword.
For example, the main keyword “Photoshop for beginners”, could be semantically related to keywords like:
- Learn Photoshop
- Photo editing
- Adobe software
- Designer
- Photo manipulation
A main keyword “Create an online course”, could be semantically related to:
- Digital marketing
- Course platforms
- Online education
- E-learning
- Digital courses
3. Create a compelling thumbnail
A good course image or thumbnail should:
- Have only two or three main elements (including text)
- Have a professional feel and look
- Ideally, have your face in it (to make it more trustworthy)
- Convey clearly what your course is about and what the student should expect to learn from it
If you’re too lazy to make your course image yourself I recommend going on Fiverr and just hiring a freelancer to do it for you. There are so many great freelancers there that can create a professional-looking course banner without emptying your wallet.
Related: How To Make Clickable YouTube Thumbnails
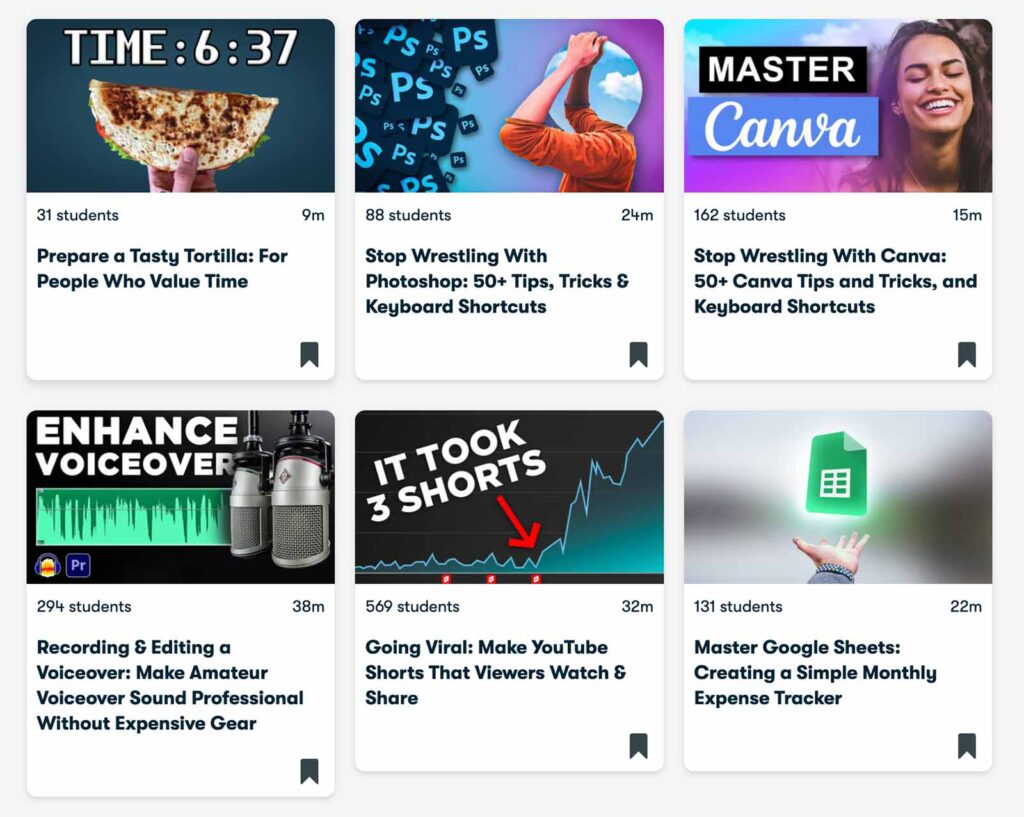
Here’s what my course thumbnails look like:
4. Create a compelling landing page
Your course landing page is a web page specifically designed for marketing or advertising your course.
You can think of it as a page that describes your course and what the student is going to get if he or she decides to enrol.
Most course creation platforms such as Podia allow you to create fully custom, professional-looking landing pages for your course.
Here are some things a compelling landing page has:
- Professional, uncluttered design
- Easy navigation
- A clear call-to-action (for example a button that says “Enrol” at the top and at the bottom of the page)
- Compelling copy that clearly communicates the problems that the course will solve for a potential student
- Testimonials, reviews and proof that the course has solved those problems for other students in the past
- Clearly communicates who you are and why they should listen to you
- A pricing structure that’s easy to find
5.List all the benefits for the student on the landing page
In order to list benefits well you have to identify problems first.
Think about what happens before and after customers purchase your course. Think in as much detail as possible.
This is very important. The more problems you can think of the more problems you get to solve.
Then, transform problems into solutions and name the solutions.
Example #1:
Making YouTube Shorts takes a long time -> You’ll make 10x the amount of Shorts in the same time that it takes you to make 1.
Example #2:
My YouTube Shorts aren’t getting any views -> You’ll create YouTube Shorts that each viewer watches 3 times and can’t wait to share with their friend.
When writing copy for your landing page frame benefits in terms of status gained from the viewpoint of others.
People want to increase their perceived status relative to other people.
Status can be money, beauty, being a better mom, anything.
Example:
“If you buy this gold club your drive will increase by 40 yards. Your buddies’ jaws will drop when they see your ball sore 40 yards past theirs. They’ll ask what changed, only you will know.”
When creating the landing page focus on the problem or the obstacle that your course will help overcome rather than what kind of information a student is going to learn.
For instance, if your course is teaching video editing instead of saying that someone will learn how to edit videos tell them what video editing can bring to their lives.
It could be finally reaching a flat retention curve on YouTube videos, having the freedom and flexibility to work from anywhere in the world, setting your own work hours, or the ability to instantly transform ideas that pop into their head into video form.
Focus on the transformation, not the information.
6. Include bonuses + proof that your course will deliver the transformation a student wants
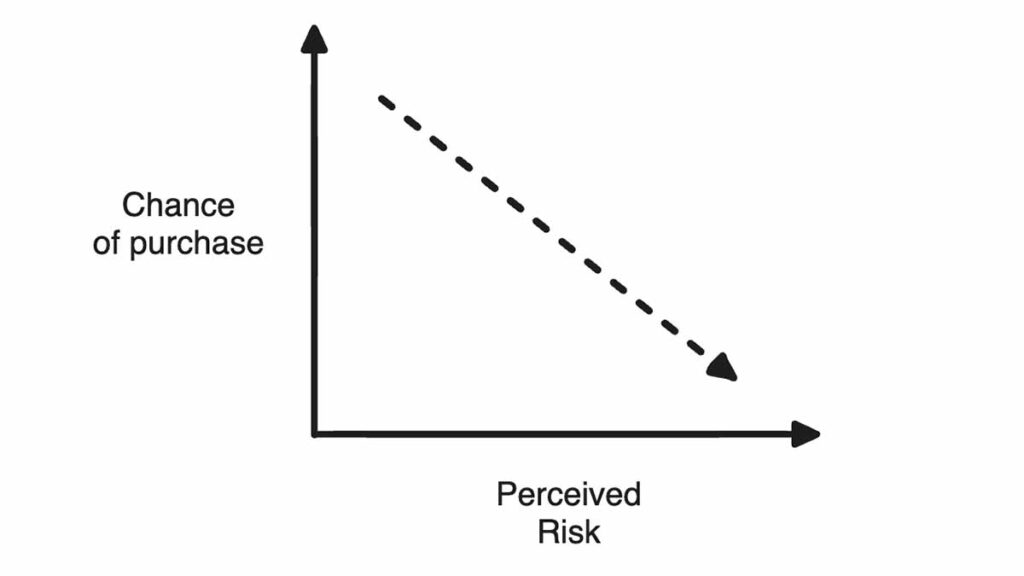
People value certainty.
They want their perceived likelihood of achievement to be high.
Risk is the main factor why people don’t buy, they don’t trust that the product you’re selling will give them guaranteed results. The goal is to eliminate risk for them.
You will pay more for a surgeon who did 10,000 surgeries than the one who did 0.
We need to communicate a 100% likelihood of achievement through past results, messaging, proof, and what we choose to include or exclude in our course offer and guarantees.
By the way, I’m taking some of these ideas from a brilliant book called $100M Offers by Alex Hormozi. It goes over how to create an offer people feel stupid saying no. This book is a perfect read before designing your course offer and landing page.
If you have any testimonials from people you’ve taught before make sure to add them to the landing page.
Money-back guarantees work as well. You can say something like this:
“If at any time you’re not satisfied with the level of service that you’re getting from me you can request a refund at any time for the program.”
10. Price your course
Don’t underprice your course.
Cheap is still expensive for someone. Even though your course is cheap in your eyes, it’s still going to feel expensive for someone else, and they will expect a lot more from it that you won’t be able to deliver.
These customers will also refer to your business by saying “It’s cheap”, not “It’s amazing value”, and amazing value is what you’re aiming for.
But what if people can already find the information you share in your course for free on the internet?
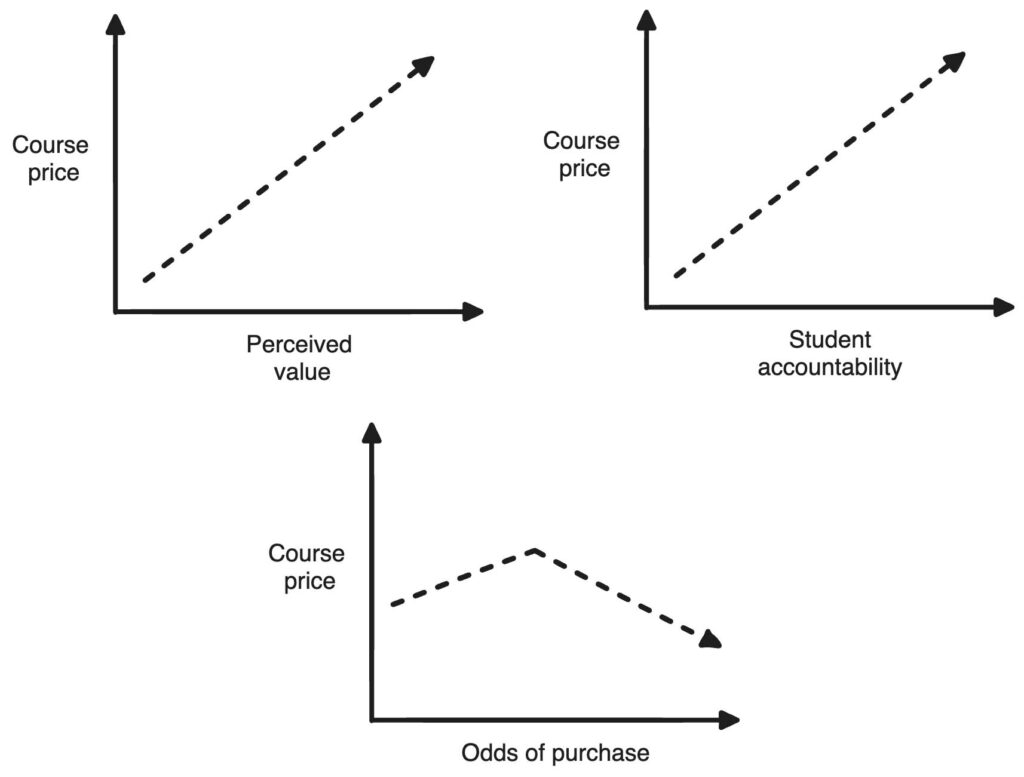
People pay for convenience and accountability not for just information. Convenience and accountability help them achieve the transformation they want best.
Think of Uber, it takes the same amount of time as a Taxi but costs more.
So why is Uber a multi-billion dollar company?
Because of convenience.
It’s just more convenient to call an Uber than a Taxi. You know how long it will take to arrive, you know it’s here just for you and you know that it’s going to be waiting for you outside as soon as you step out the door.
In certain scenarios, charging more is more helpful for the customer.
Let me explain.
Imagine you’re buying an exercise plan. If you spend $10 on it the likelihood of you following through and doing what’s in the plan for a long enough time that you’ll be able to see results is quite low. After all, if you don’t follow through all you lose is $10.
Now think of what would happen with your motivation to follow through on the exercise plan if it were to cost $1997.
I bet you’d follow it rigorously.
Paying more for it would create more accountability (even if the actual plan stays the same) because if you don’t do what the exercise plan says you’d lose a lot of money for no reason.
It’s the same with a course.
When people pay more they pay more attention. And that’s beneficial both for you and the customer because:
a) you make more money and
b) the customer is more likely to solve the problem that they are buying the course for.
Charging more for a course is a win-win.
Moreover, it’s the same stress level fighting for cheap students and for expensive ones. So why not fight for the expensive ones?
Generally, I would not recommend charging less than $50 for a course of any length. In fact, don’t price your course based on length. If you really want to price it low then go for something like $199 or more.
11. Launch your course
Once you have a clean, compelling landing page, your pricing figured out, and all the lessons recorded and uploaded it’s time to launch!
If you already have a social media following or an email list (if you don’t, don’t worry we’ll go over how to market the course in the next step) make sure to share it with them.
Once of the best ways to get initial traction for your course is to list a part of it (one chapter for example) as a mini-course on course platforms that already have an audience looking for courses (such as Skillshare or Udemy).
In the mini-course description or in the last lesson you could mention that this mini-course is a part of a bigger course and if a student is interested in deepening their knowledge further it could be a great funnel for your full course.
12. Market your course
There are two ways to market and sell your course: the passive way (the one I prefer and would recommend) and the active way.
The active way involves finding places where people with a problem that your course solves hang out and reaching out to them.
It can be Reddit, different forums, YouTube channels, Facebook groups, social events, etc..
But this takes a lot of time and once you stop the sales stop rolling in.
A much better method is passive marketing.
The passive way to market your course is to leverage the internet and its algorithms, i.e. creating content around the problem that your course can solve.
The best places to do that are YouTube and your own website (blog).
Making YouTube videos is a clear winner here because blog posts take a while to rank on Google (usually around 8-12 months) and start bringing you course students in a passive way. Whereas good YouTube videos can be pushed out to a large audience by the algorithm in days or even hours.
I do both. I have a YouTube channel where I occasionally mention my YouTube Video Course (speaking of which, if you want to learn how to make YouTube videos and grow a channel from scratch I would highly recommend checking it out), and the very blog that you’re reading right now where I also promote my courses.
What’s even better is that YouTube videos and blog posts have a very long shelf life. You make them once and they can bring in clients for years to come.
Yes, it does take a while to make a good video or write a blog post but it’s so worth it.
Make 50 YouTube videos or write 50 blog posts related to the problem that your course solves, and promote your course as a solution and I guarantee your life will change. I can’t put any numbers on it, but if your content and the course are good and actually solve a legit problem for your target customer then it would be so unreasonable for your course not to succeed and earn you passive income while you sleep.
With all that said, I’ll leave you with a few killer resources that I’ve put together about
(1) How to promote your course passively:
(2) How to create a blog to promote your course:
- Best Website Hosting For WordPress Blogs
- How To Make A Website (With 0 Coding)
- 11 Best Blogging Tools You’ll Actually Want To Use
(3) How to create a YouTube channel to promote your course:
- How To Build A Successful YouTube Channel
- Top 5 Best Video Editing Courses Online
- How To Grow A Faceless YouTube Channel – Notion Template
Thanks for reading 👋.