You DO NOT NEED expensive gear to record professional-looking lessons for your online course.
In fact, sometimes a too-polished video course can harm your student success because it makes you less relatable to the person you’re teaching. Which makes it harder for them to listen to you and achieve the transformation that they want from your course.
So here’s how to record videos for any course type:
What gear do you need to record Video for your online course at home?
If you’re not planning to show your face then you already have all the equipment you’ll need to record online classes.
The most important part is the audio. Not the video.
Students will sit through low-quality video but if your audio is bad no one will want to take your course.
So here’s the gear you want to have in order to record a professional online course at home:
1. Microphone
As I’ve said before audio is a lot more important than video.
You want your voice to sound as clear and as crisp as possible.
In terms of the microphone, there are a few options:
- Use your Phone’s built-in microphone (it’s free but not the best option if you’re also recording video of yourself talking since the mic will be far away from your mouth)
- Use a condenser microphone (the best option but a little more expensive)
- Use a Lavalier microphone (one that can be attached to your shirt)
You can achieve a 95% good-sounding voiceover by just using your iPhone’s mic but you have to know how to speak to it correctly and how to set up your recording environment so that the audio ends up sounding as professional as possible.
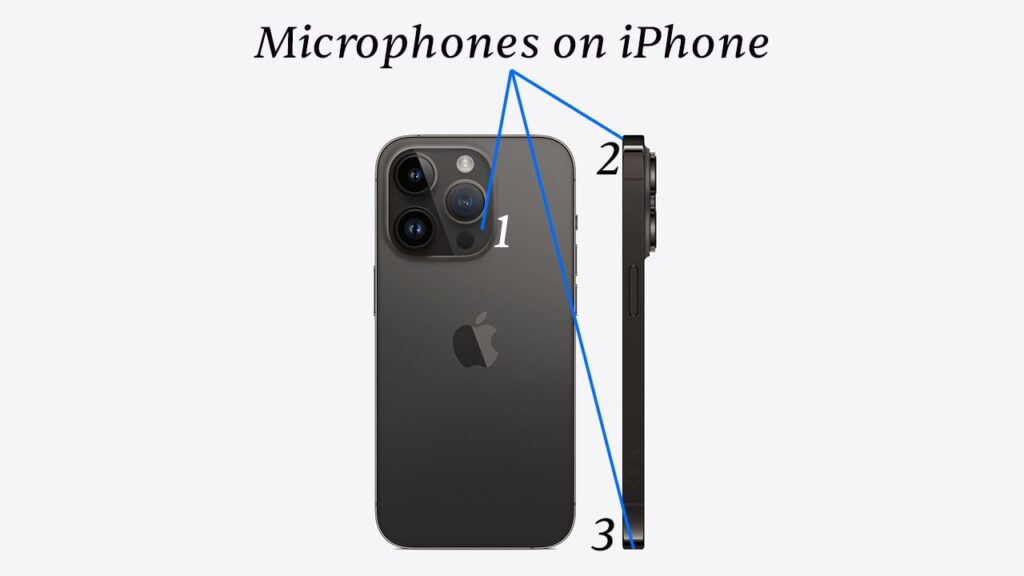
Here’s how to do it:
- Make sure you’re recording in a quiet environment. Turn off the AC, make sure no one is talking in the background, and that there are no dogs barking or loud clocks ticking.
- Make sure there’s no reverb. An easy hack to do this is to surround yourself with a few pillows or blankets and close the curtains.
- Speak roughly 15 centimetres or 6 inches away from the microphone. That’s the distance between the end of your thumb and your pinky finger.
- Smile when you speak. This will not only make you sound more confident but also increase your overall voiceover energy level as well as make your voiceover enjoyable and pleasant to listen to.
These are just a few basics that can make a huge difference in how your course audio sounds.
I recorded more than 300 voice-overs both for my online courses and for my YouTube channel.
And I did it all with just a built-in laptop microphone.
I’ve also had numerous people commenting about how crisp my voice sounds in my YouTube videos (I especially love the first one):
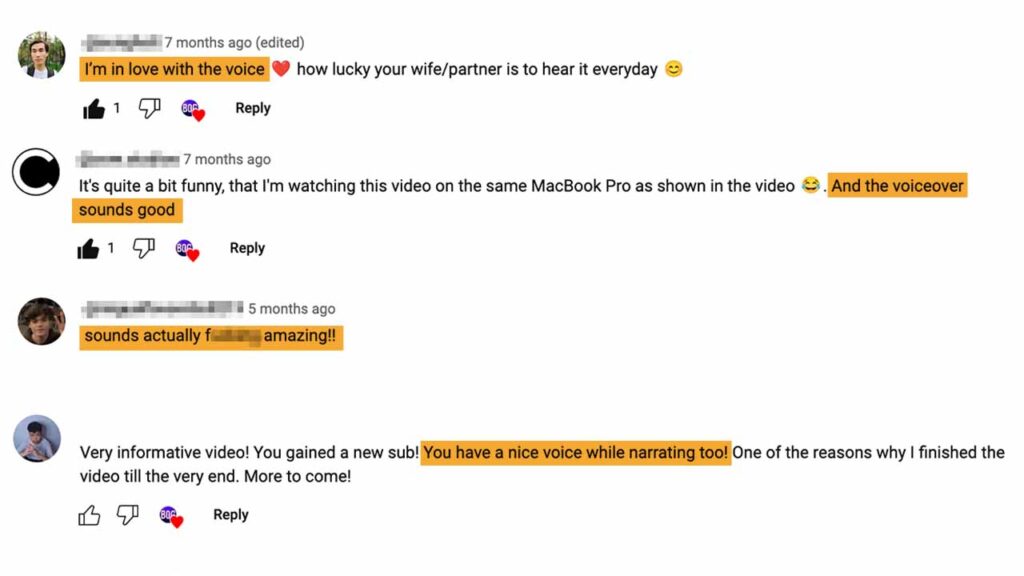
That’s why I decided to make a short 30-minute course about how I do it and put it on Skillshare (which means you can take it for free with their 30-day trial).
As a result of taking it, students will be able to record studio-quality voice-overs with just their Phones in their bedroom as well as learn to enhance their voiceovers in post-production all while saving hundreds of dollars on expensive audio gear.
You can enrol in the voice-over course here.
2. Screen recording software
Most online courses use some sort of screen recording or slides in the course material (you can create slides for free with Google Slides).
That’s because it’s the easiest method to get the information across to your students.
I use CleanShot X to do all of the screen recording for my online courses.
It’s hands down the best screen recording software for Mac.
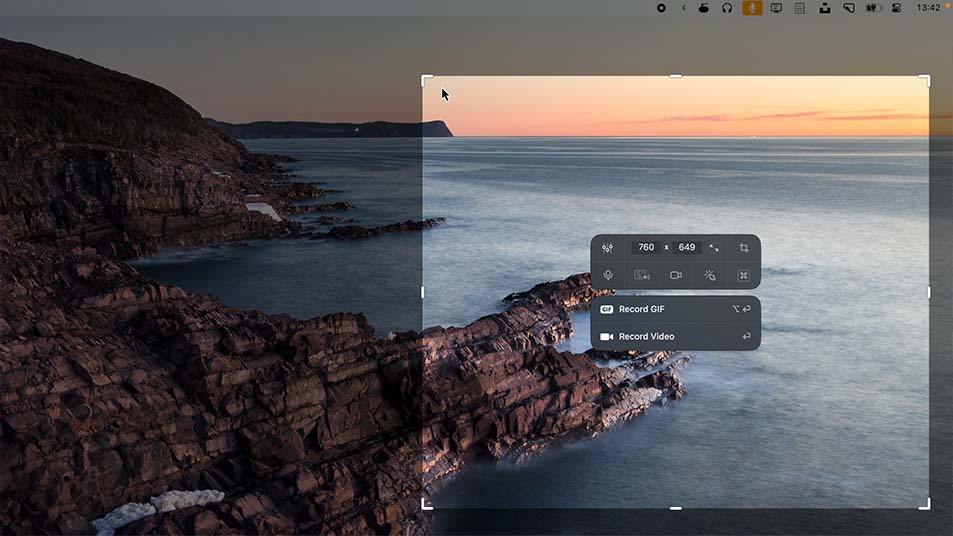
However, it’s not free and it’s Mac only.
The best free screen recording tool is OBS. It’s an open-source tool that you can download for Windows, Mac, and Linux to record your screen.
OBS may seem quite complicated at first but once you watch a few YouTube tutorials on how to use it, it becomes child’s play.
Windows and Mac also have screen recorders built into the OS. On Windows, it’s called the snipping tool (you can use it with WINDOWS KEY + SHIFT + S keyboard shortcut) and on Mac, it’s called QuickTime (you can use it with COMMAND + SHIFT + 5 keyboard shortcut).
Both of these will let you record your screen as well.
3. Your Phone
This one is optional.
If you’re not going to be showing your face in your course lessons then you may not even need to record anything with your phone.
But if you still haven’t decided whether you want to record yourself or not just know that there are a few benefits of showing your face:
- Students will trust you more.
- It will help your students relate to you better.
- It will boost engagement. Seeing your face along with slides is a lot more engaging than just seeing slides. Showing your face will make it more likely that the student will finish your course and achieve the transformation they came to get.
Most people think that the camera they use is the most important thing that keeps them from recording a professional-looking video.
But it’s not the camera, it’s the lightning.
Most of us have a great camera inside of our pockets.
It’s just not used well.
Most people record in a dark place, right in front of a window or in front of a messy background.
This brings me to the next section:
How to record videos for online course with your phone
1. face your camera away from the window
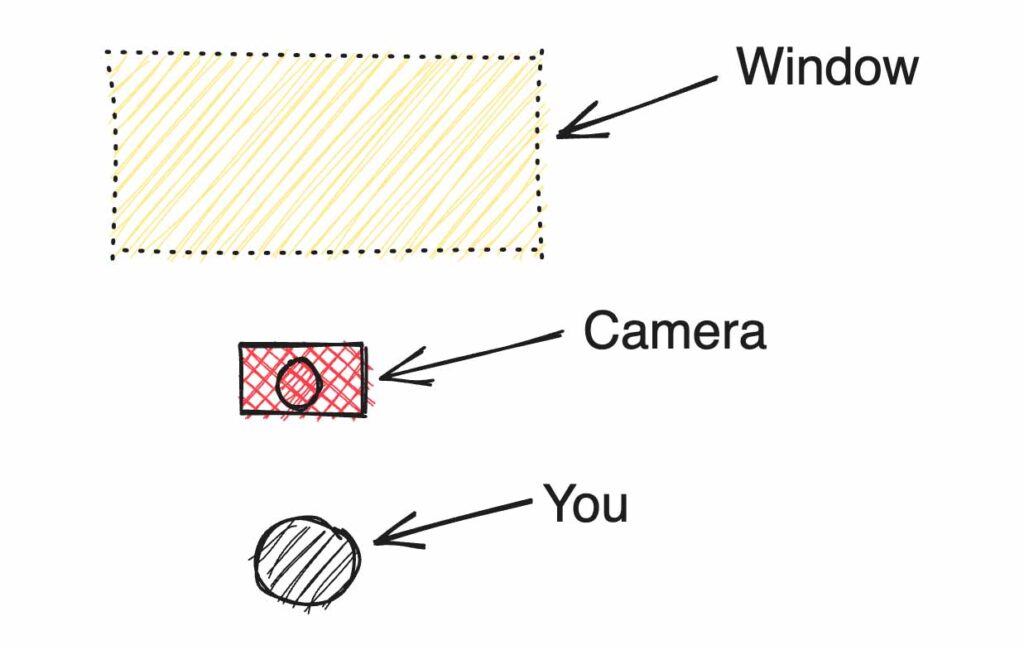
If you face your camera towards the window it will have a hard time capturing the bright part of the shot (the window) and the dark part (your room) at the same time.
And if you set up your camera with the window in the background the natural light coming from it will nicely illuminate you.
This will make your shot look professional without having to buy artificial camera lights.
2. Use the optimal camera settings
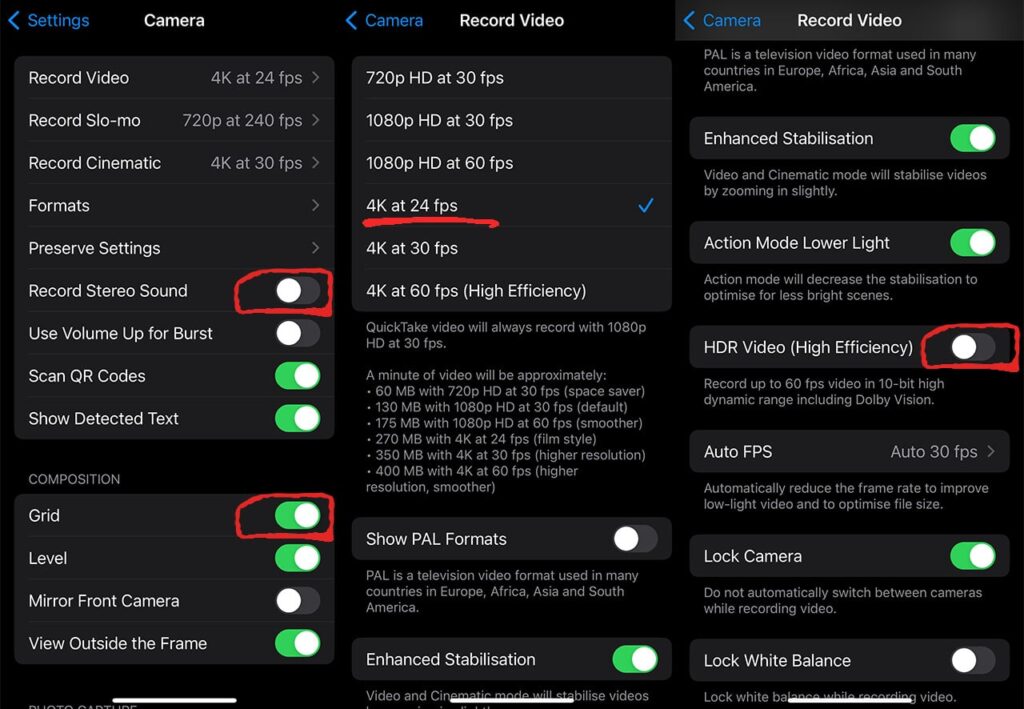
Here are the best camera settings to use if you’re recording your course with an iPhone (these settings also exist for Android phones but they’ll have slightly different names and hide under different setting menus):
- Set your camera to record at 4k resolution and 24 fps (frames per second). This is the highest resolution that your phone will be able to record (which will look the sharpest). The 24 frames per second is the frame rate that most movies use which means that most people’s eyes are used to 24 fps and it’s perceived to be the highest quality.
- Disable HDR Video if you’re recording your course on an iPhone. If you have it enabled it can screw up the colors of your recording when you’re trying to edit your course lessons.
- Disable stereo sound. This will make it easier to enhance the audio in post-production since all of your audio will be on one audio channel.
- Enable grid. The grid will help you position yourself in the centre of the frame (more about that in the next step).
3. position yourself head in middle top of the frame
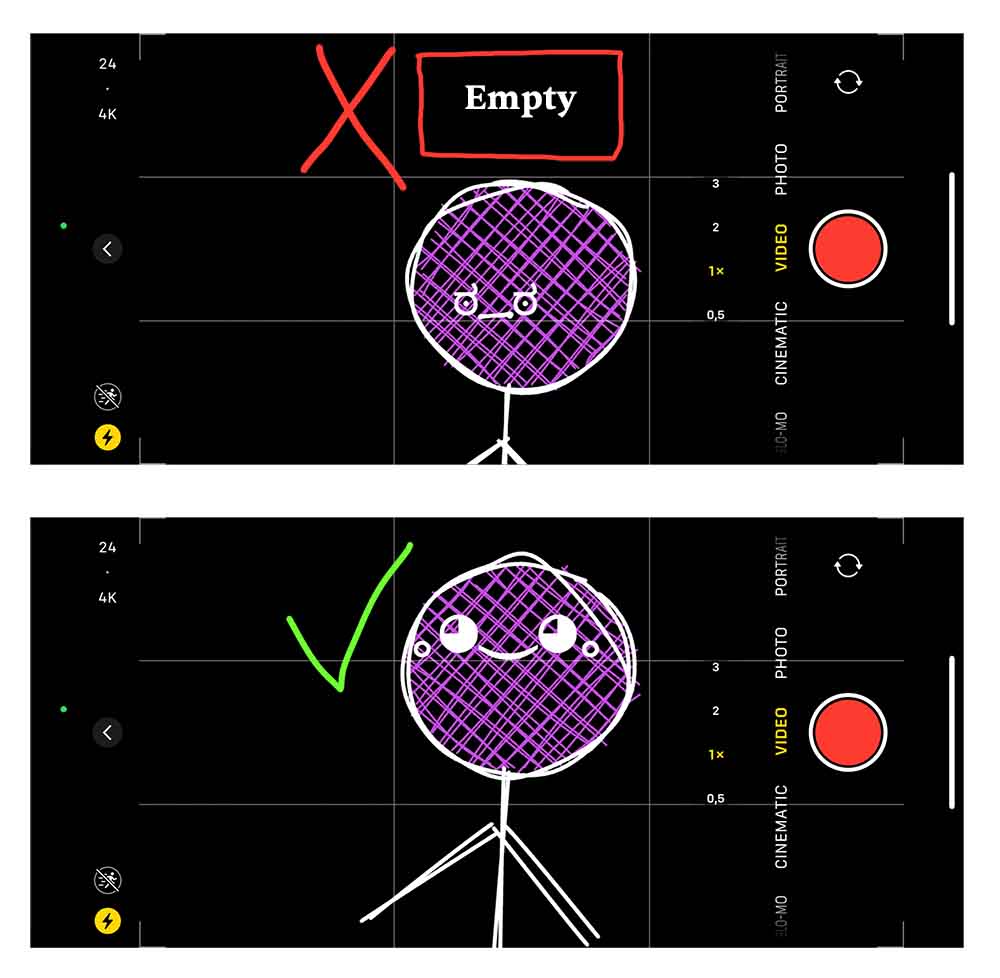
Position your head in a way that the top of your hair is slightly touching the top of the frame.
Most people think if you position your head in the dead centre of the camera frame it will look the best.
But that makes you look small and hesitant.
It also leaves a lot of wasted empty space since there’s nothing important above your head that the viewer should be seeing.
You want your torso to be in the centre of the frame and your nose to be on the top grid line.
4. Clean your camera lense
One of my friends kept telling me that his relatively new phone was outdated and that he needed a new one because the camera was horrible.
He told me he tried tweaking all the settings and was already eyeing a new phone because he couldn’t figure out how to fix the “bad camera”.
What he didn’t realise was that his phone’s camera was perfectly fine but the lens was dirty.
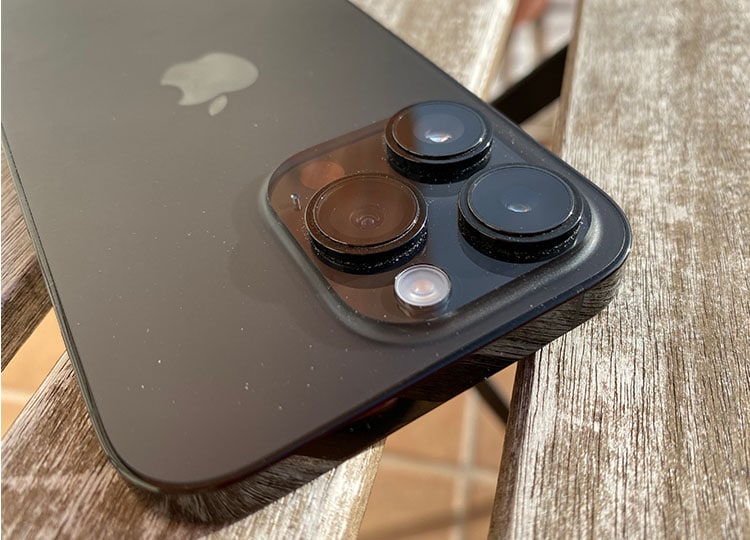
Your phone probably spends most of its time in your pocket where there’s a lot of lint or in your hand where there are numerous things on your fingers that can make the camera dirty.
So before you film anything, take a microfiber cloth and clean your camera.
You’ll be surprised how much the video quality improves.
5. Record audio separately
If you’re recording your online course lessons with a phone, chances are that it’s far away from you.
That means it will not capture good enough audio.
And good audio quality is a lot more important than good video quality when it comes to courses.
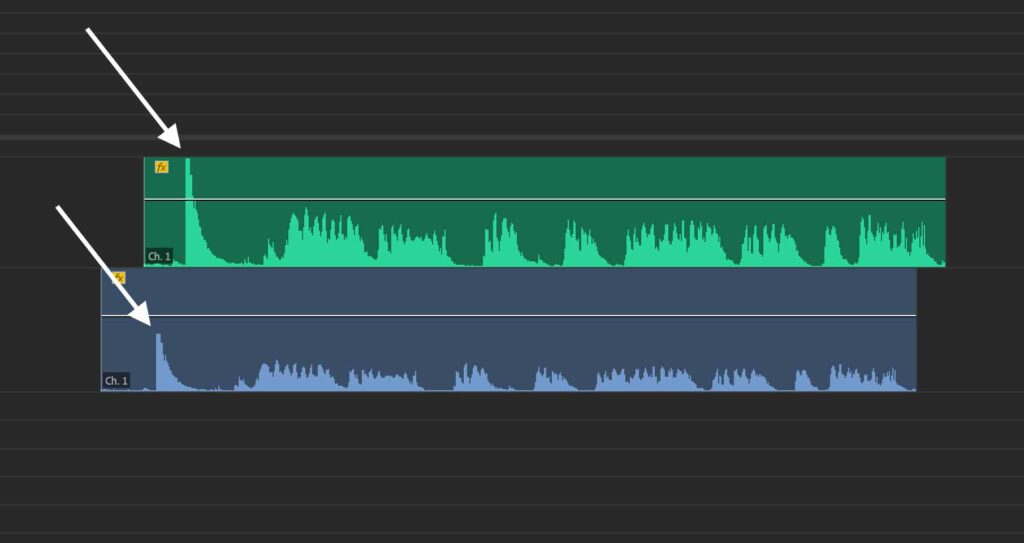
The solution would be to record audio separately and then sync the video and audio inside your editing software.
One easy way to sync audio is to clap before you start recording.
You’ll then be able to see a spike in your audio waveform and be able to align it to the video footage of your phone.
P.S. If you want to learn how to edit videos in Premiere Pro I recommend checking out my YouTube Video Course.
As a result of taking it, students will be able to edit studio-quality YouTube videos (which obviously applies to courses as well) at home in their bedroom without having to show their faces and while saving hundreds of dollars on expensive studio gear.
How to record an Online course
Here are some tips to help you record a professional-looking online course from the comfort of your home:
1. Pick your course format
There are five main course formats:
- Slides
- Screen share
- Talking-head
- Whiteboard
- Live video
The easiest format (and the one that most online courses use) is slides.
However, for most of my online courses, I prefer screen share.
For a slides course format, all you need are slides (which I’ll tell you how to prepare in the next step), a way to record them and a microphone to which you’ll do the voiceover.
You’ll see a lot of course creators combine multiple formats together to create a more immersive learning experience.
For example, you can combine a talking-head format with slides by putting a recording of yourself in the corner of the slides (this format is called picture-in-picture).
The format also depends on your course material. If you’re doing instructional jiu-jitsu or yoga videos then the best format for that is live video since you probably want to demonstrate the techniques on camera.
If you’re making a course about video editing, then the best format is screen share since you’ll be able to show students what it is that you’re doing and how to use editing software.
A whiteboard format is similar to slides but the only difference is that you’re creating the slides live by drawing on a whiteboard or on an iPad.
So when picking a format for your course think of what’s the best medium for a student to intake the information you’re trying to teach. A live video format might be great for a workout course but not so great for an animation course that requires a lot of screen share. You can also combine multiple formats together.
2. Prepare slides or main talking points
A good general rule to follow is:
1 idea – 1 slide.
1 bullet point – 1 lesson.
In order to create slides for your course lessons you’ll want to write out an outline of your course.
Having an outline in mind will make it a lot easier to prepare slides for each lesson as well as add structure so that similar topics aren’t scattered across different parts of your course and that you don’t repeat the same information.
Don’t be afraid to make a lot of slides.
Instead of talking about 7 different things on one slide make it so that each thing that you talk about has its own slide.
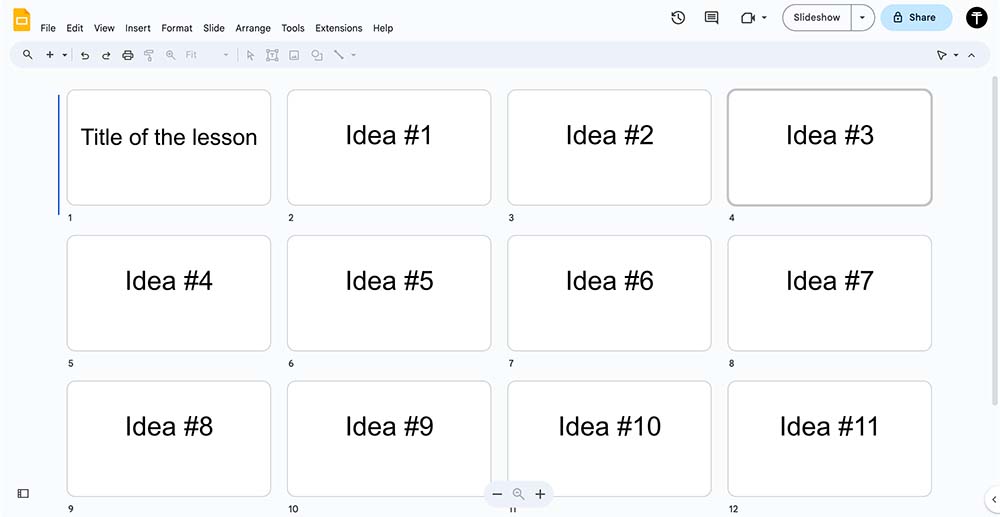
This will make it a lot easier for your students to associate the slide with a thing that you’re talking about as well as remember the information easier because they will have associated a new slide with each new idea.
Having 1 slide for 1 idea also makes it easier for the student to scrub back your video lessons and find the exact place that they want to re-watch.
But make them simple.
There’s no need to have the fanciest slides in the world.
Focus on the quality of information that that slide helps communicate to the student rather than how good it looks.
3. Record the course
If you’re just recording slides without showing yourself on camera you can use QuickTime (it’s free and already installed into MacOS) or a screen recorder for Mac called CleanShot X.
Great alternatives for Windows operating systems are OBS (free) and Riverside (paid but simpler to use directly from your browser).
If you’re doing a screen share instead of slides keep in mind that the student might be watching on a small screen or without maximizing their video player.
That’s why it’s important to make your screen recordings high-quality and to make sure all the elements are nice and big.
You can achieve this by:
(a) Zooming into your browser with “CTRL +” or “COMMAND +” keyboard shorcuts.
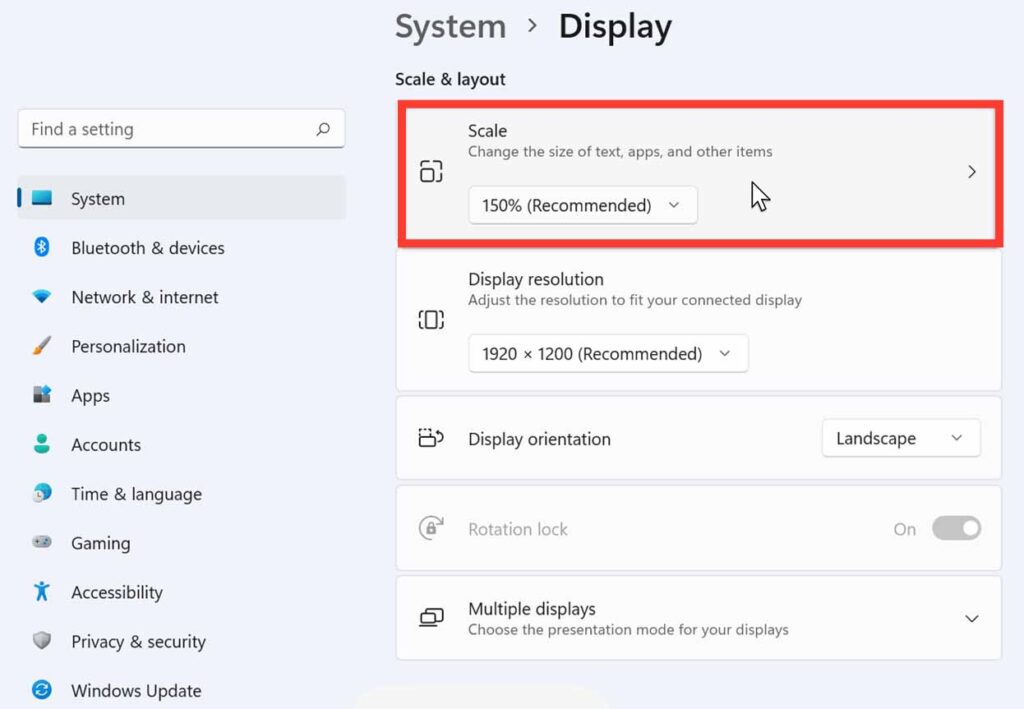
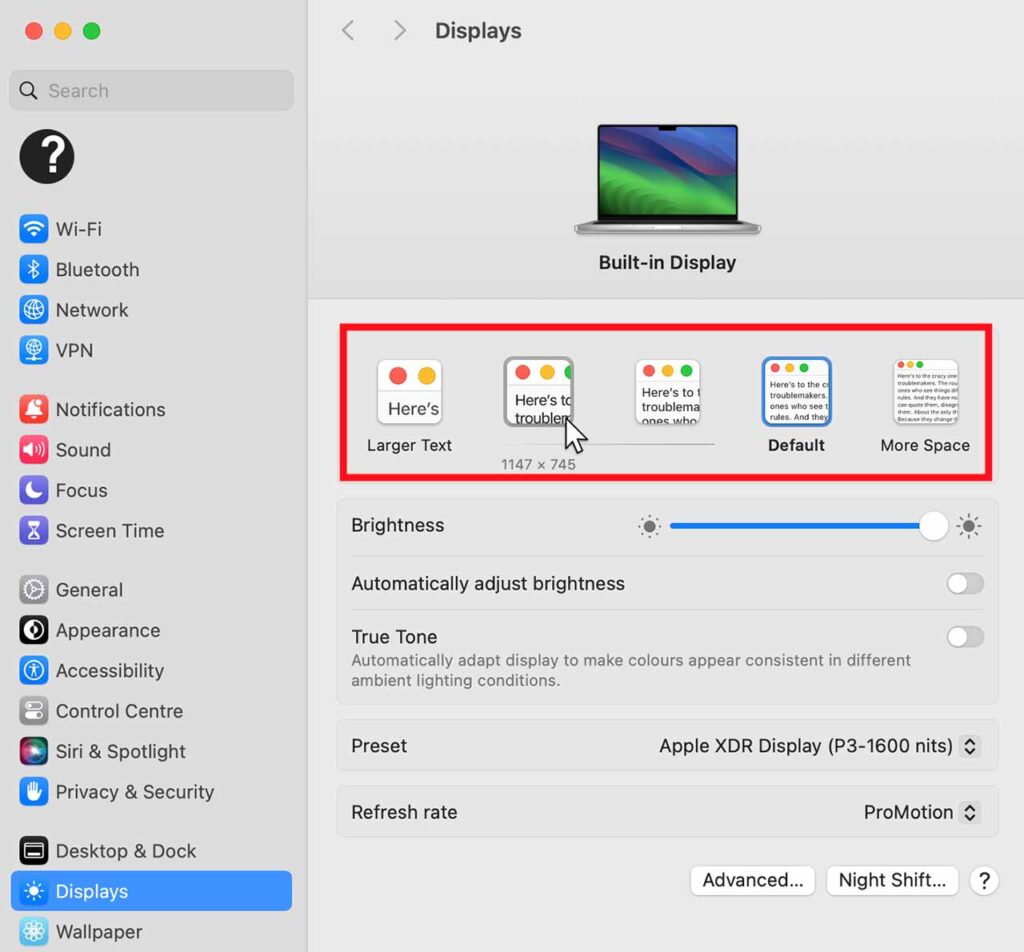
(b) Increasing your screen scaling. This will make it so all elements on your monitor will become zoomed in so it’s a lot easier for your course student to see them on a small video player.
To increase display scaling on Windows go to system settings -> display -> and increase scale.
To increase display scaling on MacOS go to system settings -> displays -> and choose larger text.
4. Talk in simple language
Don’t assume that your course students know all the context that you do.
Talk in simple language, and explain even the most obvious terms and concepts in detail.
What’s obvious to you might be completely unknown to a beginner.
When recording, imagine you’re trying to explain the subject to a 5-year-old.
That’s one of the reasons why it’s best to create a course when you have intermediate knowledge about a subject and you’re not yet a complete pro.
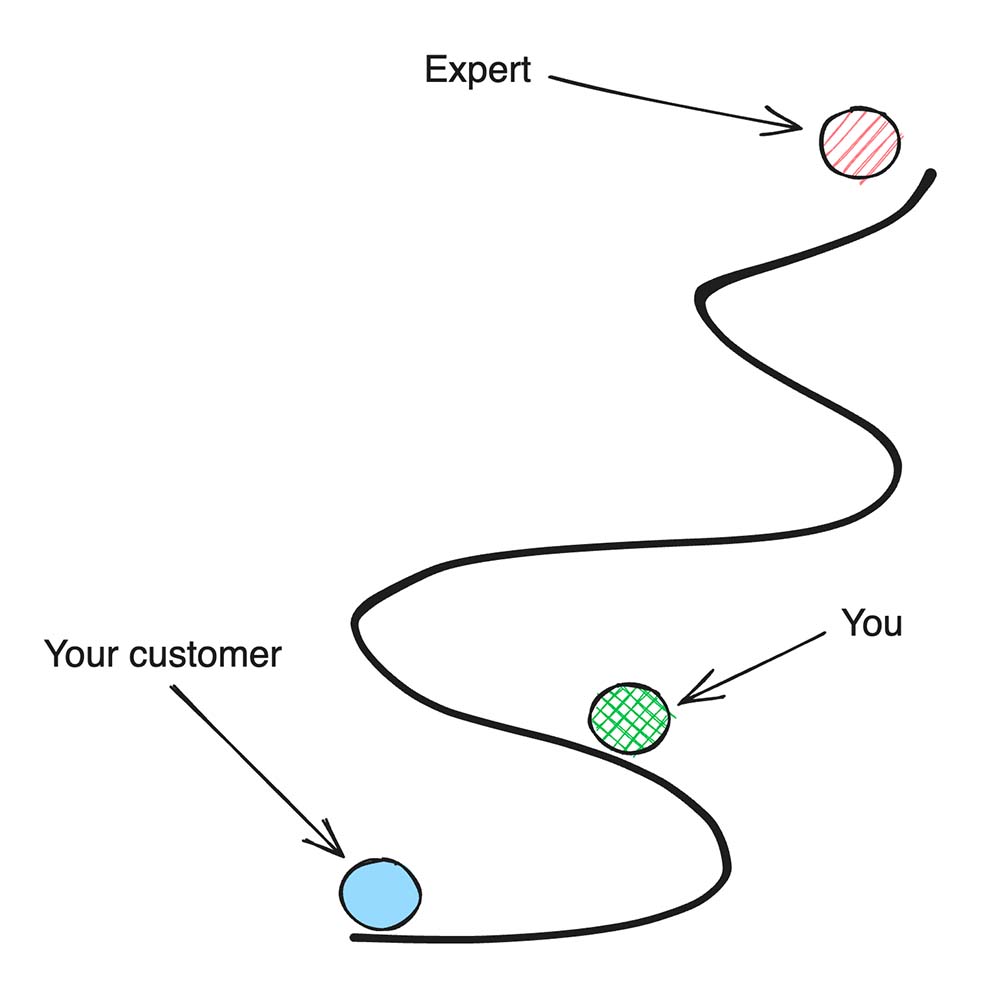
People who have advanced knowledge tend to speak in words that are extremely hard to follow for a complete beginner.
It’s best to learn from someone who’s just ahead of you rather than someone who’s miles ahead of you.
If you decide to script your course then simplifying your language is a lot simpler compared to when you’re recording it from an outline. You can throw your script in a website called Hemingwayapp.com which will tell you for which grade level your writing is best suited and also help you correct any grammar mistakes.
5. combine entertainment with education
One of the best ways to teach is to have entertainment as the backbone of all of your educational content.
I found this true with all the educational videos I post on my YouTube channel.
The more jokes and memes I add to my videos, the more my audience seems to like them while also learning something new. Which in turn boosts viewer satisfaction and then YouTube’s algorithm pushes it out to more viewers.
It’s almost as though the views that the video gets and its performance directly and positively correlate.
6. Keep each lesson between 2 to 15 minutes long
You want your course lessons to be easily digestible.
Make them too long and the student will get bored or overwhelmed.
Following the 1 bullet point – 1 lesson rule can help maintain optimal lesson length because you’ll only be covering one essential idea or concept within one lesson.
Keep this in mind when recording your course.
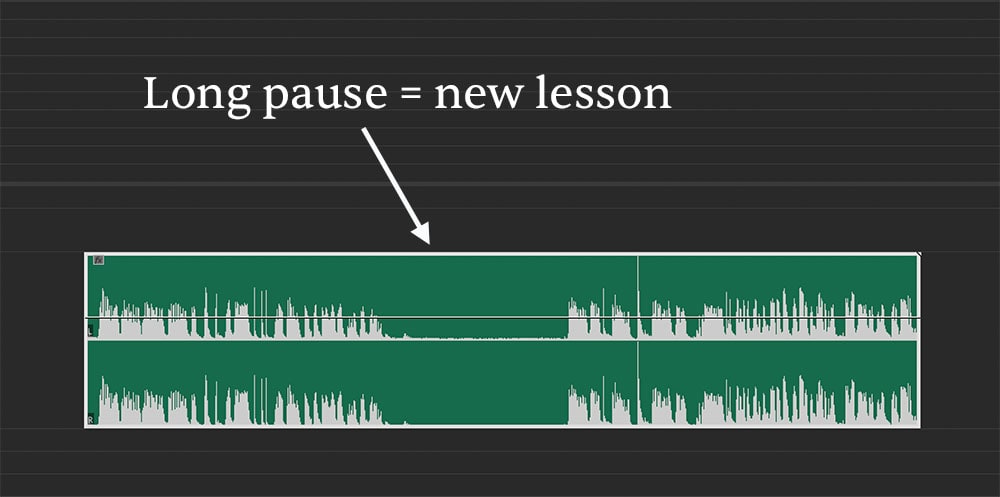
Also, it can be annoying to stop your camera whenever each lesson ends so to make it clear you can either make a long pause or clap loudly.
This will help you separate course lessons by using the audio waveform in the editing phase.
6. Take breaks
Our voice and enthusiasm need to recharge after long hours of recording.
Don’t try to cram all of your recordings in one day.
Take a break, eat something, lie down and relax and once your voice is back and you feel like you’re excited to record again, come back to it.
Forcing yourself to record as much as possible will make your course feel rushed as well as hinder your progress because you’ll be making a lot more mistakes which you’ll then have to cut out later in post-production.
7. Relax and use body language
When recording, imagine you’re talking to a friend or a group of friends.
Don’t tense up and become a statue with moving lips.
Viewers can easily sense when you’re not being yourself.
A good practice to get rid of the camera fear is to relax your hands, move them into the frame and use your body language as you’re recording the lessons.
You’re not doing public speaking. If you mess up you can always delete the recording and make a new one. No one will know.
Once you record a few initial lessons, take a break and afterwards come back and look at your recording again.
When your mind is fresh you’ll be able to see how the recording looks and feels with new eyes.
If you start to cringe as soon as you watch it then you know something is off and you can always sit down and re-record parts of your course.
Was this guide on how to record lessons for online course at home useful?
There you have it – my guide on how to record your online course at home and make it look professional.
Thanks for reading 👋.
P.S. I’ll leave you with a few more resources that will help you create an insanely valuable course for your students (that actually sells):