Editing takes so much time.
For most YouTubers, it’s probably the thing that will take the most amount of time in the beginning (until you outsource it).
I realized this 2 years ago when I was a complete beginner in content creation.
And since I was a complete rookie I took the quantity approach.
I wanted to pump out as many videos as possible.
So I could learn the ropes of YouTube.
My goal was 1 video every 3 days.
This meant that in order to achieve this I had to learn how to edit extremely efficiently.
Now, 2 years later, after editing over 200 YouTube videos for my channel I can definitely say that I learned a trick or two about video editing.
Even though my videos got complicated I can edit them a lot faster using the key principles I learned.
So here’s my ultimate guide about how to edit videos for YouTube (and do it fast).
Want to edit fast? - Edit horizontally
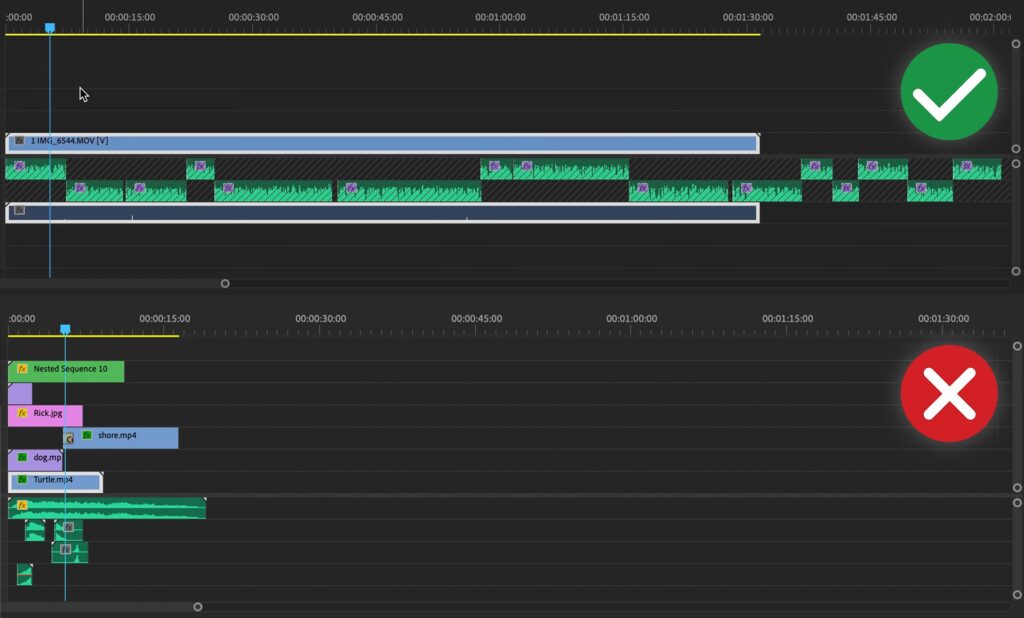
Horizontal editing is a lot faster.
Go through your timeline horizontally completing each specific task across the whole sequence instead of focusing on perfecting one specific part and then moving on to another one.
Vertical editing is picking a specific spot in your video and perfecting it.
Horizontal editing is going across your sequence and doing tasks in layers.
First, lay out the voice-over.
Second, cut up the a-roll.
Third, fill in the gaps.
Fourth, add in b-roll.
Fifth, add text.
And so on…
When you edit vertically you quickly burn out by trying to perfect specific spots in the timeline.
If you work on the intro first this usually means that by the time you get to the end, you will slack off and try to get it done as fast as possible.
Viewers will feel that and stop watching.
Editing horizontally fixes this problem.
Moreover, it will save you so much time because you won’t obsess over one specific part of the sequence.
So here’s how to edit horizontally.
1. Lay out a-roll
A-roll is your main footage.
If you’re making a talking-head video – that’s the a-roll.
If you’re making a screen recording video – that’s the a-roll.
It’s the main thing that your video revolves around.
(If you recorded a voice-over then add that first.)
2. Lay out b-roll
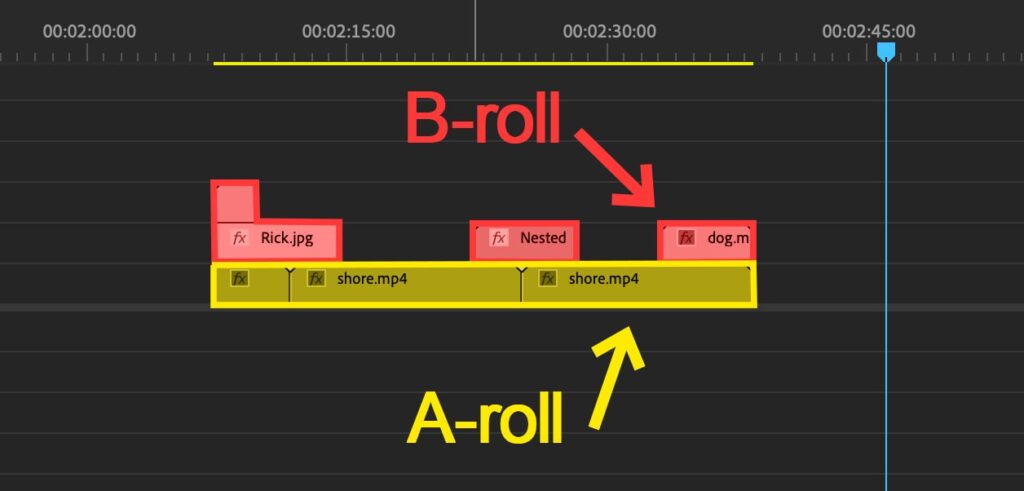
B-roll is your secondary footage.
Shots that spice up your video and help show what you’re talking about.
This can be anything from stock video footage to bonus clips you record yourself.
B-roll can also be used to fill in the gaps in your timeline if you’re making a video without showing your face.
Show don’t tell.
If you can show the viewer what you’re talking about you should.
It’s a lot better to see an elephant on the screen rather than to hear someone talk about it while seeing something completely irrelevant in the video.
Always show the viewer what you’re talking about.
3. Add extras
Transitions. Text. Animations. Overlays. Lower-thirds. Graphics. Sound Effects. Music.
Not all at once.
We want to edit horizontally.
With each of the things that you add do a new pass across your sequence.
Focus on only 1 thing.
If you’re adding text and sound effects don’t do both in one go.
First, do text across the whole video.
Then come back to the beginning of your sequence and do a “sound effects pass”.
Add each thing individually.
It will drastically reduce the time that it takes you to edit the video and improve its quality.
Humans are horrible at multitasking.
By focusing on only one thing you’ll be able to nail it instead of doing an “okay” job with each thing that you’re juggling between.
3. create and use presets
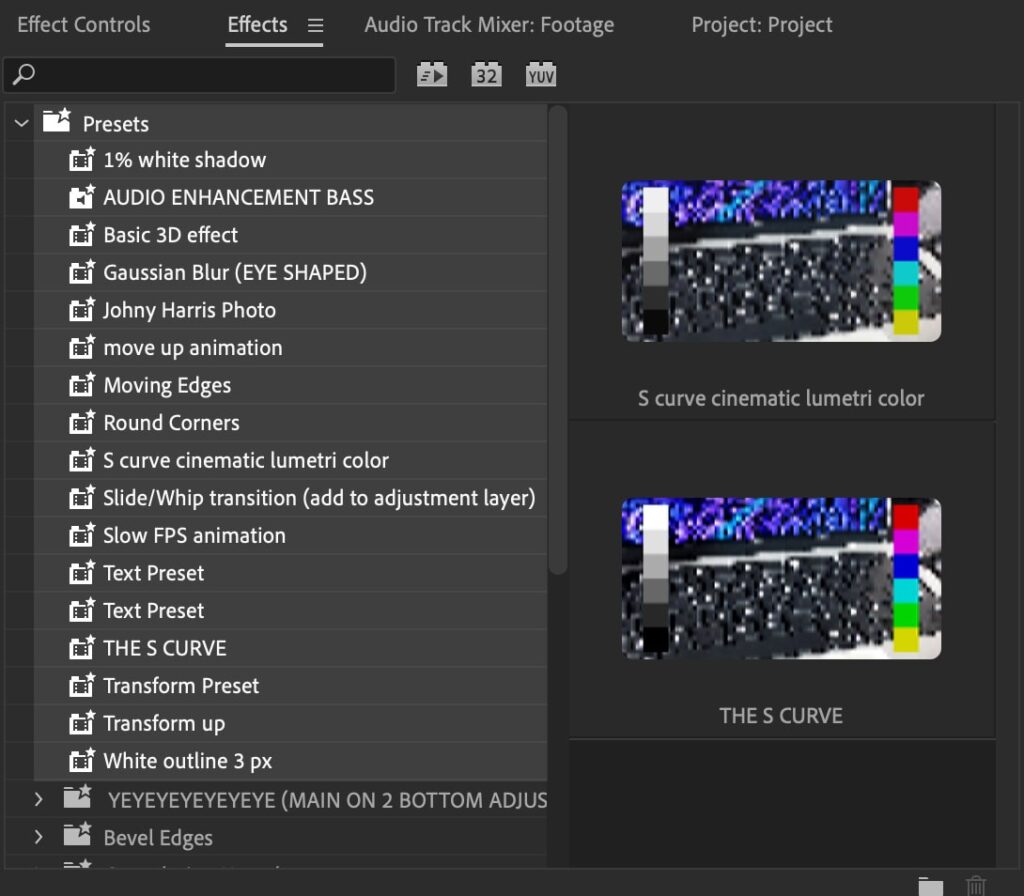
Presets save so much time.
You don’t want to be changing your text’s font and size each time that you work on a new YouTube video.
Do it once – save it for later.
Work smart, not hard.
If there’s an effect that you use for each video – turn it into a preset.
Whether it’s a zoom-in, a blur, transition, text effect, outline, drop shadow, or a color grade – it can be turned into a preset.
4. Batch videos together
Batching eliminates set-up time and saves mental energy.
The more friction – the less motivation.
Each time that you film a video there are so many little things you have to do.
Set up the camera/microphone. Close the window. Set up the light. Turn on the recording software. Get in the mood. Prepare to speak to the camera.
Same inside the editing software.
Open it up, create folders, import footage from your phone or SD card, organize footage, rename files, drag them into your editing software, organize there, and many more little things that seem insignificant.
These things add up.
Before you know it making each video seems like a drag.
Especially once the dopamine rush, of going viral on YouTube after your first video, goes away.
Batching is your best friend.
Suffer the set-up once but make five videos instead of one.
Set a day aside to record.
Another day (or days) to edit all five.
The key is to focus on one part of the content creation process at once.
Instead of recording, editing, and doing all the little things on the same day just do one thing for five videos.
Batching videos together will save you so much mental energy of having to switch between tasks, reduce the overall time it takes to make a video, and make your videos better because you’ll focus on perfecting one specific area each day instead of jumping between different ones.
Trust me. Try it once and you’ll never go back.
5. Organise footage efficiently
The bigger your project the more important the organization becomes.
For a small video – it’s okay to get disorganized.
For a whole YouTube channel – no bueno.
This is my folder structure:
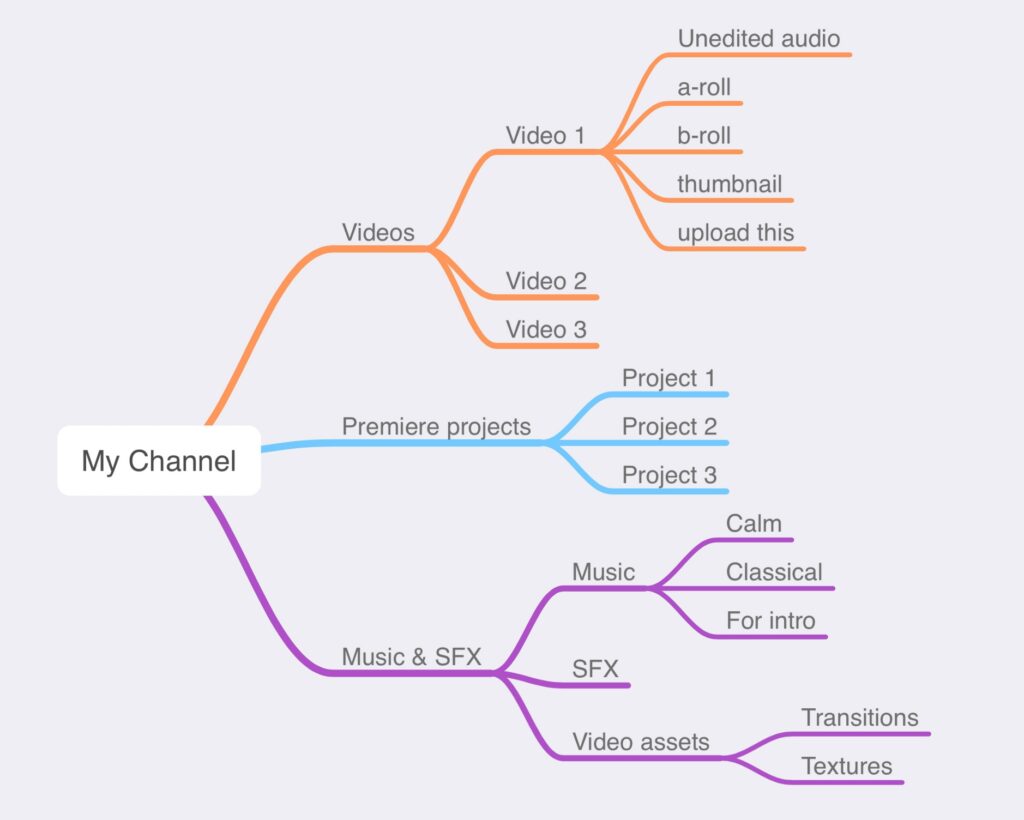
I have my music, sound effects, and video assets in a separate folder that I always import into every single Premiere Pro video project.
This means that I don’t have to re-import my music and sound effects each time I work on a new video.
I know that that folder is always there and I can use it whenever I want.
6. Get 1% better with each video
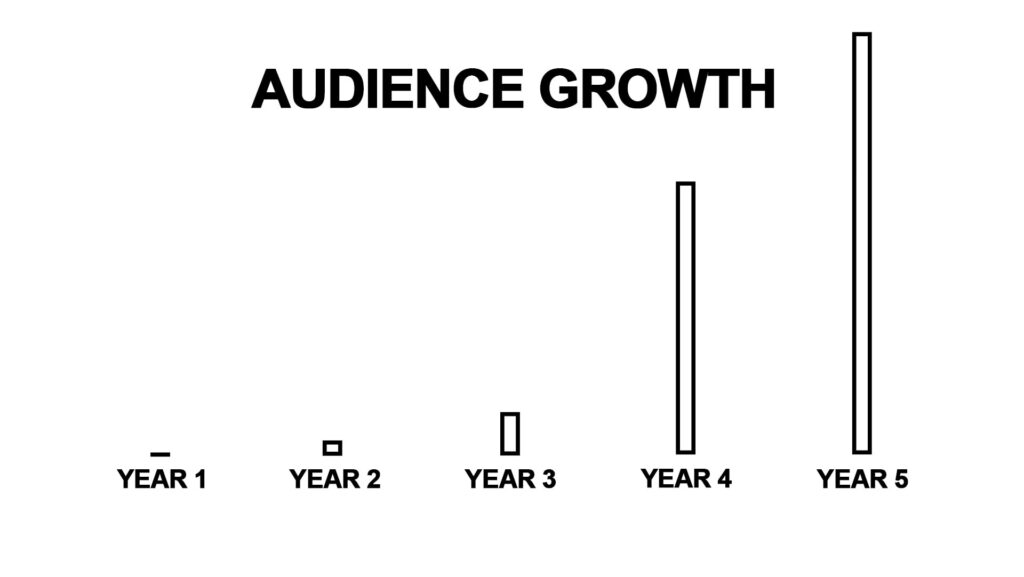
If you get 1% better each day for 1 year, you’ll become 37 times better by the end.
Make each video better than your last.
The changes don’t have to be noticeable to the viewer.
At the start, they probably won’t be.
But over time small improvements add up.
Soon you’ll look back at your old videos and think “What the hell was I doing”.
That’s a sign of improvement.
Make it 1% better even if it’s just smiling while you talk to the camera, cutting out one more breath, watching the video once it’s done and correcting 1 mistake, or taking 5 minutes to search for inspiration for your thumbnail.
Small changes lead to remarkable results over time.
7. Focus on the pacing not video effects
You don’t want to start off your video with 100 cuts each second and for it to die off as soon as the first 30 seconds are over.
Pacing is everything.
It’s the flow of your video.
A viewer is always subconsciously looking for a reason to quit watching your video.
Don’t give him that reason.
Your video should flow nicely keeping the viewer entertained each second.
If there’s a part that doesn’t add to the story – throw it away.
If there’s a point that you feel like you dragged on for too long – remove it.
The video comes together in the edit.
If you recorded something it doesn’t mean that it has to make the final cut.
If your footage doesn’t make your video better once you remove it – you should keep it that way.
Most people think that the pacing of the video looks like this.
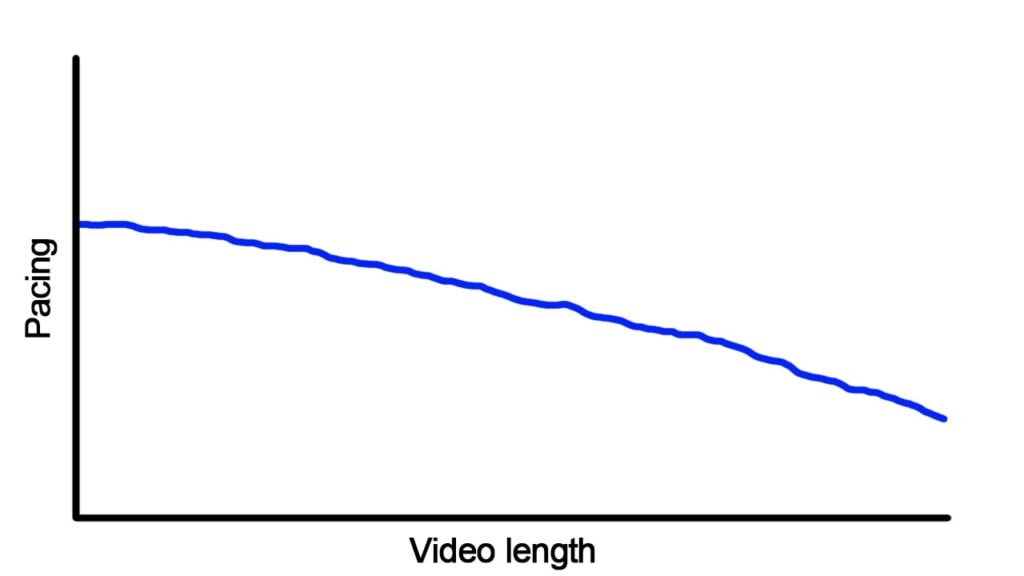
If you’re pacing continually slows down throughout your video viewers will leave.
Moreover, the pacing is relative.
If it’s always high, then that’s the baseline.
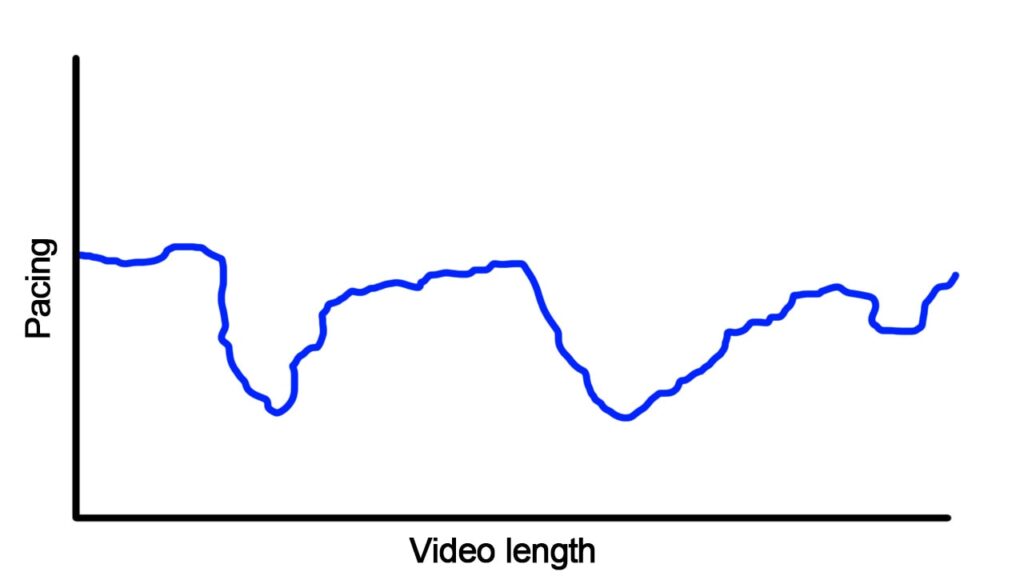
You want viewers to be able to compare different parts of your video subconsciously and notice the difference in pacing.
In reality, good video pacing looks like this. It can go up and down but not just down.
8. Storytelling is king
Humans love stories.
Try to tell a story even if you’re making a gaming video or a simple tutorial.
Stories make it easy for our brains to understand information through emotion.
Stories cause laughter, make people cry, and make them feel angry or anxious, but the outcome is the same.
Through stories, we gain powerful learning experiences.
Information is just that – information.
But people don’t care about information, they care about their transformation.
Transformation usually requires emotions.
So tell a story in your videos.
Best Software For Editing YouTube videos
VEED – Best for beginners.
Simple software, it lets you edit in your browser, has an auto subtitle feature & a built-in stock footage library.
DaVinci Resolve – Best free advanced video editing software.
Edit on your computer, has all the advanced features that a professional video editing software, such as Premiere Pro does, has a steeper learning curve than other options.
InVideo – Best for editing Shorts.
Has a mobile app or a browser version, has the most basic features, simple, and easy to use.
How to grow a YouTube channel from 0 (free template)
Get a free Notion template with the tutorial for the game of YouTube
🚀 10+ Notion pages about how to play the YouTube game
⚙️ List of tools & gear for YouTubers
🧑⚖️ How to make your first video and get your channel off the ground
💰 Detailed guide about finding your niche & making money
Was this guide on how to edit videos for YouTube useful?
All in all, to edit videos faster use the horizontal editing method. Instead of trying to perfect each specific spot in the video work in layers across all of your timeline. Do an a-roll pass, then a b-roll pass, an effects pass, SFX pass & a music pass.
Here are some great resources to help you start and grow a YouTube channel:
9 Best AI Tools For YouTubers (Make Videos 67.1% Faster With AI)
How To Grow A Faceless YouTube Channel – Notion Template
What Gear Do You Need To Start A YouTube Channel
Thanks for reading 👋.
