A good video draws your attention, encourages you to think, laugh, tells a story and makes you want to come back for more.
The basic essence of it is creating something that (1) people want to click (2) they want to watch and (3) they’re left satisfied with.
I’ve been making YouTube videos for almost two years now and I’ve realised that there are many quirks that go into making a video.
Every YouTuber goes about it differently, some use animation, others do talking head, but I prefer not to show my face. This leaves me with two options: show my screen or film something with my phone. It’s a creative constraint that lets me think outside of the box.
Here’s a quick beginner’s guide to making YouTube videos regardless of which niche you’re in:
Step 1: The Idea
Ideas exponentially increase your video performance.
I used to make the mistake of just sitting down and trying to come up with an idea. Out of nowhere.
Horrible approach.
Ideas need inspiration to fuel them.
It can be looking at YouTube’s homepage, what other people make videos about, doing keyword research, watching movies or brushing your teeth (to help your brain piece the stuff you consume into a solid idea). Being bored works as well.
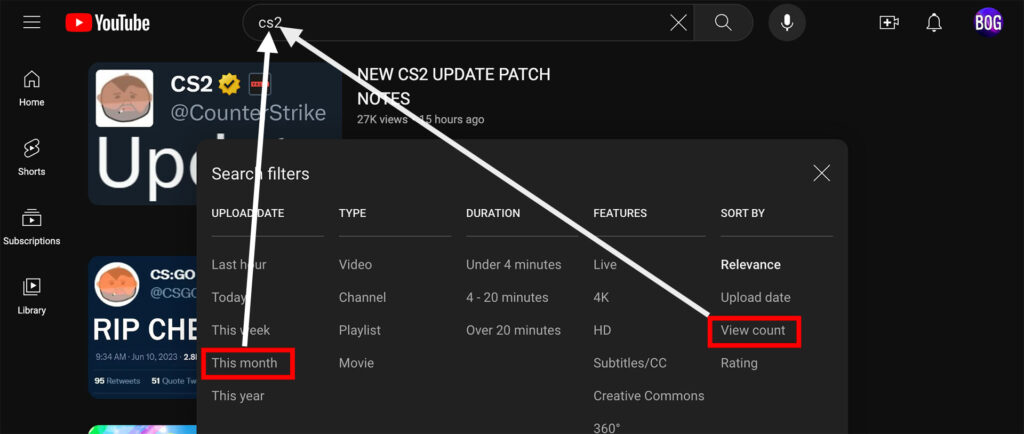
If you want to see what videos work for other people you can go into YouTube → type in a keyword → click search → go into filters → select this month → filters again → select view count.

Then scroll through the videos and look for channels that have low subscribers compared to the views on the video. You can have something like VidIQ installed to see subscribers right next to the channel name.
These videos are outliers that you could study and take inspiration from for your video.
Step 2: The Plan
Once I have an idea I’m excited about and before I film anything I always plan out the video.
The hardest part is speaking. Speaking without a full script that is.
At first, all of my videos were scripted down to a tee but later I thought that it would be so much quicker and maybe even better if just wrote down bullet points and spoke from those. And thus my “I tried MacOS for X time” series was born.
I still script most of my videos though so this is very much a work in progress.
When I’m writing I try to cram as much value into a video as possible.
It starts out with the why, why would someone care about watching? It’s more important for someone to know why to do something and the “how” will follow later.
Once I have a script ready I move on to the voiceover.
Step 3: The Voiceover
There’s a saying going around that audio is 80% of the video.
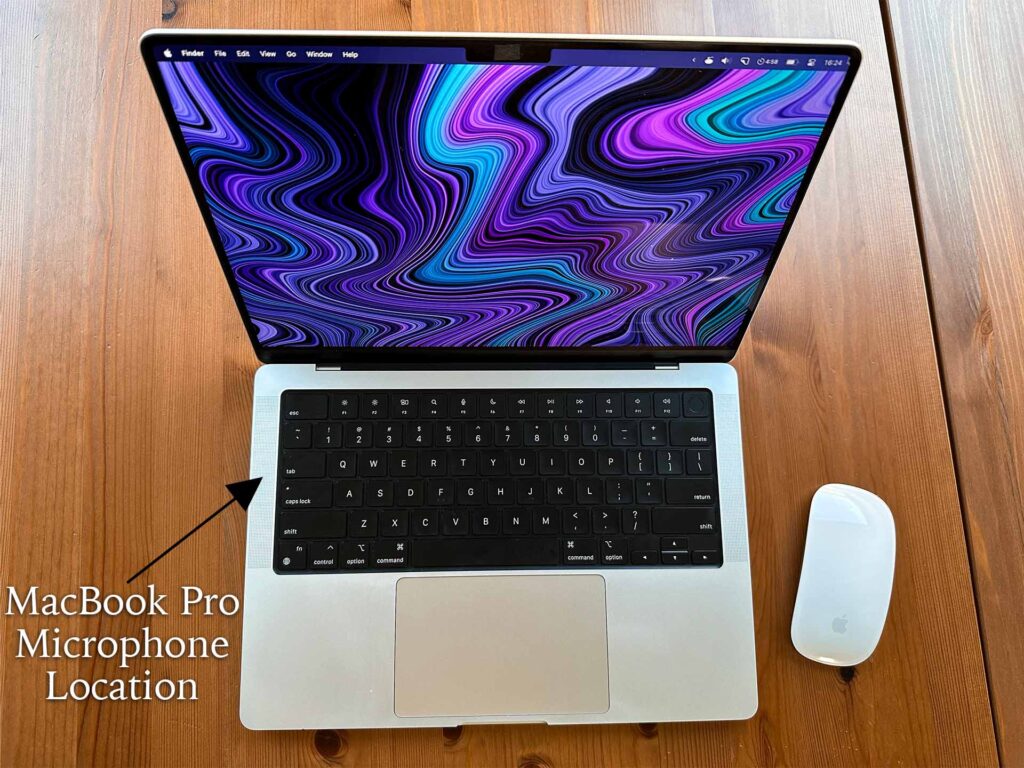
I struggled with making my audio sound good in the beginning. That’s mainly because I record into either my phone or my laptop’s built-in microphone.

P.S. You can get the wallpaper pack here.
But over time I’ve managed to dial in all the settings and the environment that I record in and now I think the voiceovers turn out not that horrible.
I even made a Skillshare class a while back diving deeper into how to make an amateur voiceover sound more professional.
Once I’m done with the recording I move the voice-memos file to my laptop for enhancements. The first software on the list is Audacity. It’s a free app that lets you work with audio. I add some enhancements here like a filter curve and a compressor and then export the audio and import it to Premiere Pro.
Step 4: Editing Audio
I use Premiere Pro for editing my videos and if you’re an honest citizen it will cost a pretty penny each month.
There’s Final Cut Pro that you could use – it has its own quirks and features just like all Apple products, such as the magnetic timeline, which means that every clip you place on the timeline just glues itself to the last clip.
There’s DaVinci Resolve – best for everyone who wants to edit for free and has a semi-decent computer.
I import the audio and then cut out everything from it, all the uhhs, ums, repeated sentences and everything else. This is how it looks before and after.

As you can see I make a lot of mistakes even when just reading from a script.
Step 5: Recording Footage
Next comes the recording. I have the audio on the timeline but nothing to put above it.
This is where I can choose between the two options I mentioned before (1) record something with my phone or (2) record my screen.
This is why I like the way that MacOS renders fonts too. It, paired with the high resolution and its scaling makes the screen recordings look sharp. MacOS also has a great built-in screen recording tool (keyboard shortcut command + shift + 5) that at least for me never bugs out or corrupts the recording.
I try to show only relevant things on the screen as I’m talking about them. Not just random stock footage. That creates a more immersive experience.
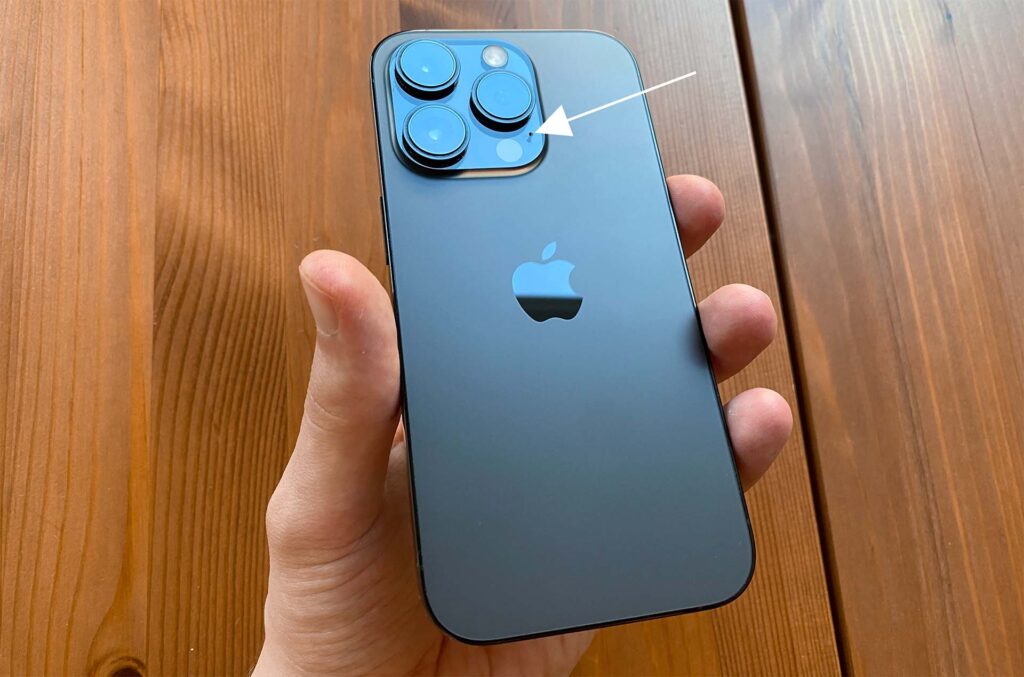
Now for the phone recordings, I typically record with the main camera but if I’m making a “talking hands” video then I use an app called Beast Cam. The only reason I bought it was for the ability to change which microphone the iPhone records audio from. The default microphone that my iPhone 14 Pro defaults to this one at the back:

And this microphone is horrible. Super noisy.
As far as I know, this is only an issue on this iPhone model. So what that app allows me to do is change the microphone to either this one on the front or this one at the bottom. Audio is 80% of the video so it’s worth it.
Here’s a great quote:
‘The best videos can be made with out fancy effects the goal is to make something simple and engaging, timing, flow, effective use of music, and simplicity of story… It takes lots of practice, but prioritize telling a great story before you learn anything fancy… fancy edits are useless if the story isn’t engaging’
Zach Levet (video editor for Ryan Trahan)
What’s as important as the video itself, if not more important is the packaging – the title and the thumbnail.
Step 6: Thumbnails And Titles
I’m a little naughty here because most pros advise making the title and the thumbnail before working on the script. That way you know exactly what you’re making the video about and can make sure that the video matches the expectations set in the title and thumbnail.
I do this only sometimes hence why this step is number 6 and not number 2.
While the video is set in stone and you can only remove parts with the YouTube editor, the thumbnail and the title can be changed. So if the video flops completely, changing up the packaging may help revive it.
I make all my thumbnails in Photoshop, some take 10 minutes and others 30 minutes. There are so many ways that you can show what the video is about and that’s why I end up making at least two or three thumbnail variations for each video. And like seven title variations.
The general rules that I follow for thumbnails are:
Don’t put too much little stuff in there.
Do not repeat the title.
Have only 2 or three main elements.
Don’t put important stuff at the bottom right because it gets covered by the timestamp.
Step 7: Don’t Overthink It
The most common fear is that you’ll be publicly judged and humiliated by other people but guess what (1) no one cares, people are too worried about their lives to notice what anyone else is doing (that’s the spotlight effect), and (2) you can just not tell anyone about it.
Even if you show your face no one will discover your channel. There are over 40,000 channels with more than 1M subscribers.
Really.
If you’re a YouTube connoisseur you’ve heard of at most 500 of them. That’s 1.2%. And these are 1M subscriber channels.
In the beginning, your friends, their friends, your colleagues and no one else will find you if you don’t share your channel with them.
I know this because I didn’t share my channel with anyone and guess what no one found out.
In fact, I was so afraid of someone finding out that I even changed my voice. Well, that and also because I hate how my voice sounds. Completely different in the recording from the giga chad I hear in my head.
Even now, to this day, 1.5 years later no one I know knows I make videos. If that’s what’s stopping you just no. NO.
Want Me To Help You?
And if you want ME to help YOU level up your YouTube channel check out my YouTube Video Course.
You’ll learn how to edit videos in Premiere Pro from scratch, what matters on YouTube and more importantly what doesn’t. How to approach it in general if you have no clue what to make videos about or how to make them.
There are six chapters that will walk you through exactly how to start editing in Premiere, how to get good at it, how to win the YouTube game without showing your face, and how to have clean & crisp audio.
Learning to make videos helped me become my own boss. I unlocked the ability to make money with just my laptop and from anywhere in the world. In fact, right now I’m writing this from Spain sitting in an Airbnb. And in this course, I share how to do it. It’s not a get-rich-quick scheme and takes a lot of work, but if you’re up for the challenge, I’ll give you all the tools that’ll set you up for success.
Thanks for reading 👋.