YouTube is hard.
You need to wear so many hats to run a channel by yourself.
You have to be a good marketer, designer, video editor, writer, SEO specialist, and more. But video editing is the one that takes up the most amount of time and the longest to master for most YouTubers.
I know this because I’ve edited more than 200 videos for my channel.
So here are the best tricks & techniques I picked up along the way.
1. Horizontal flip to change up camera angles
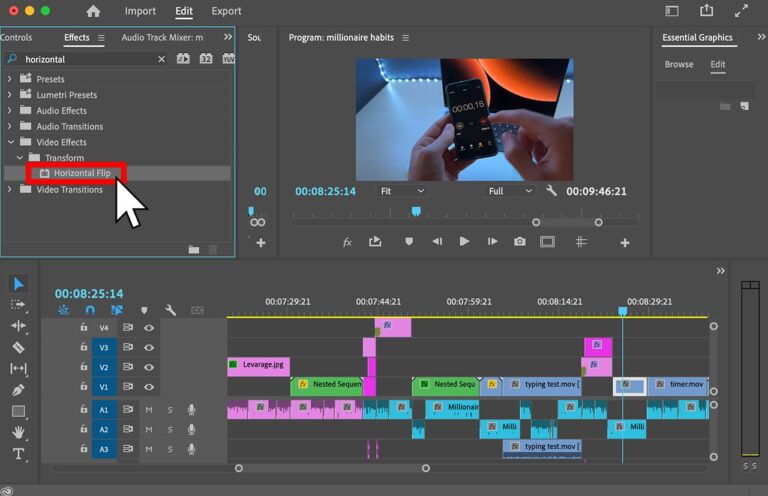
This is useful for talking head videos where there’s only one camera angle, or for showcasing B-roll twice in the same sequence.
To make the video more engaging you can flip your footage horizontally or punch in.
This makes it seem like that’s a different camera angle or a completely different clip.
2. Ken Burns effect
Ken Burns effect is zooming in or out of a stationary frame or image.
It can make pictures more exciting and alive.
Slowly zooming in or out adds movement to the video and makes it flow better.
If there’s an image on the screen that you want to showcase for an extended period of time add a slight zoom-in animation to make it more pleasant to look at.
3. Zoom in with natural motion blur
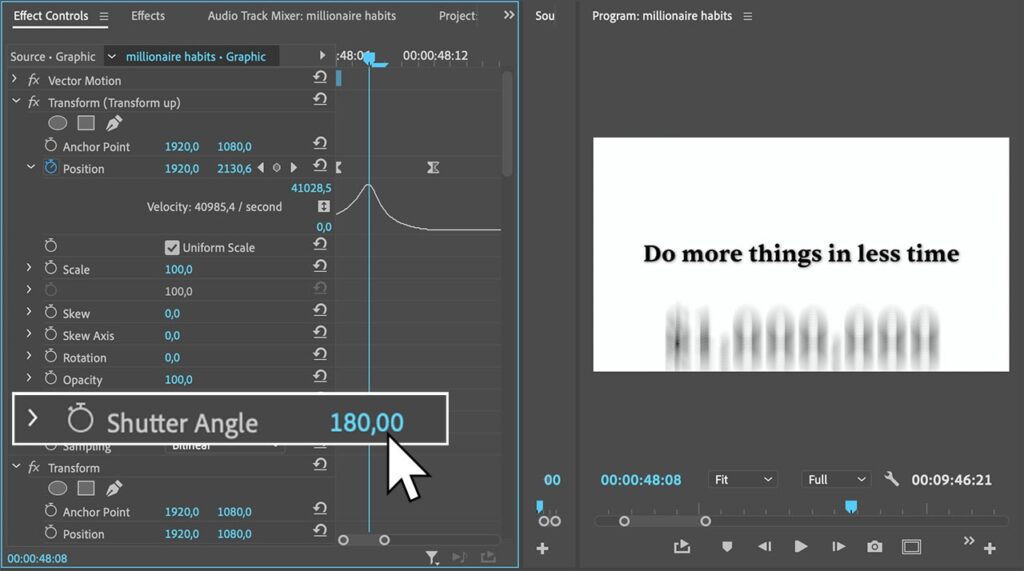
When objects move faster than your eyes can track them in real life there’s always a motion blur.
Adding an artificial motion blur to animations or quickly moving elements on the screen can make them feel more real and pleasant to look at.
If you’re using Premiere Pro to edit your videos you can apply a natural-looking motion blur to your animations with the transform effect.
Use a 180-degree shutter angle for the most realistic blur amount.
4. Overlapping ends of sentences
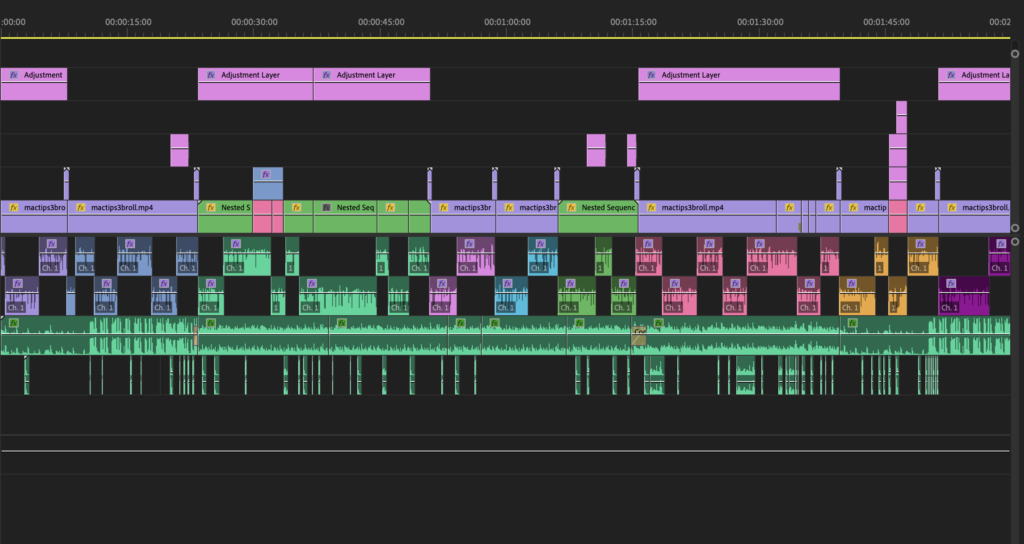
Audio is 80% of the video.
Removing breaths, silences and background sounds from your audio is going to make it a lot easier for your viewers to listen to.
But you can take it a step further.
It’s pretty hardcore but by overlapping the ends of sentences you can remove the tiny amount of space between them which eliminates the possibility of viewers’ thoughts wandering away during that split second.
5. Pope in the pool
The pope-in-the-pool technique refers to showing something interesting or shocking to the viewers while explaining important information.
It comes from a screenplay called “The Plot to Kill the Pope” during which the pope swims in the pool while being explained a bunch of important information.
Instead of presenting dry facts to your audience come up with your “pope in the pool”.
Distract your viewers with astonishing visuals while feeding them the necessary “boring” information.
6. Set up open loops
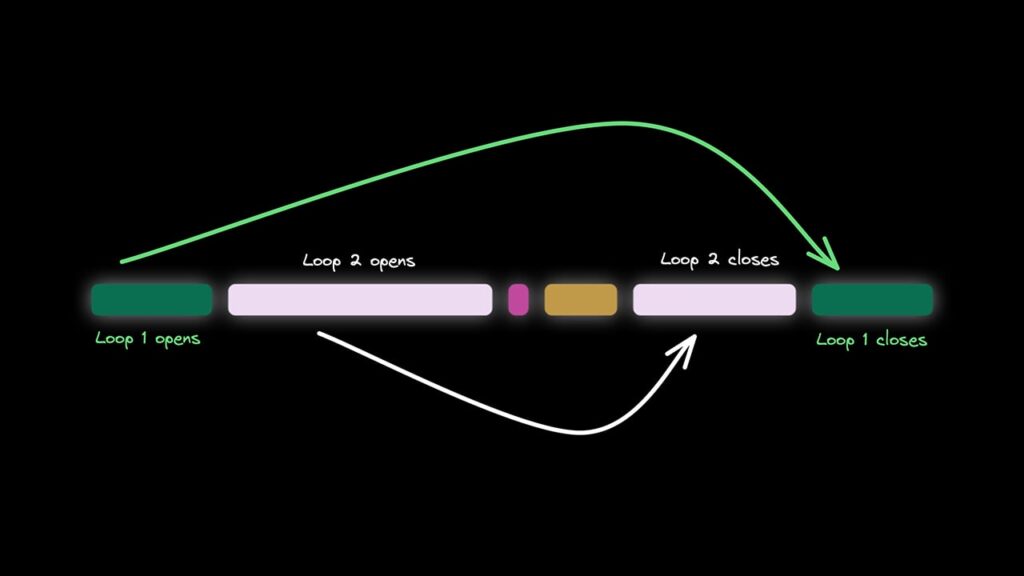
Open loops are stories within a video that get interrupted by something else.
By “opening a loop” you give your audience something to anticipate (just don’t forget to close those loops later).
Movies do this a lot.
They show you something that seems irrelevant at the moment but later that thing becomes the key part of the story.
Here’s an example of an open loop in one of Veritasium’s videos about IQ tests.
At 0:55 in the video, Veritasium explains how he’s going to take an IQ test but he doesn’t immediately do it.
He moves on to explaining something else relevant to the video and only shows the result of his IQ test at 27:35 in the video.
He opened a loop for the viewers to anticipate it and stay watching longer and closed the loop by the end of the video.
There can also be multiple loops opening, overlapping, and closing within one video.
7. Use sound effects (especially in the intro)
Your intro is where most viewers will drop off.
It happens to most videos on YouTube.
But sound effects are a great “scroll stopper”.
In short, a good choice of background music, sound effects, and voiceover can turn your video from an average performer to the top performer for your channel.
I talk about using them more in-depth in my YouTube Video Course.
Here’s an example video intro from Biaheza of sound effects being used exceptionally well.
I recommend using the free YouTube Audio Library in your YouTube Studio to download sound effects or picking up an Epidemic Sound subscription for a more professional and wider choice of music and sound effects.
8. Rewatch the video after taking a break
This was a game-changer for my channel.
Taking a break or better yet rewatching my video on the day of upload allowed me to look at it with fresh eyes.
When I’m in the editing mode I often miss subtle details and the bigger picture.
Rewatching my edit a couple of hours or even days later can help me look at it from the eyes of the viewer and spot places that need a re-edit.
And almost 90% of the time taking a break reveals something that I missed.
9. Use artificial blur (gaussian blur)
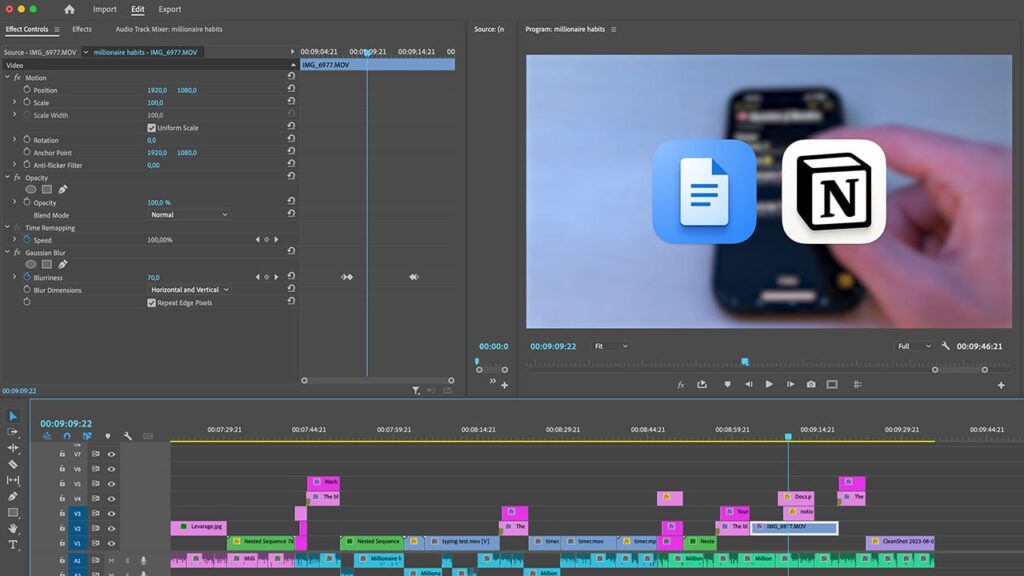
Using Gaussian blur to make your footage artificially go out of focus can add that little bit of depth to your video (pun intended).
You can animate the blur to showcase something on top of the footage or use it to transition into another clip or title on the screen.
10. Use subtitles and text
It’s so hard for our brains to not read text when it pops up on the screen.
Our brains just love it.
Using text to emphasize key points can help you drive them across better because the viewer will not only listen to what you say but also read it on the screen.
Using subtitles can also make certain videos more engaging.
One cool trick I see popular YouTubers doing is adding subtitles only to the important parts of the sentence.
This helps highlight key points of information while keeping the viewer engaged (it’s also less work for you because you won’t have to subtitle everything).
11. Show don't tell
It’s a lot more powerful to see something rather than listen to someone talk about it.
Whenever you’re talking about something in the video show it on the screen.
You can use stock footage to do this or record your B-roll.
You’d be surprised at how many creative ways there are to show something you’re talking about even if you don’t have footage of it yourself.
You can use stock videos, draw something on a piece of paper, do a screen recording, let AI generate the visuals for you, draw in Photoshop, use a simple image (with the Ken Burns effect), and so on.
I recommend Envato Elements as the best all-in-one subscription for stock videos, music & sound effects for YouTube. You can read my review about it here.
12. Use bezier keyframes (for smooth animations)
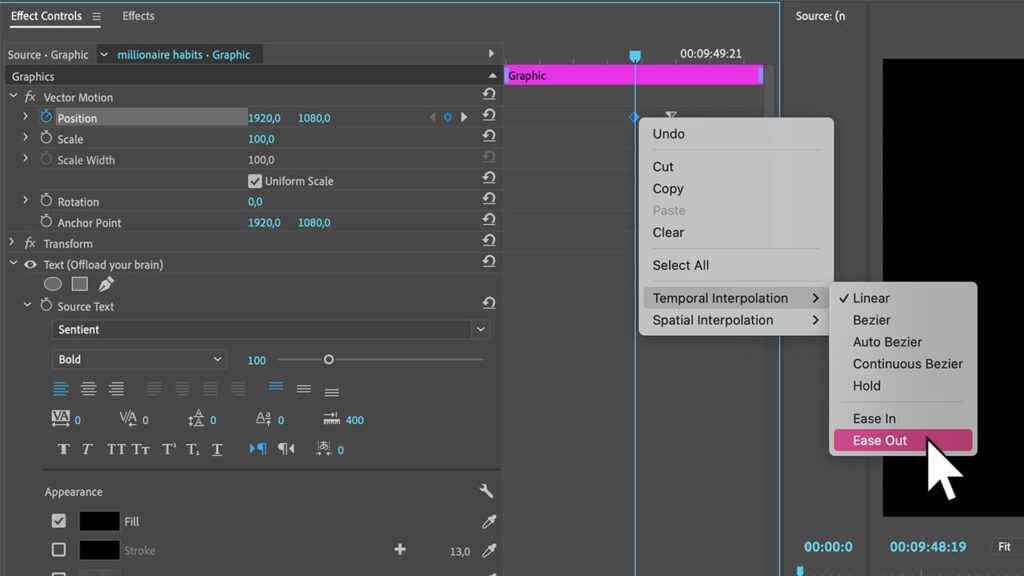
When using keyframes to animate text or elements in Premiere Pro the default setting for those keyframes is linear.
Linear keyframes mean that your animation will start and stop abruptly.
In Premiere Pro you can right-click on a keyframe -> choose “temporal interpolation” -> select “ease out” for the first keyframe, and “ease in” for the last keyframe to make the animation smoother.
Other video editing software have the same options but they could be tucked away behind different names or setting panels.
Now it will start slowly, ease into the motion, and slow toward the end.
Little details like this will make your video much more enjoyable.
13. Use Keyboard shortcuts for everything (on the left side)
Video editing takes a lot of time.
Especially if you want to make your videos good.
But the thing that can make this process a lot easier is keyboard shortcuts.
Learning the basic ones is a must.
But you can go deeper.
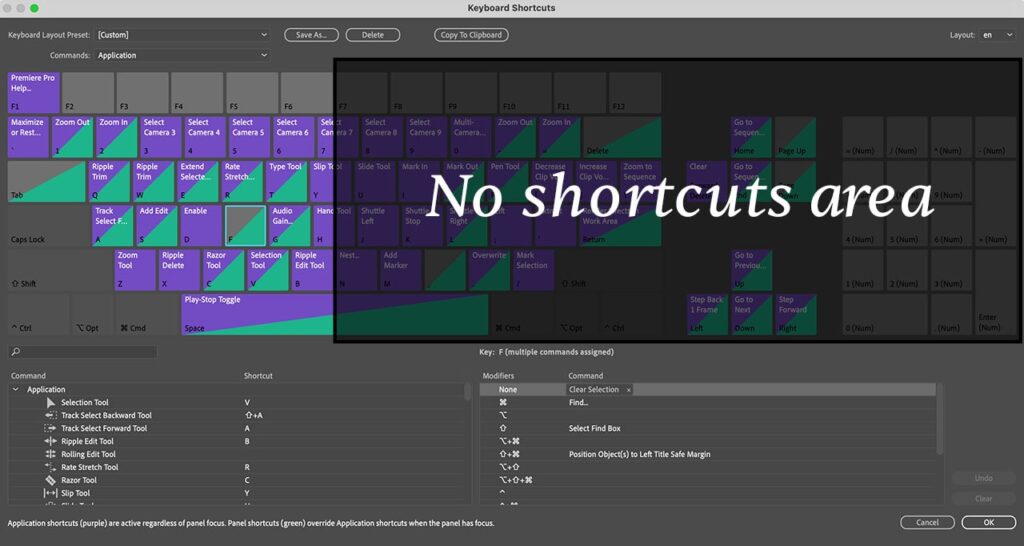
I set keyboard shortcuts for almost every single action that I do within Premiere Pro.
And all my keyboard shortcuts are on the left side of the keyboard.
If a shortcut key is on the right side you will either have to move your left hand over there or let go of your mouse and use the right hand to press it.
And that wastes time.
Not a lot of time for one edit but that time adds up drastically across 30 or 100 videos.
14. Use pattern interrupts
“Pattern interrupts” are things that interrupt the flow of your video.
They’re like curveballs that come out of nowhere and surprise the viewer keeping them at the edge of their seat.
They’re useful to emphasize key points in your video or switch topics.
They also work great for holding the viewer’s attention.
A pattern interrupt is a sudden stop or change of background music, a quick zoom-in, a sound effect, new element popping up on the screen.
Anything that disturbs the current footage that’s shown on the screen.
15. Don't use stock footage without transforming it
Stock footage is useful to fill in the empty gaps in your sequence.
Of course, more often than not, recording your own B-roll is going to be better than using generic stock footage.
But it takes a lot more effort and time to record your own clips.
Sometimes it can even be impossible.
That’s when we turn to stock footage.
But you’ll notice that most stock footage has this feel to it and you and your viewers can tell that it’s “stock footage”.
But what most amateur editors forget is that you can transform it.
Add a color correction, LUTs, animations, zoom-ins, flip it horizontally, mask it, use 2 clips at the same time, add text, elements, and more.
Make it feel less like stock footage and more like your footage.
16. Don't show everything
Human brains are extremely good at filling in the details.
For example, there’s no need to read out the text that you put on the screen as a title.
You can continue the next chapter of your videos and your viewers will read what’s on the screen automatically.
A good test for whether you need to show something or not is to cut it out and watch the video.
If the video makes perfect sense without it, why leave it in?
Sometimes leaving things out on purpose can even create intrigue and keep the viewer watching.
Was this list of video editing tricks useful?
There you have it – editing tricks that will enhance your video quality and your editing workflow.
But there’s more to YouTube than just good editing.
That’s why I’ll leave you with a few killer resources that will help you grow your YouTube channel:
- How To Get 1000 Subscribers On YouTube
- YouTube Video Course – How To Make Killer Videos From Scratch
- How To Grow A Faceless YouTube Channel – Free Notion Template
Thanks for reading 👋.